Info in English and German – Info in Deutsch und Englisch
English Version:
Select a Photoshop image which already has a path or a contrasting background as the white in our sample. InDesign is able to detect the edges and wrap the text around the object.
In two simple steps: First open Adobe InDesign and place your image.
1. Select your image with the Selection Tool and go to MENU > OBJECT > CLIPPING PATH > OPTIONS. This will open the following window where you should select the option TYPE > DETECT EDGES and play around with the Treshold and Tolerance to find the right setting for your image. (In the same window you could select a Photoshop Channel or a Photoshop Path if available)

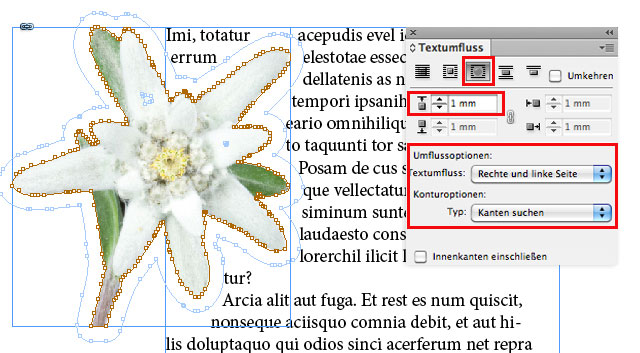
2. Now the image should have a Path around it. Go to WINDOW > TEXT WRAP and select the third Box with the name “Wrap around object shape”. Select the Offset which defines the distance from your Path to the text.

This should do it! Of course, we’re only using this method as a quick fix for layout purposes.
![]()
Deutsche Version:
Nehmen Sie ein Photoshop Bild mit einem Pfad oder eines mit einem neutralen Hintergrund, wie in unserem Beispiel; Weiss. InDesign kann die Kanten finden und den Text um das Objekt fliessen lassen.
In zwei einfachen Schritten: zuerst öffnen Sie Adobe InDesign und platzieren Sie Ihr Bild.
1. Wählen Sie das Bild mit dem Auswahlwerkzeug an und gehen Sie unter MENU > OBJEKT > BESCHNEIDUNGSPFAD > OPTIONEN. Damit wird sich ein Bedienfeld öffnen, wobei Sie die Option ART > KANTEN SUCHEN und spielen Sie mit dem Schwellenwert and Toleranz um die richtige Einstellung für Ihr Bild zu finden. (Im selben Bedienfeld finden Sie zudem die Optionen Photoshop Kanal und Photoshop Pfad)

2. Jetzt sollte Ihr Bild einen Pfad haben. Gehen Sie zum FENSTER > TEXTUMFLUSS und wählen Sie die dritte Box mit dem Namen “Umfliessen der Objektform”. Wählen Sie Ihren Versatz welches die Distanz von Ihrem Pfad zum Text definiert.
Damit sollte es klappen! Natürlich benutzen wir diese Art nur als schnelle Lösung zum layouten.
