Which PDF should I take? / Welches PDF soll ich nehmen?

Tutorial in English and German / Anleitung in Deutsch und Englisch

English version: (Deutsche Version siehe unten)

Would you like to receive our tips for free in your e-mail box? Simply select FOLLOW to sign up with your e-mail address.

Tip of the week: Choose the correct PDF!

It’s very simple, InDesign CS5, CS6 and CC you have 5 main PDF Formats to choose from:

Screen Shot 2014-08-17 at 4.55.02 PM

IMPORTANT: Before you export a PDF-file, you should always talk to your printer about the resolution and the color profile!

1. Go under FILE > Adobe PDF Presets > High Quality Print
Which is a PDF for quality printing on desktop printers.

HighQuality

2. Go under FILE > Adobe PDF Presets > PDF/X-3, PDF/X-4
Which are for professional printing presses which have ISO standard for graphic content exchange. IMPORTANT: always ask your printer which PDF/X to choose.
PDF/X 4 includes support for live transparency.
More info on how to export a PDF/X: How to export a PDF/X

3. Go under FILE > Adobe PDF Presets > Press Quality
Creates PDF files for high-quality print production such as for digital printing.

PressQuality

4. Go under FILE > Adobe PDF Presets > Smallest File Size
Choose this PDF for on-screen display, Websites and to attach to an e-mail.

More info directly at ADOBE Help: PDF Options

More info on Presets directly at ADOBE Help: PDF Presets

divider

Deutsche Version:

Möchten Sie unsere gratis Tipps im e-mail erhalten? Schreiben Sie sich unter FOLLOW mit Ihrer e-mail Adresse ein.

Tipp der Woche: Wählen Sie das korrekte PDF!

Es ist simpel einfach. InDesign CS5, CS6 und CC haben Sie 5 PDF Formate zum auswählen:

Bildschirmfoto 2014-08-17 um 17.01.15

Hinweis: Bevor Sie eine Adobe PDF-Datei erstellen, sollten Sie mit der Druckerei die Ausgabeauflösung und sonstige Einstellungen (Farbprofil) klären!

1. Gehen Sie unter DATEI > Adobe PDF Vorgaben > Druckausgabequalität.
Dies erstellt PDF-Dateien für die Druckausgabe in hoher Qualität (z. B. für den Digitaldruck).

Druckasugabequalitaet

2. Gehen Sie unter DATEI > Adobe PDF Vorgaben > Kleinste Dateigrösse. Dieses PDF ist ideal für Webseiten und falls Sie Ihrem Kunden das PDF in einem e-mail schicken möchten.

3. Gehen Sie unter DATEI > Adobe PDF Vorgaben > PDF/X-3, PDF/X-4
Diese sind für professionelle Offset Druckmaschinen die ISO Standard kompatibel sind. WICHTIG: Fragen Sie immer welches PDF/X Ihre Offsetdruckerei möchte!
Mehr Info wie man ein PDF/X exportiert: Wie man ein PDF/X exportiert

4. Gehen Sie unter DATEI > Adobe PDF Vorgaben > Qualitativ hochwertiger Druck.
Dies erstellt PDF-Dateien für hochwertige Drucke auf Desktop-Druckern.

hochwertigerDruck

Mehr Info direkt bei ADOBE Help: PDF Optionen

Mehr Info über die PDF Vorgaben bei ADOBE Help: PDF Vorgaben

Advertisement

Formats and extensions / Formate und Endungen

Info in English and German – Info in Deutsch und Englisch

This is quick guide of file extensions for beginners / Eine Liste der Dateiendungen und ihre Bedeutungen für Anfänger:

.psd = Photoshop (working file with all layers, path and masks / Arbeitsdatei mit allen Ebenen, Pfade und Masken)

.tif = Tagged Image File Format (Often, printers will prefer TIFF files for digital photos / Meistens werden Druckereien TIFF Dateien für digitale Fotos bevorzugen)

.eps = Encapsulated PostScript (Considered the best choice of graphics format for high resolution printing of vector illustrations / Generell eine gute Wahl für Hochresolution-Vektor-Illustrationen im Druck)

.pdf = Portable Document Format (PDF is a file format created by Adobe Systems, Inc. PDF is highly portable across computer platforms and perfect to send to printers. / PDF ist ein Format von Adobe Systems, Inc. PDF ist Plattformübergreifend und ideal um druckfertige Dateien professionell drucken zu lassen)

.svg = Scalable Vector Graphics (SVG files are smaller and easier to compress than other formats. SVG images are zoomable and scalable. Like other graphics, SVG works as a static or animated image. / SVG Dateien sind kleiner und einfacher zu komprimieren als andere Formate. SVG Grafiken sind skalierbar und können sogar animiert werden)

.jpg = Joint Photographic Experts Group, also known as JPEG files (common file format for digital photos used for websites / Wird meistens für digitale Fotos für Webseiten benutzt)

.gif = Graphics Interchange Format (GIF images are ideal for transparency and animation for websites. GIF files are ideal for simple shapes since they are reduced to 256 unique colors. / GIF Bilder sind ideal für Transparenzen und Animationen für Webseiten und sind ideal für Grafiken mit nicht mehr als 256 Farben)

.png = Portable Network Graphic (The PNG format was developed as a replacement for the GIF Format. PNG files offer transparency as well as animation. / Das PNG ersetzt heute vielfach das GIF Format. PNG sind gut für transparente Bilder und Animationen)

Color Profiles / Farbprofile

Tutorial in English and German / Anleitung in Deutsch und Englisch

Deutsche Version siehe unten!

English Version:
Color profiles are necessary to maintain optimal color quality for both print and digital. The following is a brief overview for beginners in Adobe.

RGB = Red, Green and Blue color mode is based on light primarily for digital display and often used with the following color profile: sRGB. (Standard RGB). This profile ensures consistency across a wide range of monitors and displays for websites, apps, video-games, etc.

sRGB is also a preferred choice by many designers if your image will be used in office programs such as Microsoft Word and on the internet. The colors display correctly on the web, has the simplest workflow and looks fine in print. BUT! It has a smaller color space than ADOBE RGB. The latest trend: simply place jpgs, sRGB, 72 images into Indesign and let Indesign converting it into CMYK for the printing press when exporting the file into a print-ready PDF.

CMYK = Cyan, Magenta, Yellow and Key (Black) color mode is based on ink primarily for use with an actual printing press and will often require color profile and/or conversion provided by the printer.

ASSIGN PROFILES: allows you to check how the colors react in your image. Assigning a color profile shows you the result, without changing the colors permanently. ASSIGN PROFILES is like putting a sticker on your image – if someone takes that sticker away, your image returns to the original setting. TIP: ASSIGN PROFILES is ideal to check how the your colors react to a different color profile.

Screen Shot 2014-02-20 at 4.18.53 PM

INFO: Changing the mode from RGB into CMYK in Photoshop is a crucial step. (RGBs contain approx. 16 millions of colors, CMYK approx. 4000 to 6000). Therefore, it is recommended to leave your Photoshop (psd) file in RGB as long as possible and keep all the layers, paths and masks.

Once your Photoshop (psd) file is completed; save out a PSD or Tiff copy and flatten it to one layer.

Step 2: Open your flattened Tiff file. Go to Menu > Edit > Convert to Profile and select your CMYK color profile. (In our case: FOGRA 39. To find out which color profile you should choose: contact your printer directly, as the correct color profile will depend on a number of variables including your paper choice, printing press and location!)

Screen Shot 2014-02-20 at 4.19.42 PM

CONVERT TO PROFILE: converts your colors permanently into another color profile!
The document will be converted to and tagged with this new profile.

Step 3: Make sure your Tiff has the correct resolution for print (300dpi) and place your Tiff file at 100% size into your Adobe InDesign Layout. (Enlarging or reducing a Tiff Image in InDesign will usually result in quality loss.)

Tip 1: Article on How to resize a pixel image
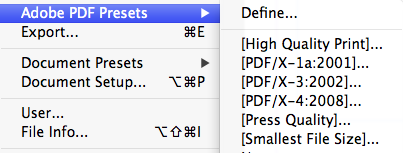
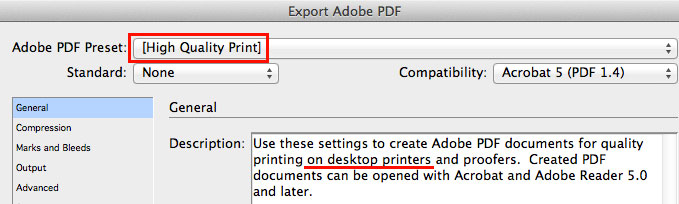
Tip 2: Article on How to make a PDF/X

IMPORTANT: to maintain color consistency throughout the entire Creative Suite Design programs, make sure you synchronise your Creative Suite Color settings in Adobe Bridge. Open Adobe Bridge and go to Menu > Edit > Creative Suite Color Settings. Click on the box “Show expanded List of Color Settings Files” and make your selection.

Additional info and download options for offset printing color profiles in Europe: European Color Initiative. Please download and install the archive ECI Offset 2009. In case you are not sure which ICC profile for offset printing to use, it is recommended to use ISO Coated v2 300% (ECI). it is crucial to keep yourself informed on the latest news by visiting this website if you’re working with European printing houses: www.eci.org .

Additional Info for color profiles in the United States: INTERNATIONAL COLOR CONSORTIUM

divider

Deutsche Version!

Farbprofile zu verstehen ist wichtig, um optimale Farbqualität im Druck oder Web zu erhalten. In diesem Tutorial diskutieren wir beides, aber auf einem Niveau für Anfänger.

RGB = Rot, Grün und Blau sind sogenannte additive Lichtfarben, werden für Monitore gebraucht und meistens im folgenden RGB Profil: sRGB. (Standard RGB) Dies ist eine kluge Wahl, solange man ein Bild für den Bildschirm benutzt, zum Beispiel für Webseiten, Apps, Videogames usw.

sRGB ist auch eine sichere Option, wenn du dein Bild in Office Programmen wie Microsoft Word benutzen und auf dem Internet zeigen möchtest. Adobe RGB hat einen grösseren Farbraum im Grün-Bereich, die Farben werden dadurch verstärkt auch im Kontrast, was beim Drucken je nach dem positiv sein kann, aber wird auf dem Internet deine Farben nicht korrekt zeigen.
Ein neuer Trend hier im deutschen Raum heisst: Medien-neutrales-Arbeiten Check it out!

CMYK = Cyan, Magenta, Yellow (Gelb) und Key (Schwarz) sind subtraktive Prozessfarben, die in einer professionelle Offsetdruckmaschine benutzt werden.

PROFILE ZUWEISEN: Ermöglicht die Auswahl eines anderen Profils. Die Anwendung weist dem Dokument das neue Profil zu, ohne die Farben in den Profilfarbraum zu konvertieren. Das Erscheinungsbild der Farben auf Ihrem Monitor kann sich dadurch erheblich verändern.

AdobeRGB

PROFIL ZUWEISEN WIE EINE ETIKETTE – wenn man diese wegnimmt kehrt das Bild wieder in den Ursprung zurück. TIPP: ZUWEISEN ist IDEAL um anzuschauen wie sich die Farben in einem anderen Farbprofil verhalten.

INFO: Der Moduswechsel von RGB zu CMYK in Photoshop ist ein heikler Punkt.
(RGB hat ca. 16 Millionen von Farben, CMYK nur ca. 4000 bis 6000). Darum ist es empfohlen das Photoshop (psd) Dokument in RGB zu lassen und alle Ebenen, Pfade und Masken zu behalten.

Sobald du mit dem Bearbeiten ihres Photoshop (psd) Dokuments fertig bist, speicherst du eine PSD oder Tiff Kopie und reduzierst es auf eine Ebene.

2. Öffne deine Tiff Datei. Geh zum Menu > Bearbeiten > in Profil umwandeln und wählen dein CMYK Farbprofil für deine Tiff Datei. (In unserem Fall: FOGRA 39. Um das korrekte Farbprofil zu erfahren: frag unbedingt deine Offset-Druckerei, denn das korrekte Farbprofil hängt vom Papier, der Druckmaschine und dem Land ab!)

Fogra39

IN PROFIL UMWANDELN: Konvertiert die Dokumentfarben in ein anderes Profil!
D.h. du rechnest die Farbwerte in den anderen Farbraum um. Das gewählte FARBPROFIL wird mit diesem Befehl permanent umgewandelt.

3. Vergewissere dich, dass dein Tiff Bild die korrekte Resolution für den Druck aufweist (300dpi) und platziere dein Tiff zu 100 % Grösse in dein Adobe InDesign Layout. (Vergrössern oder verkleinern eines Tiff Bildes in InDesign kann auch Qualitätsverlust erzeugen).

Tipp 1: Artikel Wie man ein Pixel Bild vergrössert oder verkleinert
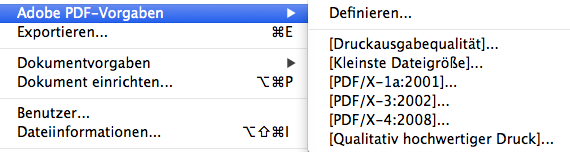
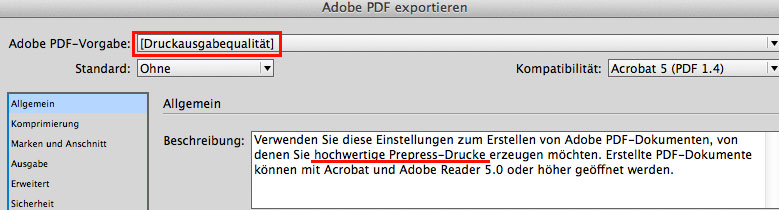
Tipp 2: Artikel Wie man ein PDF-X für die Druckerei erstellt

WICHTIG: Um die Farbprofile in allen Creative Suite Design Programme konsistent zu halten, ist es wichtig die Creative Suite Farbeinstellungen in Adobe Bridge zu synchronisieren . Öffne dein Adobe Bridge Programm und gehe zum Menu > Bearbeiten > Creative Suite-Farbeinstellungen. Wähle dann die Box “Erweiterte Liste mit Farbeinstellungsdateien anzeigen” und dein gewünschtes Farbprofil.

Um deine gewünschten Farbprofile für den Offsetdruck herunterzuladen und mehr Informationen – findest du hier der Link zur Webseite > European Color Initiative.
Tipp: Die ECI Offset 2009 Farbprofile herunterladen und installieren. Im Zweifelsfall ist das ISO Coated v2 300% (ECI) das richtige Farbprofil. Es ist wichtig, sich immer via www.eci.org auf dem neuesten Stand zu halten.
Gratis Leitfaden für die Erstellung von PDF-X: PDF-X READY LEITFADEN

Black is not Black!

Info in English and German – Info in Deutsch und Englisch

English version:

Would you like to receive our tips for free in your e-mail box? Simply select FOLLOW to sign up with your e-mail address.

divider
TIP OF THE WEEK:
how to use BLACK!

Ever wondered why Black sometimes prints more like a dark grey?
This is our suggestion how to set set the right Black for the CMYK printing process:

To print large areas of Black we suggest using: 30 % Cyan, 20 % Magenta, 20 % Yellow and 100 % Black to print a neutral and deep Black. Some printers go as high as: 70c, 60m, 50y – ask your printer for details.

For fonts in general, especially if the type is thin and small: 100 % Black is fine. Is the Black font big in size, like a large, bold headline; you might add Cyan, Magenta and Yellow as mentioned above.

As for Registration Black: Please DO NOT use this for anything else than Registration marks. Why? Because it is: 100 % Cyan, 100 % Magenta, 100 % Yellow and 100 % Black (=Key), is used for registration marks only and goes way over the 300 % color limit.

In general: pay attention that you won’t go over the 300 % color limit, which is easy to check in InDesign under: WINDOW > OUTPUT > SEPARATIONS PREVIEW > the Ink Limit should not exceed 300 %)

Tip: as you may have noticed the “default” black of Photoshop is 75c 68m 67y 90k, which takes you to the 300% maximum total ink limit and also allows for a little ink dot gain or “spreading” at the press by lowering the black(Keyline) 10%

cheers – REEDesign

divider

Deutsche Version:

Möchten Sie unsere gratis Tipps im e-mail erhalten? Schreiben Sie sich unter FOLLOW mit Ihrer e-mail Adresse ein.

divider
TIPP DER WOCHE:
Wie man Schwarz korrekt einsetzt.

Haben sie sich jemals gewundert, warum schwarze Flächen als Dunkelgrau gedruckt werden? Hier ist unser Ratschlag, wie sie ihr Schwarz korrekt für den CMYK Druckprozess vorbereiten:

Um ein tiefes Schwarz bei grossen Flächen zu erhalten empfehlen wir: 30 % Cyan, 20 % Magenta, 20 % Yellow and 100 % Black. Einige Druckereien gehen sogar so hoch: 70c, 60m, 50y – fragen Sie Ihre Druckerei.

Für Schriften, vor allem klein in der Grösse und dünn: 100 % Black ist genügend. Ist die Schrift jedoch gross und Fett, könnte man Cyan, Magenta und Yellow dazugeben.

Das Passermarken-Schwarz ist mit 100 % Cyan, 100 % Magenta, 100 % Yellow und 100 % Black (=Key) über dem erlaubten 300% Farbauftrag und ist somit nur für Schnitt- und Passermarken gedacht.

Tipp: den 300 % Farbauftrag nicht überschreiten: InDesign prüft das unter: FENSTER > AUSGABE > Separationsvorschau > Farbauftrag.

cheers – REEDesign

Wie man ein PDF-X mit InDesign professionell erstellen kann

Deutsche Version:
Möchten Sie unsere gratis Tipps im e-mail erhalten? Schreiben Sie sich unter FOLLOW mit Ihrer e-mail Adresse ein.

TIPP DER WOCHE: Wie man ein PDF-X mit InDesign professionell erstellen kann.

Unter Bearbeiten > In Profil umwandeln – Wichtig: Die Offset-Druckerei anfragen, welches Farbprofil gewünscht wird. Laut ECI ist das ISO Coated v2 300% eine gute Wahl, wenn man nicht sicher ist, welches man wählen soll. ECI Download / Farbprofile

1: Unter Datei > PDF Vorgaben > das korrekte PDF-X anwählen. (Druckerei anfragen)
PDF_D2

2: Unter Allgemein am besten Einzelseiten anwählen
PDF_D3

3: Unter Marken und Anschnitt die Schnittmarken und 3mm Anschnitt anwählen
PDF_D4

4: Unter Ausgabe das korrekte Farbprofil anwählen (Druckerei anfragen)
PDF_D5

Weitere Infos:
European Color Initiative
pdfx-ready Leitfaden

One possible way to make a PDF-X using Adobe InDesign

Would you like to receive our tips for free in your e-mail box? Simply select FOLLOW to sign up with your e-mail address.

TIP OF THE WEEK:
One possible way to make a PDF-X using Adobe InDesign.

Under Edit > Convert to Profile choose your color profile – Important: ask your professional printer which color profile he needs!

1: Under File > Adobe PDF Presets > choose your PDF-X setting – Again: ask your printer which PDF-X he wants!
PDF_E2

2: Under General select single pages!
PDF_E3

3: Under Marks and Bleeds select crop marks and bleed setting!
PDF_E4

4: Under Output select your color profile (ask your printer)
PDF_E5

Additional Info for Europe: European Color Initiative

Additional Info for the United States: INTERNATIONAL COLOR CONSORTIUM