Deutsche Version siehe unten!
Drawing is easy! I love drawing with the pen tool in Adobe Illustrator, as shown in my Illustration below. I use a simple “click n’drag technique” which allows me to control each anchor point.
Step-by-step guide on how to “Draw-your-own-Comic” for advanced Adobe users: COMIC-DRAWING with Adobe Illustrator.
ALL tips of this Blog combined in one 72 pages PD F for easy download: i-adobe book in English – Preview & download here
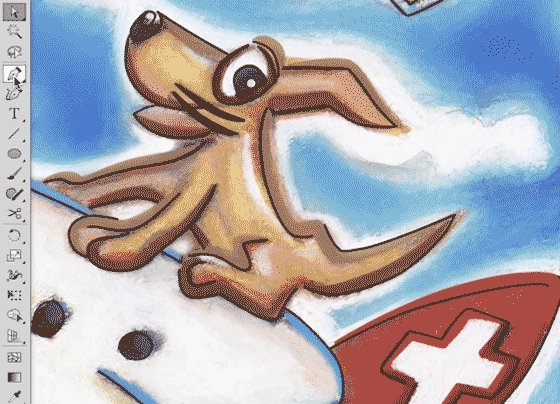
Comic illustration by Miriam Selmi Reed for ZIGGY- books. All rights reserved.
Deutsche Version
Zeichnen ist super einfach! Ich zeichne mit dem Zeichenstift-Werkzeug in Adobe Illustrator mit meiner “klick-ziehen-Methode” um jeden Ankerpunkt zu kontrollieren, wie ich oben bei meiner Illustration zeige.
“Zeichne deinen eigenen Comic Workshop” – Für fortgeschrittene Adobe BenutzerInnen: COMIC-ZEICHNEN mit Adobe Illustrator.
Alle Tipps von diesem Blog kombiniert in einem 72-Seiten PDF zum herunterladen: i-adobe book in Deutsch – Vorschau & Download hier
![]()
Run ZIGGY Run bilingual Comic for kids / zweisprachiger Comic für Kinder: ISBN 978-3-9524704-0-4
International store: RUN ZIGGY RUN International Store (6 Euro go to animal rescue / 6 Euro gehen in den Tierschutz)
Store in Germany: HUGENDUBEL Deutschland (2 Euro per book sale go to animal rescue / 2 Euro pro Buchverkauf gehen in den Tierschutz)
Store in Switzerland: EX LIBRIS, Schweiz (2 CHF per book sale go to animal rescue / 2 CHF pro Buchverkauf gehen in den Tierschutz)