Tiff with a transparent Background / Tiff mit einem transparenten Hintergrund

Tutorial in English and German / Anleitung in Deutsch und Englisch

Deutsche Version siehe unten!
divider

English version:
Tip of the week: Here’s how to make a Tiff with a transparent background, which allows you to place it into InDesign.

Step 1:
Open your file in Photoshop and double-click on the lock changing the background layer to Layer 0.
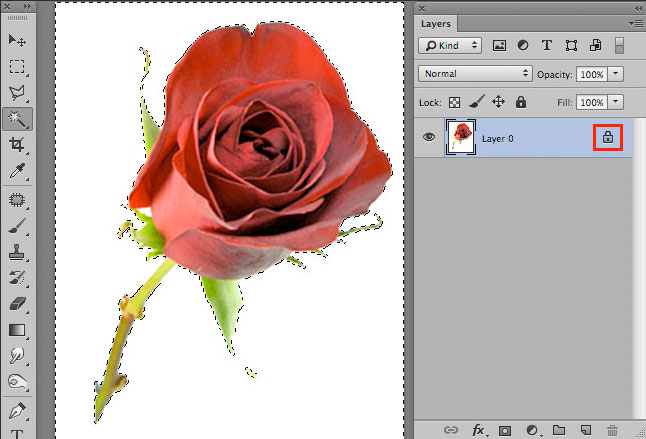
Tiff_Options4

Step 2:
Make your selection and click on the Layer Mask icon.
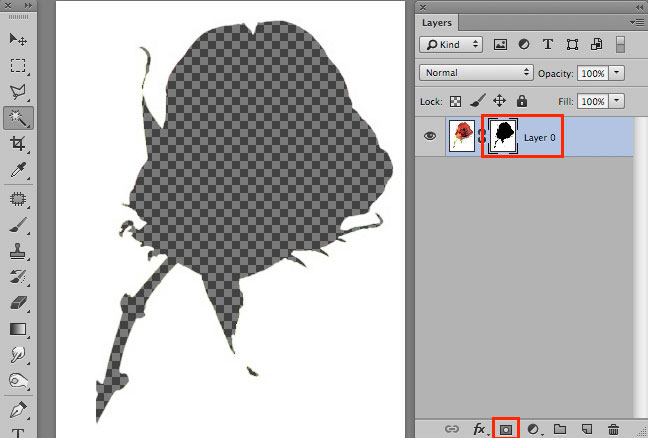
Tiff_Options3

Step 3:
In case you need to invert the selection: click on the Layer Mask so the Properties window opens. There you click on the option Invert.
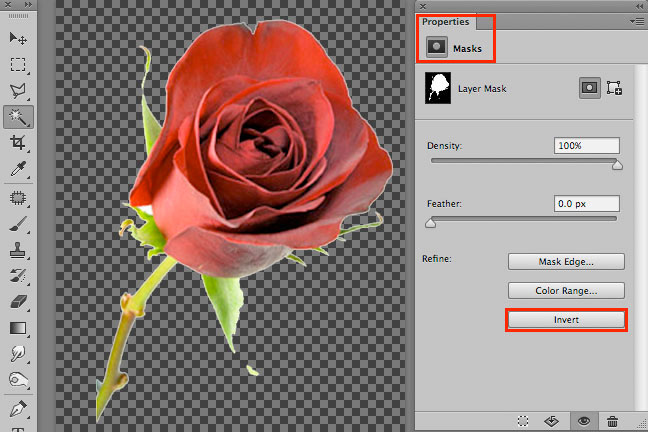
Tiff_Options2

Step 4:
Now comes the crucial step: Save the file as a Tiff with all the layers and in the Tiff Options window click on the box save Save Transparency.
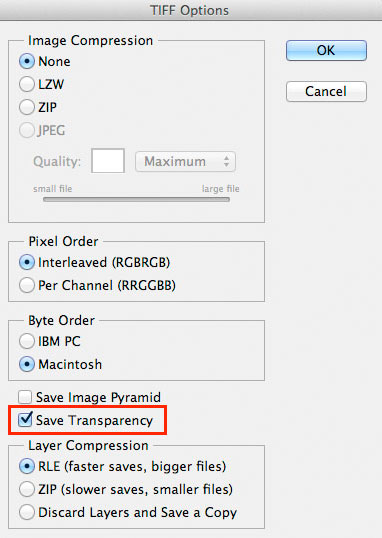
TiffOptions

Now open InDesign and place the Tiff File as an image with a transparent background!

divider

Deutsche Version
Tipp der Woche: Wie man bei einem Tiff den Hintergrund transparent macht und es ins InDesign platzieren kann.

Schritt 1:
Öffnen Sie Ihr Photoshop Bild und doppelklicken Sie auf das Schloss, damit wird es Ebene 0.
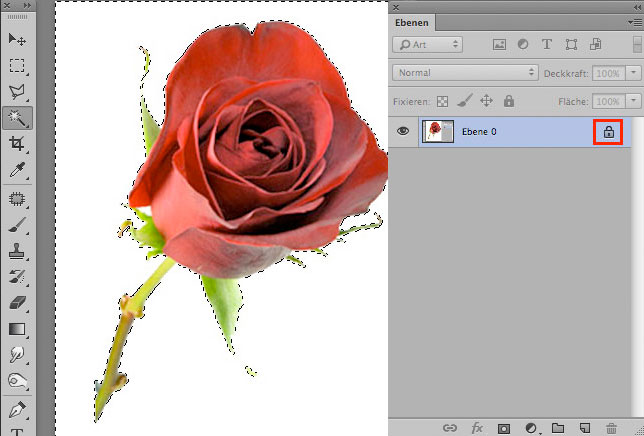
Tiff_Optionen4

Schritt 2:
Machen Sie Ihre Auswahl und klicken Sie auf das Ebenenmasken-Symbol.
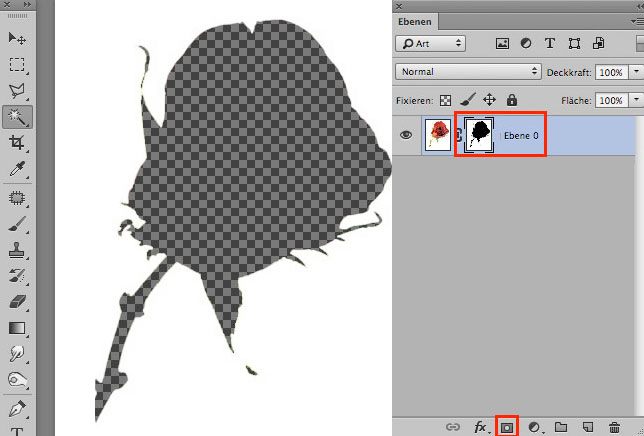
Tiff_Optionen3

Schritt 3:
In manchen Fällen müssen Sie Ihre Auswahl umkehren: klicken Sie auf die Ebenenmaske, damit öffnen sich die Eigenschaften. Dort wählen Sie die Box Umkehren.
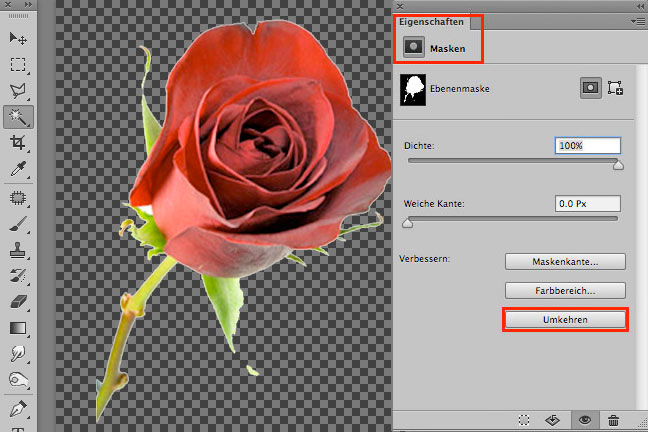
Tiff_Optionen2

Schritt 4:
Jetzt kommt der wichtigste Punkt: Sichern Sie ihr Tiff mit allen Ebenen und bei den Tiff-Optionen klicken Sie auf die Box Transparenz speichern.
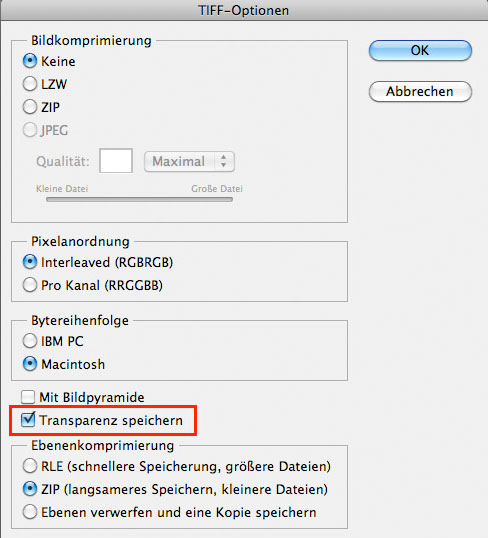
TiffOptionen

Jetzt können Sie ihr Tiff Bild ins InDesign mit transparentem Hintergrund platzieren!

Get smart with Smart Objects!

Miriam Selmi Reed's avatari-adobe

Tutorial in English and German / Anleitung in Englisch und Deutsch

English version:

In case you are into mixing Adobe programs, such as Photoshop and Illustrator, using SMART OBJECTS might be an option for you!

Placing Illustrator Images as Smart Objects into Photoshop CS6.

In two simple steps!
1. Open your Illustrator document with a simple Icon, Illustration or Logo.
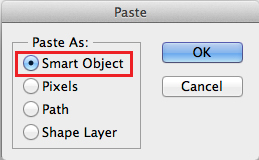
2. Copy your Object and place it as Smart Object into Photoshop.

SmartObject1

3. Click OK to confirm the placement. In the Layers you’ll find the Smart Oject as a small icon. By clicking on the small icon, the original file opens again in Illustrator.

SmartObjct2

If you make a change there and hit Save, the changes will be automatically transferred into your Photoshop Document because both programs are now connected.

Simple and Easy!

divider

Deutsche Version:

Falls Sie gerne Adobe Programme – wie Photoshop und Illustrator – mischen…

View original post 127 more words

How to make a Button / Wie man einen Störer/Stopper erstellt

Tutorial in English and German / Anleitung in Englisch und Deutsch

Deutsche Version siehe unten!

English version:

Open Adobe Illustrator CS5, CS6 or CC:

1. Make an orange circle.

Tip: If you define your Orange as a global Color you can simply alter the percentage to keep the mixing ratio.

More Info: GLOBAL COLORS

2. Copy/paste a lighter and smaller circle on top of it.
3. Select both circles and go to MENU > OBJECT > BLEND > MAKE.

Button-1

4. Make a white oval shape for the highlight.
5. Add on a black & white Gradient and make sure that the Black for the Gradient is Registration Black (C=100, M=100, Y=100, K=100)
6. Open MENU > WINDOW > TRANSPARENCY > and choose the Blending Mode Screen at approx. 50% Opacity.

Button-2

AND HERE IS THE FINAL BUTTON!
utton-E

divider

Deutsche Version:

Öffnen Sie Adobe Illustrator CS5, CS6 oder CC:

1. Erstellen Sie einen orangen Kreis. (0% c, 40% m, 90% y, 0% k)
Tipp: Wenn Sie das Orange in den Farbfeldern als globale Farbe erstellen, können Sie den helleren Kreis prozentual heller stellen.

Mehr Info dazu: GLOBALE FARBE

2. Kopieren/Einfügen Sie einen hellen und kleineren Kreis direkt darüber.
3. Wählen Sie beide Kreise gleichzeitig an und gehen zu MENÜ > OBJEKT > ANGLEICHEN > ERSTELLEN.

Button-1

4. Zeichnen Sie ein weisses Oval für den Lichteffekt.
5. Erstellen Sie einen schwarz/weissen Verlauf und wählen Sie für das Schwarz des Verlaufs ein Passermarken-Schwarz (C=100, M=100, Y=100, K=100).
6. Öffnen Sie unter MENÜ > FENSTER > TRANSPARENZ > und wählen Sie in diesem Bedienfeld die Füllmethode Neg. multiplizieren und ca. 50% Deckkraft.

Button-2

UND HIER IST DER FERTIGE STÖRER / STOPPER!
ButtonD