Tutorial in English and German / Anleitung in Deutsch und Englisch
Deutsche Version siehe unten!
![]()
English version:
Would you like to receive our tips for free in your e-mail box? Simply select FOLLOW to sign up with your e-mail address.
![]()
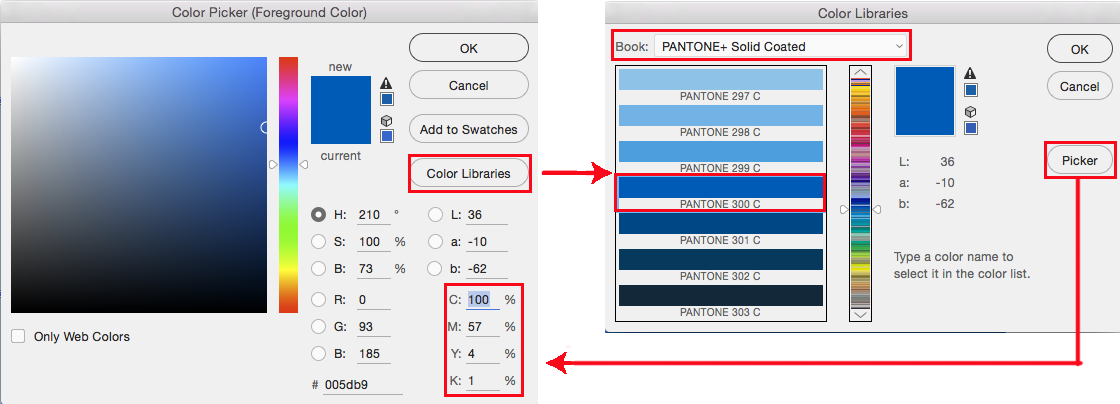
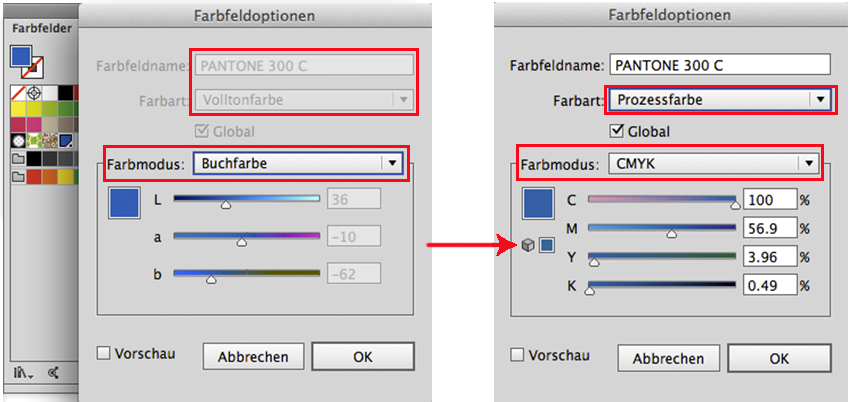
TIP OF THE WEEK: How to draw with the new PENCIL TOOL in Adobe CC
It’s never been so easy to draw in Illustrator. Simply double-click the Pencil-Tool icon in your tool bar to adjust the Pencil Tool Options.
Next step: trace your drawing by using the new Pencil Tool. You’ll see how easy it flows with the right setting! You’re now even able to draw closed shapes.

![]()
Tutorial, part 1: New Drawing Tools in Illustrator CC / Part 1
![]()
Deutsche Version
Möchten Sie unsere gratis Tipps im e-mail erhalten? Schreiben Sie sich unter FOLLOW mit Ihrer e-mail Adresse ein.
TIPP DER WOCHE: Wie man mit dem neuen Buntstift-Werkzeug in Adobe CC zeichnet
Noch nie war es so leicht in Adobe Illustrator zu zeichnen. CC macht’s möglich! Doppelklicken Sie auf das Buntstift-Werkzeug um die Optionen zu öffnen und anzupassen.
Nächster Schritt: zeichnen Sie mit dem neuen Buntstift-Werkzeug von Adobe CC den Formen nach. Jetzt ist es sogar möglich geschlossene Formen mit dem Buntstift zu erstellen!
![]()
Tutorial, Teil 1: Neue Zeichnungswerkzeuge in Illustrator CC / Teil 1
![]()
Here is the final illustration / Hier ist die fertige Illustration:
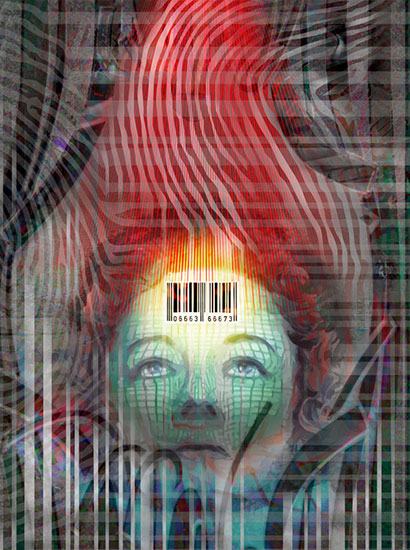
Courtesy of Illustration Source
Miriam Selmi Reed is represented by Illustration Source, New York City. Portfolio and contact: Illustration Source NYC
Illustration technique: Traditional colored pencil drawing combined with digital mixed media using Smart Objects in Adobe Photoshop and Illustrator. Copyright by Illustration Source, New York City. All rights reserved.
Illustrations-Technik: Farbstiftzeichnung gemischt mit Adobe Illustrator und Photoshop sowie Smart-Objekten. Copyright by Illustration Source, New York City. All rights reserved.