
All aboard for 2024 !
Meine Illustration zum Thema “PEACE” – gezeichnet von Hand, auf dem IPad mit Adobe Fresco

Religionsgemeinschaften sollen vereint am Frieden arbeiten. Lesen Sie dazu das
Interview mit Thomas Wipf ab Seite 6. Illustration: Miriam Selmi Reed.
www.zhref.ch/intern/kommunikation/notabene/downloads/zhref-notabene-7-2022.pdf/
Seit vielen Jahren illustriere ich Kinderbücher zusammen mit Michael Alan Reed.
Im 2016 haben wir REEDaround Books gegründet mit dem Ziel zweisprachige Bücher zu publizieren, wobei Teil des Erlöses für gute Zwecke gespendet wird. Jahrelang haben wir damit VIER PFOTEN untersützt und seit ein paar Jahren nun das Bärenland in Arosa.
Online Bookstore: Baerenland Arosa
REEDaround Books: reedaround.com
Der Star unserer Ziggy Bücher ist leider – 16 jährig – vor einem Jahr verstorben, aber seine Seele lebt in den ZIGGY Büchern weiter und hilft nun anderen Tieren in Not. Wer den “echten” ZIGGY kennenlernen möchte: z-dog.org – RUN ZIGGY RUN !

Illustration by Miriam Selmi Reed / Animation by Michael Alan Reed REEDesign.ch
Below you’ll find my personal ILLUSTRATOR Hitparade which I’m using while teaching this program.
Unten findet ihr meine persönliche ILLUSTRATOR Hitparade, welche ich benutze während ich dieses Programm unterrichte.
Seit vielen Jahren bin ich als Grafikerin/Illustratorin für Werbung, Mode, Film und Animation tätig.
Arbeitsbeispiele könnt ihr hier finden: Miriam Selmi Reed
Illustration for DVD cover by Miriam Selmi Reed. www.selmi.net
Illustrationstechnik: eine Mischung von Photoshop & Illustrator mit Hilfe von: Artikel über Smartobjekte


Die Tutorials sind von Peter Jäger, Roger Turnherr, Peter Müller und Miriam S. Reed von: com2publish.ch
Empfohlene Lehrmittel vom Rheinwerk Verlag:
Illustrator Basisbuch für Anfänger und Illustrator Handbuch für Fortgeschrittene
INFO: Der Unterschied zwischen Vektoren und Pixel Basis: Seite 23 / Handbuch: Seite 57

BASIC Key Topics
-Kennen der Grundfunktionen von Illustrator
-Sicherer Umgang in der Navigation der Oberfläche
-Beherrschen der grundlegenden Konzepten der Vektorgrafik: Pfade, Zeichenstift, Pathfinder,
Objekte/Ebenen/Eigenschaften, Flächen/Konturen, Text
-Aufbauen und Kontrollieren von Illustrator-Dateien
-Selbständiges Zeichnen und Ausgeben von einfachen Grafiken in Adobe Illustrator CC
1. DIE ARBEITSORGANISATION
Neues Dokument anlegen, Dateien erstellen, öffnen und verwalten: Basisbuch: Seiten 24 – 34 / Handbuch: 65 – 71
2. DIE BEDIENOBERFLÄCHE
EINFÜHRUNG: Erweiterte Werkzeugpalette
Bedienoberfläche, Bedienfelder, Werkzeuge, Arbeitsbereiche: Basisbuch: Seiten 35 – 46 / Handbuch: 33 – 46
NEUHEITEN Teil 1: Übersicht über die Neuheiten
Neu und genial: das Eigenschaften-Bedienfeld: Basisbuch: Seiten 107 – 108 / Handbuch: Seite 39
NEUHEITEN Teil 2: Neuheiten mit Vorlagen arbeiten
TIPP: ÜBERSICHT über die KURZBEFEHLE: Übersicht über sämtliche Kurzbefehle
3. FORMEN ERSTELLEN
Formen erstellen, geometrische Formwerkzeuge kennenlernen: Basisbuch: Seiten 109 – 115 / Handbuch: 105 – 117
Einfache FORMEN zeichnen und bearbeiten: weitere Zeichnungswerkzeuge
Objekte transformieren, gruppieren und anordnen: Basisbuch: Seiten 122 – 142 / Handbuch: 124 – 148
WORKSHOP: TRANSFORMIEREN und VERSCHIEBEN von Peter Müller: Schachbrett-Muster erstellen
Arbeiten mit dem PATHFINDER: Basisbuch: Seiten 143 – 145 / Handbuch: 336 – 340
WORKSHOP: Einführung PATHFINDER: Der Pathfinder erklärt
WORKSHOP: LOGO mit dem PATHFINDER erstellen: mit Hilfe des Pathfinders arbeiten
WORKSHOP: Ein einfaches PICTOGRAM zeichnen: Ein einfaches Pictogramm nachzeichnen
4. MIT EBENEN ARBEITEN
Ebenen erstellen, duplizieren, löschen und verschieben: Basisbuch: Seiten 246 – 250 / Handbuch: 377 – 390
Mit SCHNITTMASKEN arbeiten: Basisbuch: Seiten 251 – 252 / Handbuch: 391 – 394
In Illustrator gibt es zwei Arten von Schnittmasken. Eine wird den Objekten zugewiesen (Beschnittgruppe). Die andere wird der Ebene zugewiesen und ist in den Ebenen als Zuschneidungspfad zu erkennen.
TIPP: unter OBJEKT > SCHNITTMASKE > ERSTELLEN kann man Ebenenunabhängig arbeiten.
Mit Isolationsmodus arbeiten Basisbuch: Seite 289 / Handbuch: 395
Mit dem FORMGITTER arbeiten: Handbuch: 212 – 214
5. BILDER PLATZIEREN
Fotos platzieren, verknüpfen oder einbetten: Basisbuch: Seiten 164 – 176 / Handbuch: 651 – 669
6. AUSWÄHLEN UND VEKTOREN ZEICHNEN
Ändern von Pfaden mit den Auswahl-Werkzeugen: Basisbuch: Seiten 66 – 81 / Handbuch: 118 – 122
TIPP: ZUSAMMENFÜGEN-WERKZEUG: Lücken und überlappende Pfade
Freie Formen zeichnen mit dem ZEICHENSTIFT-Werkzeug: Basisbuch: Seiten 54 – 79 / Handbuch: 150 – 160
WORKSHOP: Ein Herz zeichnen:
Weitere Infos und Tutorials: freie Formen zeichnen
WORKSHOP: Nachzeichnen einer eigenen Zeichnung als Vorlage:
Das KURVENZEICHNER -Werkzeug: Basisbuch: Seiten 87 – 88 / Handbuch: 160 – 161
TIPP: der KURVENZEICHNER zeichnet automatisch Kurven. Bei gedrückter ALT Taste entstehen Ecken:

Der BUNTSTIFT zeichnet freie Formen: Basisbuch: Seiten 85 – 86 / Handbuch: 187 – 190
TIPP: der BUNTSTIFT zeichnet freie Formen:

7. MIT FARBEN ARBEITEN
Mit FARBEN arbeiten und in Farbfelder speichern: Basisbuch: Seiten 198 – 203 / Handbuch: 223 – 238
TIPP: mit GLOBALEN FARBEN arbeiten. Im Gegensatz zu lokalen Farben haben die GLOBALEN Farben den Vorteil, dass man diese gleichzeitig ändern kann. D.h. wenn ich dieselbe GLOBALE Farben in verschiedenen Objekten benutzt und in den Farbfelder gespeichert habe, kann ich diese dort verwalten; die Änderung wird dann in allen Objekten vorgenommen welches dieses Gelb benutzen. Info: Pantone Farben sind automatisch Global.
Mit VERLÄUFEN arbeiten: Basisbuch: Seite 206 – 214 / Handbuch: 297 – 310
WORKSHOP: VERLÄUFE: Mit Verläufe optische Illusionen erstellen
8. ARBEITEN MIT TEXT
Umgang mit TEXT: Basisbuch: Seiten 318 – 343 / Handbuch: 489 – 521
TIPP: Wir unterscheiden zwischen Punkttext, dieser entsteht indem man mit dem Text-Werkzeug KLICKT und aus diesem Punkt schreibt. Dieser lässt sich wie ein Objekt verformen. Der Flächentext, wenn wir mit dem Text-Werkzeug einen Rahmen aufziehen und in diese Fläche schreiben. Ein Pfadtext, der entlang einer Kurve läuft.
TIPP: GLYPHEN: Basisbuch: Seiten 340 / Handbuch: Seite 508 Glyphen-Alternativen gezielt einsetzen
TIPP: das TOUCH-TYPE Werkzeug kennenlernen: Basisbuch: Seiten 351 – 352 / Handbuch: 518 – 519
WORKSHOP: GOLDSCHRIFT: mit Verläufen eine Goldschrift erstellen
9. AUSGABE
AUSGABE für das WEB: Basisbuch: Seiten 366 – 368 / Handbuch: 733 – 736
AUSGABE als PDF: Basisbuch: Seiten 439 – 444 / Handbuch: 697 – 700
Dokumente OFFEN / VERPACKT weitergeben: Basisbuch: Seiten 172 – 173 / Handbuch: 725 – 726

ADVANCED Key Topics
-Professionelle Handhabung von Illustrator CC
-Verständnis für Illustrator-Konzepte entwickeln und selbständig Lösungen für Probleme erarbeiten
-Das selbständige Arbeiten auch mit vielen Objekten kennenlernen
-«Künstlerische» Funktionen zum Malen und fotorealistischen Gestalten umsetzen können
-Effiziente Methoden zum Aufbau komplexerer Illustrationen erlernen
Empfohlene Lehrmittel vom Rheinwerk Verlag:
Illustrator Basisbuch und Illustrator Handbuch für Fortgeschrittene
1. DOKUMENTE MIT MEHREREN ZEICHENFLÄCHEN
Arbeiten mit mehreren Zeichenflächen: Basisbuch: Seite 29 – 36 / Handbuch: 72 – 74
Globale Bearbeitung über mehrere Zeichenflächen hinweg: Basisbuch: Seiten 138 – 139 / Handbuch: 296 + 616
TIPP: unter ANSICHT > ANSICHT ZUSCHNEIDEN > werden Objekte die über den Rand hinausragen ausgeblendet.
Globaler oder lokaler Lineal: Basisbuch: Seite 36 / Handbuch: 85- 90
2. ERWEITERTE ILLUSTRATIONS-TECHNIKEN
Füllmethoden, Deckkraft und Transparenzen: Basisbuch: Seiten 298 – 305 / Handbuch: 419 – 423
Lichtreflexe und Filter: Basisbuch: Seiten 306 – 316 / Handbuch: 451 – 486
WORKSHOP: DECKKRAFTMASKE: Text mit transparenter Deckkraftmaske
3. TEXT-OBJEKTE
Punkt-, Text und Formtexte anlegen: Basisbuch: Seiten 306 – 316 / Handbuch: 451 – 486
Spalten einrichten: Basisbuch: Seiten 326 – 327 / Handbuch: 493 – 494
Textrahmen verketten: Basisbuch: Seiten 323 – 325 / Handbuch: 499 – 500
Umfliessen von Objekten: Basisbuch: Seiten 348 – 349 / Handbuch: 495
Text entlang Kurve oder Kreis setzen: Seiten 328 – 330 / Handbuch: 496 – 499

Tabulatoren: Basisbuch: Seiten 344 – 345 / Handbuch: 530 – 531
Zeichen- und Absatzformate: Seiten 341 – 343 / Handbuch: 532 – 534
Touch-Type und Texteffekte: Seiten 351 – 353 / Handbuch: 518 sowie 535 – 537
4. MIT SYMBOLEN ARBEITEN
Symbole erstellen und modifizieren: Seiten 288 – 293 / Handbuch: 593 – 606
TIPP: Aus SYMBOLEN eigene Grafiken erstellen: Mit der Symbol-Bibliothek neues gestalten
WORKSHOP: Kopieren, duplizieren mit SYMBOLEN: Objekte als Symbol kopieren
WORKSHOP: DYNAMISCHE SYMBOLE: die Vorteile von dynamischen Symbole
Dynamische Symbole: Handbuch: 606 – 614
5. PERSPEKTIVISCH ZEICHNEN UND 3D EFFEKTE
Der PERSPEKTIVEN-RASTER: Seiten 410 – 414 / Handbuch: 617 – 628
WORKSHOP: PERSPEKTIVE: 3D Schachtel erstellen
TIPP: Mit dem Perspektiven-Raster arbeiten: Text und Objekte mit Perspektive erstellen
6. 3D-OBJEKTE
3D Objekte und Effekte erzeugen: Seiten 398 – 410 / Handbuch: 629 – 650
WORKSHOP: 3D-Funktionen
7. MIT PINSEL ARBEITEN
Mit Pinsel malen: Seiten 270 – 275 / Handbuch: 191 – 192
TIPP: PINSEL erstellen: einen einfachen Pinsel selber erstellen
Bildpinsel erstellen: Seite 278 / Handbuch: 278 – 279
Spezialpinsel erstellen: Seite 277 / Handbuch: 282
Musterpinsel erstellen: Seite 280 / Handbuch: 283
Pinsel bearbeiten: Seite 272 / Handbuch: 290
8. ILLUSTRATIONSTECHNIKEN
Mit dem Breitenwerkzeug arbeiten: Seite 283 / Handbuch: 271 – 273
Tropfenpinselwerkzeug: Seiten 285 – 287 / Handbuch: 199 – 202
Radiergummi und Löschen-Werkzeug: Seite 80 / Handbuch: 206 – 207
WORKSHOP: PORTRAIT erstellen:
9. DAS AUSSEHEN BEDIENFELD
Effekte erstellen: Basisbuch: Seiten 306 – 310 / Handbuch: 451- 454
AUSSEHEN-BEDIENFELD: Basisbuch: Seiten 102 – 107 / Handbuch: 396- 402
WORKSHOP: EFFEKTE: Verzerrungs- und Transformationsfilter
TIPP: Mit EFFEKTEN und FILTERN arbeiten: Verzerrungs- und Transformationsfilter
EIGENSCHAFTEN-BEDIENFELD: Basisbuch: Seiten 107 – 108 / Handbuch: 403- 406
GRAFIK-STILE: Basisbuch: Seite 293 / Handbuch: 407- 410
TIPP: Step-by-Step Anleitung: Grafik-Stile benutzen

10. SÄULEN-, KUCHEN UND BALKENDIAGRAMME
Diagramme anlegen, ändern und einfärben: Basisbuch: Seiten 380 – 396 / Handbuch: 551- 574
TIPP: Step-by-Step Anleitung: Diagramme erstellen

11. RAPPORTE ERSTELLEN
Muster aus der Bibliothek verwenden und abändern: Basisbuch: Seiten 260 – 264 / Handbuch: 575- 579
Selber Muster erstellen und ändern Basisbuch: Seiten 264 – 270 / Handbuch: 580 – 590
Muster in Objekte einbauen, WORKSHOP: MUSTER erstellen: Rapporte mit Illustrator erstellen
12. MIT FARBÜBERGÄNGEN ARBEITEN
VERLAUF mit ANGLEICHEN erstellen: Basisbuch: Seiten 231 / Handbuch: 363: das Angleichen-Werkzeug
WORKSHOP: ANGLEICHEN UND SCHNITTMASKEN: mit Angleichen ein Osterei erstellen
Verläufe und Freihand-Verläufe: Basisbuch: Seiten 210 – 218 / Handbuch: 297 – 315
Mit dem VERLAUFSGITTER arbeiten: Basisbuch: Seiten 218 – 221 / Handbuch: 315 – 321
13. FOTOS VEKTORISIEREN
Basisbuch: Seiten 180 – 186 / Handbuch: 672 – 685
WORKSHOP: eine HANDSCHRIFT VEKTORISIEREN: Mit dem Bildnachzeichner

14. VERSCHIEDENE MEDIENKANÄLE
Illustrator für Webseiten: Basisbuch: Seiten 360 – 365 / Handbuch: 727 – 732
AUSGABE für das WEB: Basisbuch: Seiten 366 – 368 / Handbuch: 733 – 736
CSS-CODE aus Illustrator: Basisbuch: Seiten 372 – 373 / Handbuch: 737 – 743
Bildformate fürs WEB GIF, JPEG, PNG, SVG: Basisbuch: Seite 378 / Seiten 743 – 752
Exportieren für ANIMATE (Flash): Basisbuch: Seiten 375 – 377 / Handbuch: Seiten 753 – 759
AUSGABE für VIDEO und FILM: Basisbuch: Seite 374 / Handbuch: 760 – 766
Warum AFFINITY Designer mein Lieblingsprogramm ist…
English:
AFFINITY DESIGNER:
Introduction of AFFINITY Designer for my students – as an alternative to Adobe Illustrator!
NEWS: I’m teaching AFFINITY Designer at DIGICOMP SWITZERLAND
Affinity Designer (a vector art & design package) was launched in 2014 for macOS. It was Serif’s first product for macOS, and had been written from scratch specifically for it. This was followed in 2015 by the second Affinity product Affinity Photo (a photo editing & design package). Affinity Publisher was released in 2019.
1. Tutorial HOW TO RETOUCH in AFFINITY Designer
-Tutorial in English by Affinity: AFFINITY Designer
-Adobe Illustrator Tutorial: How to draw in Adobe Illustrator
-Our Adobe tips for easy download: i-adobe eBook in English
![]()
Deutsch:
TEIL 1 – AFFINITY DESIGNER:
Vorstellung von AFFINITY DESIGNER für meine Studenten und TeilnehmerInnen. AFFINITY Designer als Alternative zu Adobe Illustrator.
NEWS: ich unterrichte neu AFFINITY Designer Kurs bei DIGICOMP SCHWEIZ
Im Oktober 2014 wurde die App Affinity Designer im Mac-App-Store veröffentlicht. Im Juni 2015 bekam Serif für die App den Apple Design Award verliehen. Im Juli 2015 begannen die Arbeiten an Affinity Photo. 2016 wurden beide Apps mit der Version 1.5 auch für Windows veröffentlicht. Am 19. Juni 2019 erschien die DTP-Software Affinity Publisher.
1. Tutorial wie man in AFFINITY Designer retuschiert
-Tutorial in Englisch mit deutschen Untertiteln von Affinity: AFFINITY DESIGNER
-Adobe Illustrator Anleitung: Wie man mit Adobe Illustrator zeichnet
-Alle Adobe Tipps als: i-adobe eBook in Deutsch
English:
AFFINITY DESIGNER:
Introduction of AFFINITY Designer for my students – as an alternative to Adobe Illustrator!
NEWS: I’m teaching AFFINITY Designer at DIGICOMP SWITZERLAND
Affinity Designer (a vector art & design package) was launched in 2014 for macOS. It was Serif’s first product for macOS, and had been written from scratch specifically for it. This was followed in 2015 by the second Affinity product Affinity Photo (a photo editing & design package). Affinity Publisher was released in 2019.
1. Tutorial HOW TO DRAW LINES in AFFINITY Designer
-Tutorial in English by Affinity: AFFINITY Designer
-Adobe Illustrator Tutorial: How to draw in Adobe Illustrator
-Our Adobe tips for easy download: i-adobe eBook in English
![]()
Deutsch:
TEIL 1 – AFFINITY DESIGNER:
Vorstellung von AFFINITY DESIGNER für meine Studenten und TeilnehmerInnen. AFFINITY Designer als Alternative zu Adobe Illustrator.
NEWS: ich unterrichte neu AFFINITY Designer Kurs bei DIGICOMP SCHWEIZ
Im Oktober 2014 wurde die App Affinity Designer im Mac-App-Store veröffentlicht. Im Juni 2015 bekam Serif für die App den Apple Design Award verliehen. Im Juli 2015 begannen die Arbeiten an Affinity Photo. 2016 wurden beide Apps mit der Version 1.5 auch für Windows veröffentlicht. Am 19. Juni 2019 erschien die DTP-Software Affinity Publisher.
1. Tutorial wie man in AFFINITY Designer Linien und Konturen zeichnet
-Tutorial in Englisch mit deutschen Untertiteln von Affinity: AFFINITY DESIGNER
-Adobe Illustrator Anleitung: Wie man mit Adobe Illustrator zeichnet
-Alle Adobe Tipps als: i-adobe eBook in Deutsch
English version:
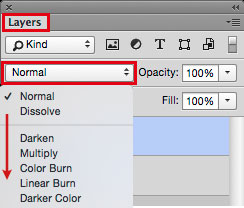
Adobe Photoshop Tip > BLENDING MODE: I love to use Blending Modes in my layers, as shown in the Illustration below. I first go under MENU > LAYERS > and select a different Blending Mode for the layer. With this method, I can apply different transparencies to my layers and work non-destructive.
Sharing infos: iADOBE FORUM – Our tips for easy download: i-adobe eBook in English

Illustration by Miriam Selmi Reed – Courtesy of Illustration Source
![]()
Deutsche Version:
Adobe Photoshop Tipp > MISCHMODUS: Ich benutze gerne den Mischmodus in Photoshop – wie bei der Illustration oben. Dazu gehe ich unter MENU > EBENEN > und stelle einen anderen Mischmodus für die Ebene ein. Mit dieser Methode arbeite ich nicht-Destruktiv, und kann somit jederzeit eine Transparenz nach Wunsch verändern.

Tausche dich aus im iADOBE FORUM – Alle unsere Tipps als: i-adobe eBook in Deutsch
![]()
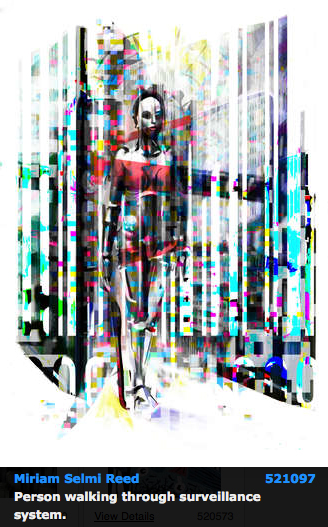
Courtesy of Illustration Source
View the artists’s homage on the topic: GOVERNMENT
Miriam Selmi Reed is represented by Illustration Source, New York City. Portfolio and contact: Illustration Source NYC
Illustration technique: watercolor, acrylic and pencil combined with digital mixed media using Adobe Photoshop and Illustrator.Copyright by Illustration Source, New York City.
Illustrations-Technik: Aquarell, Acryl mit Farbstift, gemischt mit Adobe Photoshop und Illustrator. Copyright by Illustration Source, New York City.
As instructors of Adobe programs and creative professionals, we’ve assembled this blog as easy reference for our students and clients.” Miriam Selmi Reed & Michael Alan Reed
English version:
Below is my personal way of cutting out an image with hard edges:
1. Open your image in Adobe Photoshop.
2. Duplicate your layer and select it.
3. Click TWICE on to the layer-mask icon so you will get a VECTOR MASK.
4. Select your Pen-Tool and follow the shape you would like to cut out.
5. Once you are done; click on the layer below and make it invisible.
6. To make alterations on your vector path, simply open the Properties or use the Direct-Selection-Tool to alter the vector points.
Another possible way to cut out an image using the Quick-Selection-Tool
Sharing infos: iADOBE FORUM – Our tips for easy download: i-adobe eBook in English
Illustration by Miriam Selmi Reed – Courtesy of Illustration Source NYC
Deutsche Version:
Oben zeige ich mein persönlicher Tipp wie ich Bilder mit harten Kanten freistelle:
1. Öffne dein Bild in Adobe Photoshop.
2. Dupliziere deine Ebene und wähle diese an.
3. Klicke ZWEIMAL auf das Ebenenmasken-Icon damit eine VEKTOR-MASKE entsteht.
4. Wähle dein Zeichenstift-Werkzeug und folge dem Objekt, welches du freistellen möchtest.
5. Wenn du fertig bist, mach die untere Ebene unsichtbar.
6. Um weitere Korrekturen vorzunehmen, öffne die Eigenschaften oder klicke mit dem Direkt-Auswahl-Werkzeug auf die Vektoren und verschiebe deren Position.
Ein anderer schneller Weg ein Bild freizustellen mit dem Schnell-Auswahl-Werkzeug
Tipp! Adobe Photoshop – Die komplette Übersetzung Englisch > Deutsch in Photoshop CC
Tausche dich aus im iADOBE FORUM – Alle unsere Tipps als: i-adobe eBook in Deutsch
![]()

Courtesy of Illustration Source
View the artists’s homage on the topic: Finance and Debt
Miriam Selmi Reed is represented by Illustration Source, New York City. Portfolio and contact: Illustration Source NYC
Illustration technique: watercolor, acrylic and pencil combined with digital mixed media using Adobe Photoshop and Illustrator.Copyright by Illustration Source, New York City.
Illustrations-Technik: Aquarell, Acryl mit Farbstift, gemischt mit Adobe Photoshop und Illustrator. Copyright by Illustration Source, New York City.
![]()
Your source for commissioned illustration: ORIGINAL ART STUDIOS in New York City.

Portfolio Original Art Studios, New York City: MIRIAM SELMI REED
“As instructors of Adobe programs and creative professionals, we’ve assembled this blog as easy reference for our students and clients.” Miriam Selmi Reed & Michael Alan Reed
![]()
Deutsche Version siehe unten!
Photoshop Tip: I normally use the perspective option in Photoshop, to tilt the floor; as shown in my Illustration below. I open my Photoshop file and go to EDIT > TRANSFORM and choose PERSPECTIVE. With this method, I can alter the PERSPECTIVE as I wish; by simply pulling the anchor points to change it. Hit ENTER once you’re done.
Illustrator Tip: I’ve traced the outlines with Adobe Illustrator using Adobe CC: New Tracing Tools in Adobe Illustrator
ALL tips of this Blog combined in one 72 pages PDF for easy download: i-adobe book in English – Preview & download here
Illustration by Miriam Selmi Reed / Courtesy of Illustration Source
Deutsche Version:
Photoshop Tip: Ich benutze die Perspektiven-Option in Photoshop, um den Boden perspektivisch nach hinten zu kippen; wie man oben bei meiner Illustration sieht. Ich öffne meine Photoshop-Datei und gehe zu BEARBEITEN > TRANSFORMIEREN und wähle Perspektivisch. Mit dieser Methode kann ich die PERSPEKTIVE ändern indem ich an den Hebeln ziehe. Wichtig: mit der ENTER Taste bestätigen.
Illustrator Tipp: Ich habe die neuen Zeichnungswerkzeuge von Adobe CC benutzt um die Illustration unten zu zeichnen: Neue Zeichnungswerkzeuge in Adobe Illustrator
Alle Tipps von diesem Blog kombiniert in einem 72-Seiten PDF zum herunterladen: i-adobe book in Deutsch – Vorschau & Download hier
![]()

Courtesy of Illustration Source
View the artists’s homage on the topic: MONEY
Miriam Selmi Reed is represented by Illustration Source, New York City. Portfolio and contact: Illustration Source NYC
Illustration technique: watercolor, acrylic and pencil combined with digital mixed media using Adobe Photoshop and Illustrator.Copyright by Illustration Source, New York City.
Illustrations-Technik: Aquarell, Acryl mit Farbstift, gemischt mit Adobe Photoshop und Illustrator. Copyright by Illustration Source, New York City.
![]()
Your source for commissioned illustration: ORIGINAL ART STUDIOS in New York City.
Portfolio Original Art Studios, New York City: MIRIAM SELMI REED
Tutorial in English and German / Anleitung in Deutsch und Englisch
Deutsche Version siehe unten!
![]()
English version:
Would you like to receive our tips for free in your e-mail box? Simply select FOLLOW to sign up with your e-mail address.
![]()
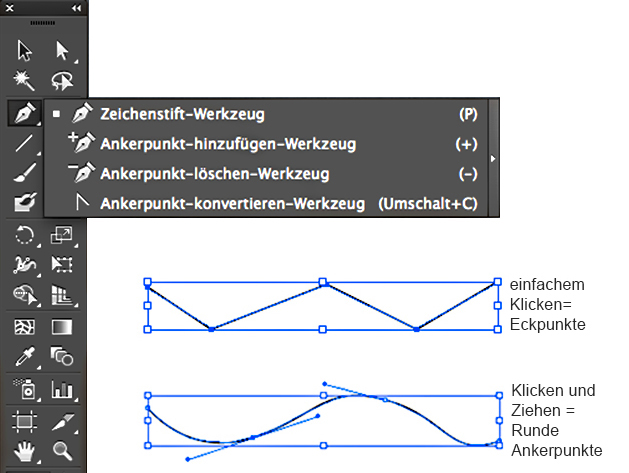
TIP OF THE WEEK: The new Curvature Tool in Adobe Illustrator Creative Cloud
It’s never been so easy to draw in Illustrator!
Select the new Curvature Tool in Illustrator CC. Start with two basic points, and then watch a preview of the how the curve will look like as you are about to drop another point at the end of the path!

Don’t want a curve? Instead of just dropping a point, press Option/Alt when you drop a point, to create a straight line from the previous point. If you’ve already created a smooth curve, double-click a point to change it. It’s simply amazing!
Illustrator Tip: New Drawing Tools in Adobe Illustrator CC – Part 2
![]()
Deutsche Version
Möchten Sie unsere gratis Tipps im e-mail erhalten? Schreiben Sie sich unter FOLLOW mit Ihrer e-mail Adresse ein.
TIPP DER WOCHE: Das neue Kurvenzeichner-Werkzeug in Adobe Illustrator CC
Noch nie war es so leicht in Adobe Illustrator zu zeichnen.
TIPP: Wählen Sie das neue Kurvenzeichner-Werkzeug in Illustrator CC. Beginnen Sie mit einem Ankerpunkt, dann sehen Sie die Kurve entstehen, währenddessen Sie den nächsten Ankerpunkt setzen.
Möchten Sie keine Kurve? Anstelle von einem normalen Klicken, drücken Sie die Option/Alt Taste wenn Sie einen Ankerpunkt setzen, damit setzen Sie eine geraden Linie vom vorherigen Punkt.
Falls Sie bereits eine runde Kurve erstellt haben, Doppel-klicken Sie auf einen Ankerpunkt um die Linie zu ändern. Es ist genial und lohnt sich auf die Creative Cloud zu wechseln, sollten Sie Probleme mit dem Zeichenstiftwerkzeug in der Version CS6 haben.
Illustrator Tipp: Neue Zeichnungs-Werkzeuge in Adobe Illustrator CC – Teil 2
![]()
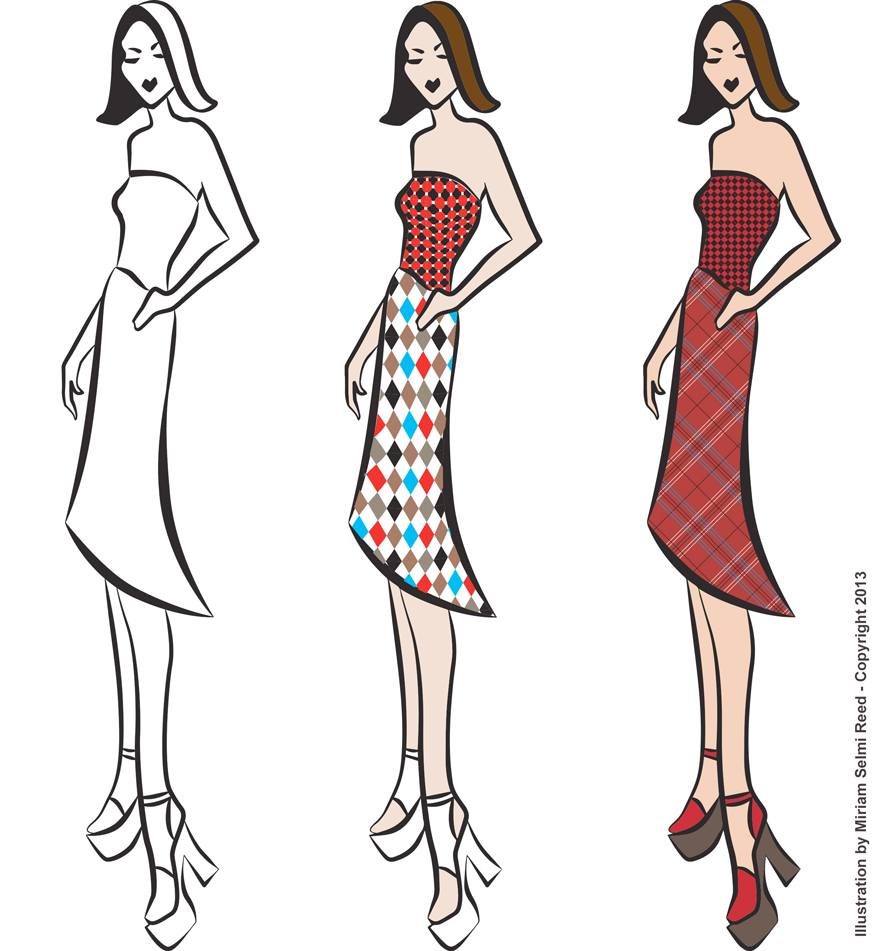
Here is the final illustration / Hier ist die fertige Illustration:

Courtesy of Illustration Source
Miriam Selmi Reed is represented by Illustration Source, New York City. Portfolio and contact: Illustration Source NYC
Illustration technique: Traditional colored pencil drawing combined with digital mixed media using Smart Objects in Adobe Photoshop and Illustrator. Copyright by Illustration Source, New York City. All rights reserved.
Illustrations-Technik: Farbstiftzeichnung gemischt mit Adobe Illustrator und Photoshop sowie Smart-Objekten. Copyright by Illustration Source, New York City. All rights reserved.
![]()
Tip 1: How to show the Photoshop channels in color!
Normally the channels in Photoshop are being shown in greyscale. In certain cases I prefer to see them in colors to make alterations. Click on the link for more info.
Tip 2: The difference between S-RGB and RGB in Adobe Photoshop
I will use sRGB for my own illustrations – you may see one below – if I’m certain that my artwork will only be for digital display. Please click on the link for more info.
![]()
Tipp 1: Wie man die Kanäle in Photoshop in Farbe anzeigt
Normalerweise werden die Kanäle in Schwarz/Weiss angezeigt. Ich ziehe es manchmal vor diese farbig zu bearbeiten. Für mehr Info bitte auf den Link klicken.
Tipp 2: Der Unterschied zwischen S-RGB und RGB in Adobe Photoshop
Ich selber benutze sRGB gerne für meine Illustrationen – siehe Beispiel unten – wenn ich sicher bin, dass diese nur auf Webseiten erscheinen werden. Für mehr Info bitte auf den Link klicken.
![]()

Courtesy of Illustration Source
View the artists’s homage on the topic THE WEATHER REPORT
Miriam Selmi Reed is represented by Illustration Source, New York City. Portfolio and contact: Illustration Source NYC
Illustration technique: Traditional painting combined with digital mixed media using Smart Objects in Photoshop and Illustrator. Copyright by Illustration Source, New York City.
Illustrations-Technik: Acrylbild gemischt mit Illustrator und Photoshop sowie Smart-Objekten. Copyright by Illustration Source, New York City.
![]()
Your source for commissioned illustration: ORIGINAL ART STUDIOS in New York City.
Portfolio Original Art Studios, New York City: MIRIAM SELMI REED
![]()
TIP OF THE WEEK: How to make your own comic: Comic & Illustration
TIPP DER WOCHE: Zeichnen Sie ihren eigenen Comic: Comic & Illustration
![]()

Courtesy of Illustration source
View the artists’s homage on the topic TAX TIME
Miriam Selmi Reed is represented by Illustration Source, New York City. Portfolio and contact: Illustration Source NYC
Illustration technique: Traditional painting combined with digital mixed media using Smart Objects in Photoshop and Illustrator. Copyright by Illustration Source, New York City.
Illustrations-Technik: Acrylbild gemischt mit Illustrator und Photoshop sowie Smart-Objekten. Copyright by Illustration Source, New York City.
![]()
Your source for commissioned illustration: ORIGINAL ART STUDIOS in New York City.
Portfolio Original Art Studios, New York City: MIRIAM SELMI REED
Courtesy of Illustration Source
View the artists’s homage on the topic: Government
Miriam Selmi Reed is represented by Illustration Source, New York City. Portfolio and contact: Illustration Source NYC
Illustration technique: watercolor, acrylic and pencil combined with digital mixed media using Adobe Photoshop and Illustrator.Copyright by Illustration Source, New York City.
Illustrations-Technik: Aquarell, Acryl mit Farbstift, gemischt mit Adobe Photoshop und Illustrator. Copyright by Illustration Source, New York City.

Courtesy of Illustration Source
View the artists’s homage on the topic: Boooo!…
Miriam Selmi Reed is represented by Illustration Source, New York City. Portfolio and contact: Illustration Source NYC
Illustration technique: Charcoal, acrylic and pencil combined with digital mixed media using Adobe Photoshop and Illustrator.Copyright by Illustration Source, New York City.
Illustrations-Technik: Kreide, Acryl mit Farbstift, gemischt Adobe Photoshop und Illustrator. Copyright by Illustration Source, New York City.
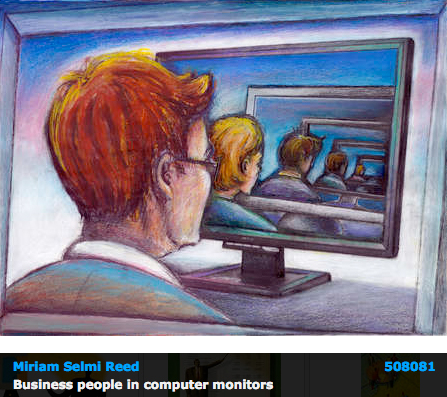
Courtesy of Illustration Source
View the artists’s homage on the topic In a meeting…
Miriam Selmi Reed is represented by Illustration Source, New York City. Portfolio and contact: Illustration Source NYC
Illustration technique: Charcoal, acrylic and pencil combined with digital mixed media using Adobe Photoshop. Copyright by Illustration Source, New York City.
Illustrations-Technik: Kreide, Acryl mit Farbstift, gemischt Adobe Photoshop. Copyright by Illustration Source, New York City.

Courtesy of Illustration Source
View the artists’s homage on the topic MONEY
Miriam Selmi Reed is represented by Illustration Source, New York City. Portfolio and contact: Illustration Source NYC
Illustration technique: Traditional painting combined with digital mixed media such as Adobe Photoshop. Copyright by Illustration Source, New York City.
Illustrations-Technik: Acrylbild gemischt mit Adobe Photoshop. Copyright by Illustration Source, New York City.
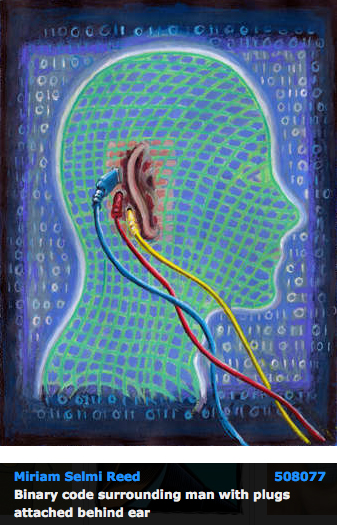
Courtesy of Illustration Source
View the artists’s homage on the topic I’m All Ears
Miriam Selmi Reed is represented by Illustration Source, New York City. Portfolio and contact: Illustration Source NYC
Illustration technique: Charcoal, acrylic and pencil combined with digital mixed media using Smart Objects / Filter in Adobe Photoshop and Illustrator. Copyright by Illustration Source, New York City.
Illustrations-Technik: Kreide, Acryl mit Farbstift, gemischt mit Adobe Illustrator und Photoshop sowie Smart-Objekte / Filter. Copyright by Illustration Source, New York City.
Courtesy of Illustration Source
View the artists’s homage on the topic THE EYES HAVE IT!
Miriam Selmi Reed is represented by Illustration Source, New York City. Portfolio and contact: Illustration Source NYC
Illustration technique: Traditional painting combined with digital mixed media using Smart Objects in Photoshop and Illustrator. Copyright by Illustration Source, New York City.
Illustrations-Technik: Acrylbild gemischt mit Illustrator und Photoshop sowie Smart-Objekten. Copyright by Illustration Source, New York City.

Miriam Selmi Reed represented and licensed by Illustration Source, New York City
Miriam Selmi Reed’s Portfolio and contact: Illustration Source NYC
Illustration technique: Traditional drawing combined with digital mixed media using Smart Objects in Photoshop and Illustrator. Copyright by Illustration Source, New York City.
Illustrations-Technik: Farbstift-Zeichnung gemischt mit Illustrator und Photoshop sowie Smart-Objekten. Copyright by Illustration Source, New York City.
