Desktop Publisher Lehrgang

Hallo zusammen
Freue mich sehr, dass unser nächster DTP Lehrgang auf “garantierte Durchführung” gesetzt wurde. Beginn nächste Woche: 24. Oktober 2020, SA Morgen von 9:00 – 12:50 Uhr.

Wir haben noch ein paar Plätze frei, weitere wichtige Informationen dazu findest du hier:
Desktop Publishing Lehrgang Klubschule Zürich

Hier ein Film mit ehemaligen DTP Absolventen zur Inspiration:

Was kann man nach einem Desktop Publisher Lehrgang vorweisen?

Würde mich sehr freuen dich im neuen DTP Lehrgang begrüssen zu dürfen!
Herzliche Grüsse,
Miriam Selmi Reed

Advertisement

I love FASHION Illustration!

Wir freuen uns auf die neue Zusammenarbeit mit Peter Jäger und com2publish.ch!

Mit Adobe Illustrator eine Figurine vektorisieren, Muster erstellen und mit einem Gitter eine 3D Wirkung erzeugen. Unser Lernfilm, klick auf diesen Link von com2publish mit Übungsdatei: Mode-Figurine selber Illustrieren mit Adobe Illustrator

Hier ist mein deutsches Tutorial für dich:

Autoren: Michael Alan Reed und Miriam Selmi Reed
-Alle Adobe Tipps als: i-adobe eBook in Deutsch

Here is my English Tutorial for you:

-Our Adobe tips for easy download: i-adobe eBook in English

SMART !


PDF zum downloaden vom Publisher

divider

Ich arbeite seit vielen Jahren mit Smart Objekten. Unten zeige ich euch zwei Illustrationen die ich mit AFFINITY Designer gezeichnet habe. Das Coole an AFFINITY Designer ist, dass ich im selben Programm von der Pixel-Persona in die Vektor-Persona wechseln kann.

I’ve been using Smart Objects for many years. Below you’ll find two of my new Illustrations created with AFFINITY Designer. The benefit of AFFINITY Designer: I can switch from the Pixel-Persona to the Vector-Persona in the same program. Tutorials: AFFINITY

Shown with Courtesy of Illustration Source, New York City, USA

View Miriam Selmi Reed’s homage on the topic: CURRENT EVENTS

Miriam Selmi Reed
 is represented by Illustration Source, New York City.
Portfolio and contact:  Illustration Source NYC

Infografiken & Flyers mit Illustrator gestalten!

Beim “INFO-GRAFIKEN Kurs mit Illustrator” sicher von Zuhause aus teilnehmen!
Der Kurs wird als WEBINAR online mit ZOOM durchgeführt werden.
(Es entstehen keine zusätzlichen Kosten)

Dienstag, 23. Juni 2020, 09.15 bis 17.00 Uhr
Anmeldeschluss: 15.06.2020
Anmeldung jetzt online via SBVV: Infografiken & Flyers mit Illustrator gestalten

Illustration by Miriam & Michael Reed, REEDesign.ch – Copyright reformierte Kirche Kanton Zürich

Sie möchten Infografiken, Logos sowie Kuchen- und Säulengrafiken erstellen. Sie möchten Ihre Flyers mit Grafiken und einfachen Illustrationen visuell gestalten und optimieren.

Ziele des Kurses
Sie erhalten Grundlagenwissen zu den Themen Infografiken und Gestaltung von Flyers. Sie können mit Adobe Illustrator Formen, Infografiken, Säulen- und Kuchengrafiken erstellen. Diese Elementefür die Gestaltung Ihrer Flyers gezielt einsetzen und mit passender Schrift (Typografie) stimmig umsetzen. Zudem kennen Sie den Unterschied zwischen Druck & Web und sind in der Lage
Ihre Flyers / Grafiken in die Druckerei zu schicken und für Webseiten zu exportieren.

TEIL 1:
Einführung in die Gestaltung von Infografiken mit Adobe Illustrator.

TEIL 2:
Einführung in die Gestaltung von Flyers mit Adobe Illustrator.

Ich freue mich Sie in meinem Infografiken & Flyers mit Illustrator gestalten Kurs begrüssen zu dürfen!

Mein Infofilm über’s zeichnen nach Vorlage mit Illustrator:

HAPPY MEITLIS – featured Artist Danja K.

Information in English and German / Anleitung in Deutsch und Englisch
Deutsche Version siehe unten!

English version:

happy

download_on_the_app_store_badge_us-uk_135x40

I’d like to present a former art student of mine, Danja K. Her talent was unsurpassed in her class and her stickers can be downloaded on the iTunes store. Danja is not only a fabulous illustrator, she is also a great person to know. Danja is happy to share her knowledge with us on how she did her famous HAPPY MEITLIS. The HAPPY MEITLIS were drawn with Adobe Illustrator and animated using XCode.

Here are some of the most important steps and infos:

  1. Sign up as an Apple Developer Program (approx. 100 dollars per year)
  2. Download the Programm «Xcode» for free
  3. For each sticker pack you must make certificates (Certificates are part of the Apple Developer Account) and activate them (each year through Xcode)
  4. You must make App Icons for each sticker pack (here is Danja K’s AI-Template)
  5. With «iTunes Connect» (Part of the Apple Developer Accounts) thats how the are transferred to Apple. They will review them and after approval, publish them

Here is Danja K’s website with all the information you need:
HAPPY MEITLI STICKERS INFO and the Sticker submissions to Apple.

Thanks a lot for sharing Dear Danja and lots of luck with your cool HAPPY MEITLIS!

Danja is happy about each Download and hopes that she can make the world a happier place with her HAPPY MEITLIS.

divider

Deutsche Version:

Ich möchte euch eine ehemalige Design-Studentin präsentieren; Danja K. Ihr Talent ist mir bereits vor Jahren in der Klasse aufgefallen und inzwischen kann man ihre Stickers sogar bei iTunes herunterladen. Danja ist nicht nur eine talentierte Illustratorin, sie ist auch eine wunderbare Person. Danja möchte uns zeigen wie sie ihre berühmten HAPPY MEITLIS erstellt hat. Zuerst zeichnete sie die HAPPY MEITLIS mit Adobe Illustrator und animierte sie dann mit XCode. Hier ist Danja’s Link zu Ihrer Webseite mit all den Informationen die du dazu benötigst: HAPPY MEITLI STICKERS INFO

Vielen Dank liebe Danja und viel Glück weiterhin mit deinen coolen HAPPY MEITLIS!

Danja freut sich über jeden Download und hofft, dass sie mit den HAPPY MEITLIS die Welt etwas bunter machen kann.

Vectorise your photo / Foto in Vektoren umwandeln

Tutorial in English and German / Anleitung in Deutsch und Englisch
Deutsche Version siehe unten!

English version:

TIP OF THE WEEK: How to vectorize & colorize a photo!
In the Illustration below, Mike used manual illustration techniques combined with Adobe Photoshop & Illustrator.

Tutorial: How to use the image trace option in Illustrator CS6 or CC, to vectorize and colorize a Photo. Watch the tutorial in English and German subtitles below.
1: Place your photo into Illustrator.

2: Vectorise your photo under > Window > Image Trace.

3: Don’t forget to click on the button “EXPAND”.

4: Edit your colors under > Edit > Edit Colors.

Tutorial:

Deutsche Version:

TIPP DER WOCHE: Wie man ein Foto vektorisiert & einfärbt!
In der Illustration unten benutzt Mike manuelle Illustrations Techniken, kombiniert mit Adobe Photoshop & Illustrator.

Tutorial: Wie man mit dem Bildnachzeichner in Illustrator CS6 oder CC arbeitet, ein Foto vektorisiert und einfärbt: Siehe Lernvideo in Englisch mit deutschen Untertiteln oben.
1: Platziere ein Foto in Adobe Illustrator.

2: Vektorisiere dein Photo unter > Fenster > Bildnachzeichner.

3: Klicke auf “UMWANDELN” um die Vektorpunkte zu generieren.
4: Du kannst dein Vektorbild umfärben unter > Bearbeiten > Farben bearbeiten.

Copyright by Michael Alan Reed

Michael Alan Reed is the Art Director / Illustrator at: www.REEDesign.ch

3D

3D is on the way… Here are a couple of cool easy 3D programs to check out.
Deutsch: 3D ist auf dem Weg… Unten findest du ein paar coole und einfache 3D Programme zum anschauen. Free 3D program for Mac and Windows: BLENDER

Cool and easy way to animate your drawings with GREASE PENCIL 2.8 – have a look:
Deutsch: Wie du deine Zeichnungen mit GREASE PENCIL 2.8 animieren kannst:

Another 3D program called SKETCH UP is not for free but easy to use and therefore interesting to check out: Info on The 3D Program SKETCH UP
Film: SKETCH UP TUTORIAL
Deutsch: Ein anderes 3D Programm mit dem Namen SKETCH UP ist zwar nicht gratis aber total einfach zum lernen. Der Film-Link oben zeigt ein Tutorial.

Since you might have ADOBE CREATIVE CLOUD, you might know about the Perspective Tool in Adobe Illustrator.
Information: Perspective in Adobe Illustrator
Deutsch: Da du vermutlich die ADOBE CREATIVE CLOUD hast, kennst du vermutlich das Perspektiven Werkzeug von Adobe Illustrator.

copyright by Miriam Selmi Reed – REEDesign.ch

Our 3D and animation infos will be continued soon – stay tuned!

Our eBook with great tips about Indesign, Photoshop & Illustrator in English: eBook in English – Adobe Tips & Tricks
Unser eBook mit Tipps über Indesign, Photoshop & Illustrator in Deutsch: eBook in Deutsch – Adobe Tipps & Tricks

Drawing / Zeichnen “the easy way” !

Deutsche Version siehe unten!
Drawing is easy! I love drawing with the pen tool in Adobe Illustrator, as shown in my Illustration below. I use a simple “click n’drag technique” which allows me to control each anchor point.
Step-by-step guide on how to “Draw-your-own-Comic” for advanced Adobe users: COMIC-DRAWING with Adobe Illustrator.
ALL tips of this Blog combined in one 72 pages PD F for easy download: i-adobe book in English – Preview & download here

Comic illustration by Miriam Selmi Reed for ZIGGY- books. All rights reserved.

Comic illustration by Miriam Selmi Reed for ZIGGY- books. All rights reserved.

Deutsche Version
Zeichnen ist super einfach! Ich zeichne mit dem Zeichenstift-Werkzeug in Adobe Illustrator mit meiner “klick-ziehen-Methode” um jeden Ankerpunkt zu kontrollieren, wie ich oben bei meiner Illustration zeige.
“Zeichne deinen eigenen Comic Workshop” – Für fortgeschrittene Adobe BenutzerInnen: COMIC-ZEICHNEN mit Adobe Illustrator.
Alle Tipps von diesem Blog kombiniert in einem 72-Seiten PDF zum herunterladen: i-adobe book in Deutsch – Vorschau & Download hier

divider

Run ZIGGY Run bilingual Comic for kids / zweisprachiger Comic für Kinder: ISBN 978-3-9524704-0-4
International store: RUN ZIGGY RUN International Store (6 Euro go to animal rescue / 6 Euro gehen in den Tierschutz)

Store in Germany: HUGENDUBEL Deutschland (2 Euro per book sale go to animal rescue / 2 Euro pro Buchverkauf gehen in den Tierschutz)

Store in Switzerland: EX LIBRIS, Schweiz (2 CHF per book sale go to animal rescue / 2 CHF pro Buchverkauf gehen in den Tierschutz)

Illustrator Workshop: Symbols 1

Tutorial in English and German / Anleitung in Deutsch und Englisch

Deutsche Version siehe unten!
divider

English Version:
How I use Symbols in Adobe Illustrator: I go under MENU > WINDOW > SYMBOLS and choose a Fashion Symbol which you can find in the Symbol-Library. Very important: to click on the icon “Break Link to Symbol”.

1E

Then I place a leather-photo (tiff or jpg) and select Embed on top.

2E

I select the leather photo and drag it into my Illustrator Swatch Box to create a New Pattern Swatch. (Menu > Window > Swatches)
4E

Then I select my Symbol (Boot) and click on the leather pattern to fill.
Next time I will show how to form the leather pattern inside the boot to make it more 3D!

divider

Our new i-adobe Ebook is available here – in English – including films on 72 pages:
EASY DOWNLOAD

Unser neues i-adobe book ist hier erhältlich – in Deutsch – inklusive Filme auf 72 Seiten: SICHERER DOWNLOAD

divider

Deutsche Version:
Wie ich Symbole in Adobe Illustrator benutze: Ich gehe unter MENÜ > FENSTER > SYMBOLE und wähle ein Mode-Symbol welche man in den Symbol-Bibliotheken finden kann. Sehr wichtig: auf das icon klicken “Verknüpfung mit Symbol aufheben”.

1

Dann platziere ich ein Leder-Foto (tiff oder jpg) und klicke oben in der Steuerung auf Einbetten .

2

Ich wähle das Leder-Foto an und ziehe es in meine Illustrator Farbfelder um ein neues Musterfeld zu erstellen. (Menü > Fenster > Farbfelder)
4

Dann wähle ich mein Symbol (Stiefel) und fülle es mit meinem neuen Ledermuster indem ich auf das neue Musterfeld klicke. Nächstes Mal werde ich zeigen wie ich das Ledermuster um den Stiefel forme damit es mehr 3D wirkt.

Illustrator: new Drawing Tools 1 / neue Zeichnungs-Werkzeuge 1

Tutorial in English and German / Anleitung in Deutsch und Englisch

Deutsche Version siehe unten!
divider

English version:

Would you like to receive our tips for free in your e-mail box? Simply select FOLLOW to sign up with your e-mail address.

divider

TIP OF THE WEEK: The new Curvature Tool in Adobe Illustrator Creative Cloud

It’s never been so easy to draw in Illustrator!

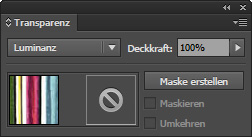
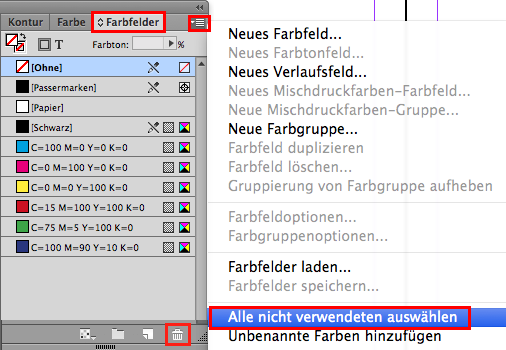
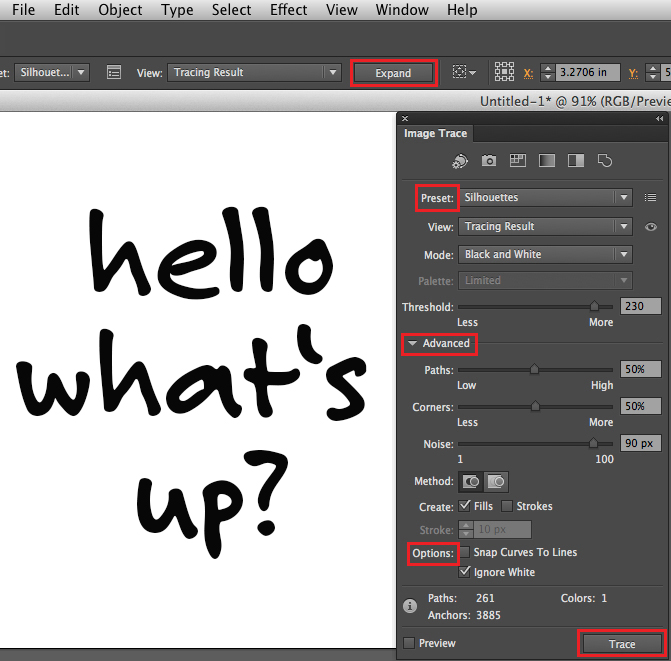
Select the new Curvature Tool in Illustrator CC. Start with two basic points, and then watch a preview of the how the curve will look like as you are about to drop another point at the end of the path!

kruemmung

Don’t want a curve? Instead of just dropping a point, press Option/Alt when you drop a point, to create a straight line from the previous point. If you’ve already created a smooth curve, double-click a point to change it. It’s simply amazing!

Illustrator Tip: New Drawing Tools in Adobe Illustrator CC – Part 2

divider

Deutsche Version

Möchten Sie unsere gratis Tipps im e-mail erhalten? Schreiben Sie sich unter FOLLOW mit Ihrer e-mail Adresse ein.

TIPP DER WOCHE: Das neue Kurvenzeichner-Werkzeug in Adobe Illustrator CC

Noch nie war es so leicht in Adobe Illustrator zu zeichnen.

TIPP: Wählen Sie das neue Kurvenzeichner-Werkzeug in Illustrator CC. Beginnen Sie mit einem Ankerpunkt, dann sehen Sie die Kurve entstehen, währenddessen Sie den nächsten Ankerpunkt setzen.

kruemmung

Möchten Sie keine Kurve? Anstelle von einem normalen Klicken, drücken Sie die Option/Alt Taste wenn Sie einen Ankerpunkt setzen, damit setzen Sie eine geraden Linie vom vorherigen Punkt.
Falls Sie bereits eine runde Kurve erstellt haben, Doppel-klicken Sie auf einen Ankerpunkt um die Linie zu ändern. Es ist genial und lohnt sich auf die Creative Cloud zu wechseln, sollten Sie Probleme mit dem Zeichenstiftwerkzeug in der Version CS6 haben.

Illustrator Tipp: Neue Zeichnungs-Werkzeuge in Adobe Illustrator CC – Teil 2

divider

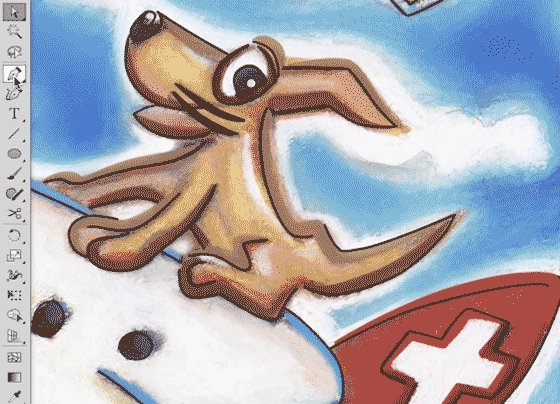
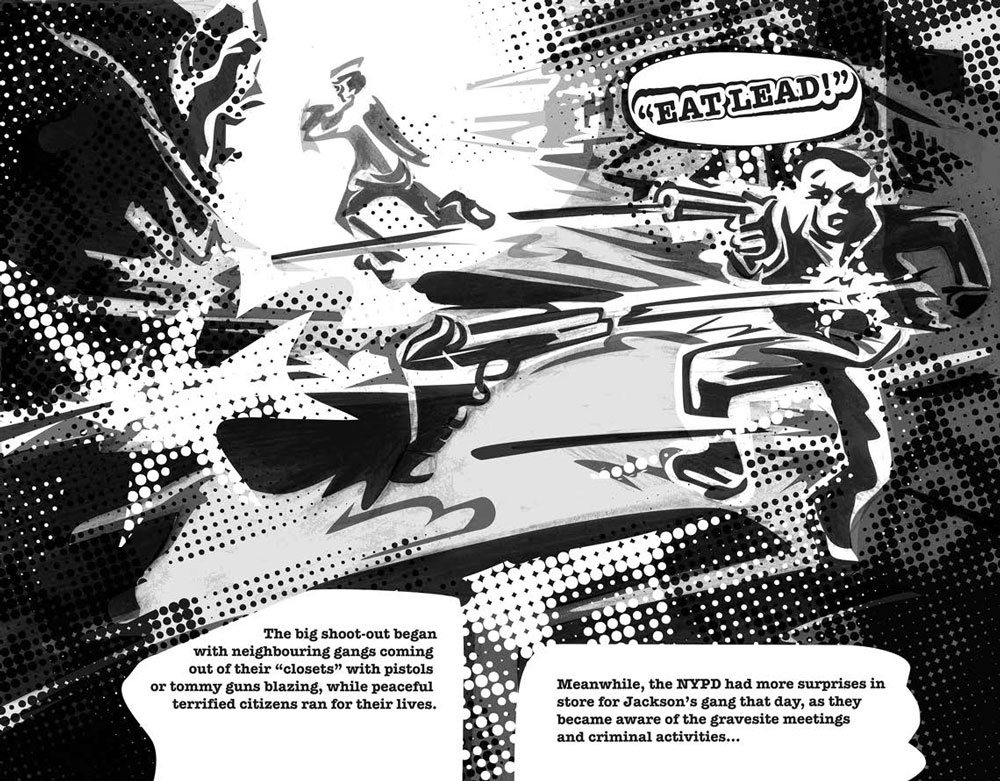
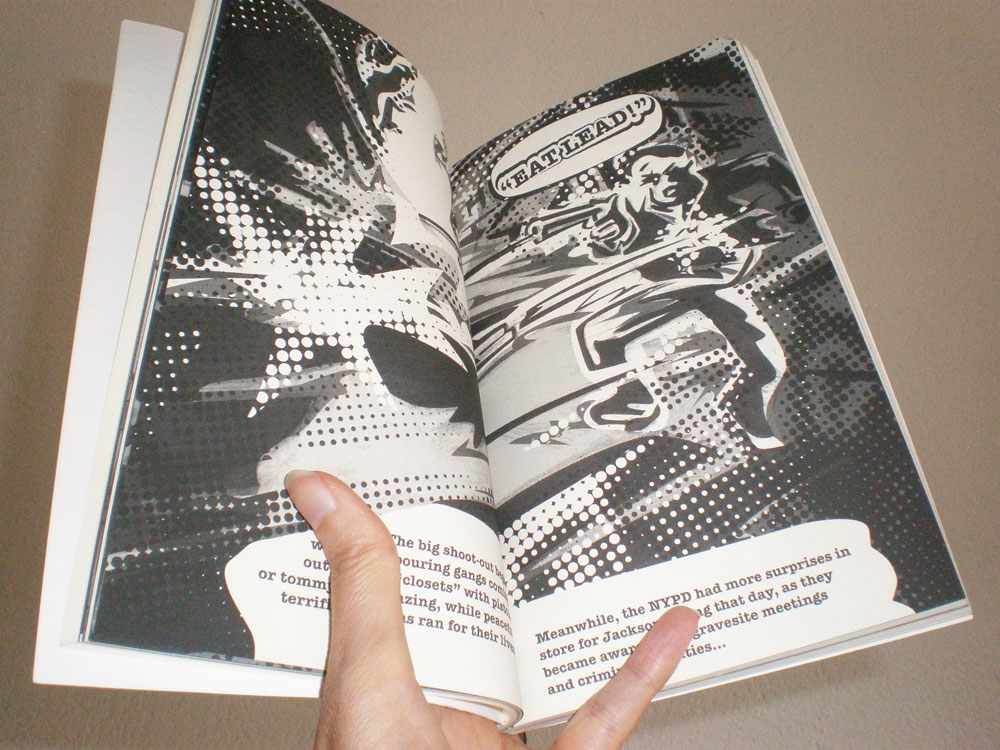
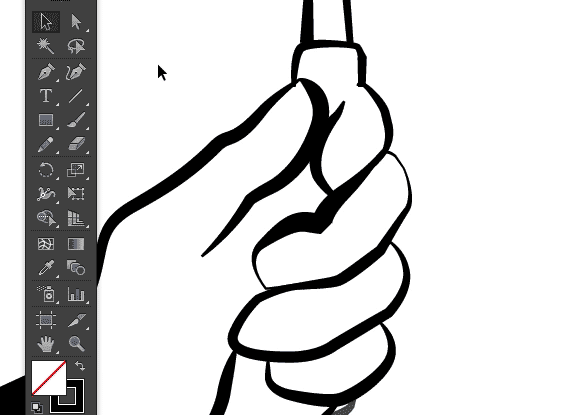
Here is the final illustration / Hier ist die fertige Illustration:

Courtesy of Illustration Source

Miriam Selmi Reed is represented by Illustration Source, New York City. Portfolio and contact: Illustration Source NYC

Illustration technique: Traditional colored pencil drawing combined with digital mixed media using Smart Objects in Adobe Photoshop and Illustrator. Copyright by Illustration Source, New York City. All rights reserved.

Illustrations-Technik: Farbstiftzeichnung gemischt mit Adobe Illustrator und Photoshop sowie Smart-Objekten. Copyright by Illustration Source, New York City. All rights reserved.

Topic of the week: Consumerism

divider

Illustrator Tipp > TRANSPARENCY: I love to use Transparencies in Adobe Illustrator, as shown on my Illustration below. I first go under MENU > WINDOW < TRANSPARENCY; and select a Transparency for my selected object. With this method, I can apply different transparencies and work non-destructive.

transparency

divider

Illustrator Tip > TRANSPARENZ: Ich benutze gerne die Transparenzen in Illustrator – wie bei meiner Illustration unten. Dazu gehe ich unter MENU > FENSTER > TRANSPARENZ; und wähle eine Transparenz nach Wahl. Mit dieser Methode arbeite ich nicht-Destruktiv, und kann somit jederzeit eine Transparenz löschen oder nach Wunsch verändern.

transparenz

divider

Miriam Selmi Reed represented and licensed by Illustration Source - Courtesy of Illustration Source

Miriam Selmi Reed represented and licensed by Illustration Source – Courtesy of Illustration Source

View the artists’s homage on the topic: CONSUMERISM

Miriam Selmi Reed is represented by Illustration Source, New York City. Portfolio and contact: Illustration Source NYC

Illustration technique: watercolor, acrylic and pencil combined with digital mixed media using Adobe Photoshop and Illustrator.Copyright by Illustration Source, New York City.

Illustrations-Technik: Aquarell, Acryl mit Farbstift, gemischt mit Adobe Photoshop und Illustrator. Copyright by Illustration Source, New York City.

divider

Your source for commissioned illustration: ORIGINAL ART STUDIOS in New York City.

OAS

Portfolio Original Art Studios, New York City: MIRIAM SELMI REED

Clean up Swatches automatically / Farbfelder automatisch aufräumen lassen!

Tutorial in English and German / Anleitung in Deutsch und Englisch

Deutsche Version siehe unten!
divider

English version:

Would you like to receive our tips for free in your e-mail box? Simply select FOLLOW to sign up with your e-mail address.

TIP OF THE WEEK: How to clean up color Swatches in InDesign and Illustrator

Ever had a huge amount of colors in your Swatch-box in an InDesign or Illustrator document and had no idea which colors to delete?

In order to provide the printer or another designer a clean working file, it is advisable to remove unnecessary color swatches.

The answer is simple: Go to MENU > WINDOW > and open the Swatches.
1. Select all Unused. 2. Click on the trash can.
All colors which you didn’t use in your document are now deleted in your swatch box automatically!

UnusedSwatches

divider

TIP 2: How to use Global Colors in Adobe Illustrator – here is a cool trick: GLOBAL COLORS

divider

Deutsche Version:

Möchten Sie unsere gratis Tipps in Ihrem e-mail erhalten? Schreiben Sie sich unter FOLLOW mit Ihrer e-mail Adresse ein.

TIPP DER WOCHE: Wie man in Adobe InDesign und Illustrator Farbfelder aufräumt

Hatten Sie jemals Ihre Farbfelder in InDesign oder Illustrator so vollgeladen mit Farben, dass Sie nicht mehr wussten, welche Farben in Ihrer Datei verwendet wurden?

Die Lösung ist einfach: gehen Sie zu MENU > FENSTER > und öffnen Sie das Bedienfeld Farbfelder.
1. Alle nicht verwendeten auswählen. 2. Klicken Sie auf den Papierkorb.
Alle Farben die in Ihrem Dokument nicht benutzt werden, wurden somit aus Ihrem Farbfeld-Bedienfeld automatisch gelöscht!

Um der Druckerei oder einem anderen Designer eine saubere Datei zu schicken, ist es ratsam, unnötige Farbfelder zu löschen.

NichtgebrauchteFarbfelder

divider

TIPP 2: Wie man globale Farben in Illustrator benutzt. Ein cooler Trick: GLOBALE FARBEN

divider

Any support is greatly appreciated – Jede Unterstützung freut uns: PayPal Donate Button

divider

Comic Illustration

TIP OF THE WEEK: how to illustrate a book with Adobe Illustrator / TIPP DER WOCHE: wie man mit Adobe Illustrator illustriert.

STEP 1: scan your drawing / 1 Schritt: scannen Sie Ihre Zeichnung

Drawing by Miriam Selmi Reed

Drawing by Miriam Selmi Reed

STEP 2: Trace with Adobe Illustrator / Nachzeichnen mit Adobe Illustrator

Illustration by Miriam Selmi Reed - Copyright by Round Robin Editrice, Rome, Italy

Illustration by Miriam Selmi Reed – Copyright by Round Robin Editrice, Rome, Italy

STEP 3: Print the illustration or book / Die Illustration oder das Buch wird gedruckt

Illustration by Miriam Selmi Reed - Copyright by Round Robin Editrice, Rome, Italy

Illustration by Miriam Selmi Reed – Copyright by Round Robin Editrice, Rome, Italy

Secure ONLINE SHOP / Sicherer ONLINE SHOP:
Screen Shot 2013-07-13 at 3.45.22 PM

divider

Tutorial in English and German – Anleitung dazu in Deutsch und Englisch

1. Scan your image and place it in Adobe Illustrator – FILE > PLACE.
Scannen Sie ihre Bildvorlage und platzieren Sie es in Adobe Illustrator – DATEI > PLATZIEREN.

2. Go to WINDOW > LAYERS and add a layer on top to trace your image using the Pen Tool.
Unter FENSTER > EBENEN erstellen Sie eine neue Ebene und zeichnen mit dem Zeichenstiftwerkzeug den Linien nach.

CARTOON PATH PART 1 – COMIC FIGUR TEIL 1

3. Go to WINDOW > SWATCHES and select your lines to fill them with color.
Unter FENSTER > FARBFELDER und wählen sie ihre Konturen und füllen diese mit Farbe.

CARTOON PATH PART 2 – COMIC FIGUR TEIL 2

Tutorial for beginners: How to draw in Adobe Illustrator
Übung für Anfänger: Wie man mit Illustrator zeichnet

divider

Any support is greatly appreciated – Jede Unterstützung freut uns: PayPal Donate Button

Featured Illustrator: Michael Alan Reed

divider

Mike’s TIP OF THE WEEK: How to use a layer mask and make a background transparent in Photoshop – PHOTOSHOP LAYER MASK

divider

Featured Illustrator Mike Reed has an amazing technique; a combination of manual and digital media – we love his style! Manual drawing with pencil enhanced with digital media.

Copyright by Michael Alan Reed - all rights reserved

Copyright by Michael Alan Reed – all rights reserved

Michael Alan Reed, a native of the American North West, has been successfully working as a graphic designer / illustrator and image composer for many years. His work has been shown, printed and licensed in fashion, sportswear, magazines, products, advertising and animation internationally.

COOL STUFF! check out his PORTFOLIO and BLOG at: Michael Alan Reed
Contact & website: REEDesign

divider

Mike’s TIPP DER WOCHE: Wie man ein Foto in Photoshop mit einer Ebenenmaske freistellt und den Hintergrund transparent speichert – PHOTOSHOP EBENENMASKE

divider

Vectorize your hand writing – Vektorisieren sie ihre Handschrift

Tutorial in English and German – Anleitung in Deutsch und Englisch

Deutsche Version siehe unten!
divider

We just received a “coffee” donation and request from a former student for the following tutorial:

ENGLISH version:

Vectorize your hand writing (scan or photo) in Illustrator CS6 or CC and colorize it!
In three simple steps:
1. Place a scan or pixel image (jpg, tiff, psd) into Illustrator CS6 or CC.
2. Go to Menu > Window > Image Trace, choose your Preset, select under Advanced your Options and click on Trace.
3. When you are done, don’t forget to click on Expand in order to vectorise your image.
You may select the box “Ignore White” to delete the white background and make it transparent.
Tip: Choose your Direct-Selection-Tool to colorise each font element separately and place it into your InDesign document.

(To vectorize in CS5: go under Object > Live Trace > Tracing Options.)

imagetrace_new

divider

DEUTSCHE Version:

Dieses folgende Tutorial wurde auf Anfrage zusammengestellt, als “Danke für die Kaffee-Donation”:

Vektorisieren Sie ihre Handschrift (Scan oder digitales Foto) in Illustrator CS6 oder CC.
In drei einfachen Schritten:
1. Platzieren sie ihre Pixel-Vorlage (jpg, tiff, psd) in ihr Illustrator CS6 Dokument.
2. Gehen sie zu Menü > Fenster > Bildnachzeichner, wählen sie ihre Vorgabe, wählen zudem unter Erweitert ihre Optionen und klicken auf Nachzeichnen.
3. Wenn sie fertig sind, ist es wichtig auf Umwandeln zu klicken. Damit wird ihr Foto vektorisiert.
Sie können die Box “Weiss ignorieren” anwählen um den weissen Hintergrund zu löschen.
Tipp: Wählen sie das Direktauswahl-Werkzeug um jeden Buchstaben separat einzufärben und platzieren sie es in ihr InDesign Dokument.

(Um in CS5 zu vektorisieren: gehen sie unter Object > Interaktiv nachzeichnen > Nachzeichneroptionen.)

Bildnachzeichner_new

Additional option:

Compound Path Release option if you are trying to colorize a font
In case you’d like to colorize a font: With the “Compound Path Release” option, you can release the paths and colorize individual parts of each letter separately.

Zusatzinformation:

Option “Zusammengesetzter Pfad zurückwandeln” beim einfärben von Schriften
Möchten sie einzelne Buchstaben einer Schrift einfärben: Mit der Option “Zusammengesetzter Pfad zurückwandeln” kann man die Verknüpfung aller Pfade lösen und jeder Teil innerhalb des Buchstaben einzeln einfärben.

Tutorial spoken in English & German / Schritt für Schritt Anleitung auf Deutsch und Englisch:

Happy new year – 2015!

Mixed media

Courtesy of Illustration Source

View the artists’s homage on the topic: A New Start!

Miriam Selmi Reed is represented by Illustration Source, New York City. Portfolio and contact: Illustration Source NYC

Illustration technique: Charcoal, acrylic and pencil combined with digital mixed media using Adobe Photoshop and Illustrator. Copyright by Illustration Source, New York City.

Illustrations-Technik: Kreide, Acryl mit Farbstift, gemischt Adobe Photoshop und Illustrator. Copyright by Illustration Source, New York City.

Symbole / Symbols in Illustrator CS6

Tutorial in English and German / Anleitung in Deutsch und Englisch

English version:

Would you like to receive our tips for free in your e-mail box? Simply select FOLLOW to sign up with your e-mail address.

divider

TIP OF THE WEEK: Symbols in Adobe Illustrator

Are you not good in drawing? Use your Symbol library provided by Illustrator CS6!
Go to Menu > Window > Symbols and click on the library which opens the Symbol collection.
In our sample we’ve used the RETRO collection and have chosen the guitar.
Once the selected Symbol shows up in your own Symbol library, you may click on the “un-link” icon, which breaks the link to the secure Adobe collection.

Symbole

Your symbol now shows anchor points which allows you to recolor and make it your own illustration. The Direct Selection Tool (white arrow) is able to choose each part separately which makes it easy to make your alterations.

Symbole2

Learn how to draw in Adobe illustrator: ADOBE ILLUSTRATOR DRAWING TUTORIALS

divider

Deutsche Version:

Möchten Sie unsere gratis Tipps im e-mail erhalten? Schreiben Sie sich unter FOLLOW mit Ihrer e-mail Adresse ein.

TIPP DER WOCHE: Symbole in Adobe Illustrator

Können Sie nicht gut selber zeichnen? Benutzen Sie die Symbol-Bibliothek in Illustrator CS6!
Gehen Sie im Menü unter Fenster > Symbole und öffnen unten links Ihre Symbol-Bibliothek.
In unserem Beispiel öffneten wir die RETRO Sammlung und wählten die Gitarre aus der Adobe Kollektion.
Sobald Ihr gewähltes Symbol in Ihrer Bibliothek auftaucht, können Sie die Verknüpfung zur geschützten Adobe Kollektion unterbrechen.

Symbole

Da nun Ihr Symbol die Ankerpunkte zeigt, können Sie Ihr Symbol jetzt umfärben und zur eigenen Illustration verwandeln. Mit dem Direktauswahl-Werkzeug (weisser Pfeil) können Sie jeden Teil separat anwählen und verändern.

Symbole2

Lernen Sie wie man mit Adobe illustrator zeichnet: ADOBE ILLUSTRATOR ÜBUNGEN

Today’s concept: BOO !

Courtesy of Illustration Source

Courtesy of Illustration Source

View the artists’s homage on the topic: Boooo!…

Miriam Selmi Reed is represented by Illustration Source, New York City. Portfolio and contact: Illustration Source NYC

Illustration technique: Charcoal, acrylic and pencil combined with digital mixed media using Adobe Photoshop and Illustrator.Copyright by Illustration Source, New York City.

Illustrations-Technik: Kreide, Acryl mit Farbstift, gemischt Adobe Photoshop und Illustrator. Copyright by Illustration Source, New York City.

How to make a Comic / Wie man einen Comic zeichnet

Tutorial in English / Deutsch:

1. Scan your drawing and place it into Illustrator / Scannen Sie Ihre Zeichnung und platzieren Sie diese in Illustrator

2. Trace the outlines of your drawing / Zeichnen Sie mit einer Konturfarbe Ihrer Zeichung nach

3. Fill in the shapes with a fill color / Füllen Sie die Konturen mit Flächenfarben

Development of Z-Dog - Copyright by Miriam Selmi Reed / All rights reserved

Development of Z-Dog – Copyright by Miriam Selmi Reed – All rights reserved

divider

the new Z-DOG COMIC is now online at: z-dog.org
Copyright by Miriam Selmi Reed / All rights reserved

divider

Z-Dog1

divider

NEW Published Graphic Novel
:
Soul Crime of new York
Copyright by Round Robin editrice, Rome, Italy / All rights reserved.

divider

INFO: to get serious about drawing in Illustrator, we highly suggest the following tutorials / Um wirklich in Illustrator zeichnen zu können, empfehlen wir die folgenden Übungen:

Tutorial 1 in English for beginners: How to draw in Illustrator

Tutorial 1 in Deutsch für Anfänger: Wie man mit Illustrator zeichnet

divider

Tutorial 2 in English for advanced users: How to draw your own comic figure

Tutorial 2 in Deutsch für Fortgeschrittene: Wie man eine Comicfigur zeichnet

divider

Don’t forget: “Practice makes Perfect!” / Nicht vergessen: “Übung macht den Meister!”

How to draw in Illustrator

Would you like to receive our tips for free in your e-mail box? Simply select FOLLOW to sign up with your e-mail address.

divider

Adobe Illustrator is primarily a vector based design tool to draw clean shapes and to create resizable Logos. Whereas Photoshop is raster based and therefore pixel dependent, Illustrator is using vector shapes made out of anchor points.

Therefore the Pen Tool in Illustrator is ideal to draw paths with anchor points:
With a simple mouse CLICK, you are setting corner anchor-points. If you are clicking AND dragging with the mouse at the same time, you’ll get round anchor-points with levers, with those are round corner points and curves possible.

The Pen Tool is ideal to draw closed shapes. It’s easy! Draw your shape while setting your points until you reach the first anchor-point again; select it to close the shape and choose a fill color.

PenTool

Video Tutorial for beginners:

The Pencil Tool draws lines which you can combine with the Width Tool.
To open the options for the Pencil Tool: Double click the Pencil Tool icon in the tool sidebar. The same way you may open the Brush options if needed.

The Pencil Tool is ideal to draw lines. If you do need to close the open path into a shape;
you either have to select both end-points and go under Menu > Object > Path > Join or use the shortcut ctrl+J for PC / command+J for Mac.

pencilTool

Video Tutorial for beginners:

The Width Tool in Adobe Illustrator CS6 is ideal to give your line a Brush stroke character: select the line and drag with the mouse until the line becomes wider.

WidthTool

The Pen Tool and Pencil Tool are both ideal to draw clean shapes and lines. The Width Tool can help to simulate a brush line. Although to achieve structures and water color effects; the Brush Tool would be a better choice!

The Brush Tool and its options are easily to find under Menu > Window > Brushes.
On the bottom of the Brush-Option, you may find the icon for the Adobe Brush Library with all kinds of artistic brushes.

Brushes

How to create your own Brushes or alter existing Brushes in the Adobe Library, will be shown in a future tutorial.
I-Adobe FOLLOWERS are going to receive updates on this topic automatically by e-mail.

divider

Additional tutorials for advanced users:
Drawing in Illustrator for advanced users