Illustrator Tutorial:How to vectorize a photo and colorise it
I like to use my own photographs and combine them into my illustrations. Here is a cool trick on how to vectorize your own photos in Illustrator.
Illustrator Tipp:Wie man ein Foto vektorisiert und einfärbt
Ich benutze gerne meine digitalen Fotos in meinen Illustrationen. Hier ist ein cooler Trick wie Sie Ihre eigenen Photos in Illustrator vektorisieren.
Courtesy of Illustration Source
View the artists’s homage on the topic: SOCIAL MEDIA
Miriam Selmi Reed is represented by Illustration Source, New York City. Portfolio and contact: Illustration Source NYC
Illustration technique: watercolor, acrylic and pencil combined with digital mixed media using Adobe Photoshop and Illustrator.Copyright by Illustration Source, New York City.
Illustrations-Technik: Aquarell, Acryl mit Farbstift, gemischt mit Adobe Photoshop und Illustrator. Copyright by Illustration Source, New York City.
Your source for commissioned illustration: ORIGINAL ART STUDIOS in New York City.
Tutorial in English and German – Anleitung in Deutsch und Englisch
Deutsche Version siehe unten!
We just received a “coffee” donation and request from a former student for the following tutorial:
ENGLISH version:
Vectorize your hand writing (scan or photo) in Illustrator CS6 or CC and colorize it!
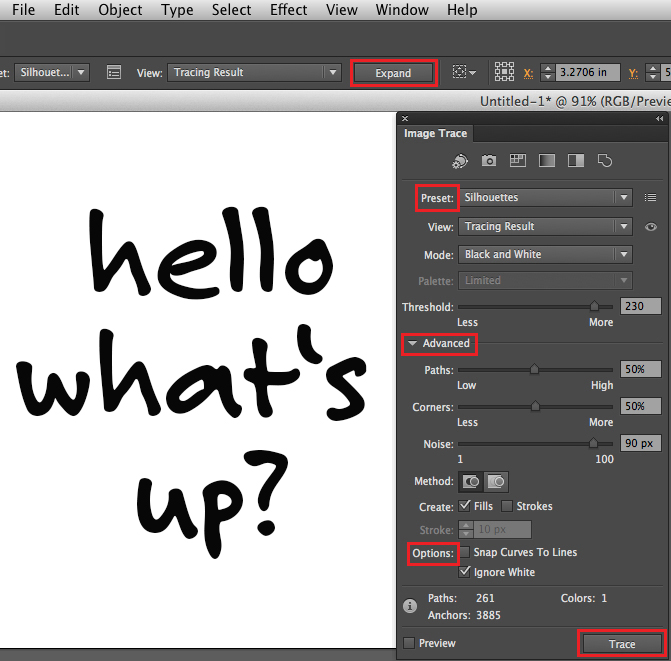
In three simple steps: 1. Place a scan or pixel image (jpg, tiff, psd) into Illustrator CS6 or CC. 2. Go to Menu > Window > Image Trace, choose your Preset, select under Advanced your Options and click on Trace. 3. When you are done, don’t forget to click on Expand in order to vectorise your image.
You may select the box “Ignore White” to delete the white background and make it transparent. Tip: Choose your Direct-Selection-Tool to colorise each font element separately and place it into your InDesign document.
(To vectorize in CS5: go under Object > Live Trace > Tracing Options.)
DEUTSCHE Version:
Dieses folgende Tutorial wurde auf Anfrage zusammengestellt, als “Danke für die Kaffee-Donation”:
Vektorisieren Sie ihre Handschrift (Scan oder digitales Foto) in Illustrator CS6 oder CC.
In drei einfachen Schritten: 1. Platzieren sie ihre Pixel-Vorlage (jpg, tiff, psd) in ihr Illustrator CS6 Dokument. 2. Gehen sie zu Menü > Fenster > Bildnachzeichner, wählen sie ihre Vorgabe, wählen zudem unter Erweitert ihre Optionen und klicken auf Nachzeichnen. 3. Wenn sie fertig sind, ist es wichtig auf Umwandeln zu klicken. Damit wird ihr Foto vektorisiert. Sie können die Box “Weiss ignorieren” anwählen um den weissen Hintergrund zu löschen. Tipp: Wählen sie das Direktauswahl-Werkzeug um jeden Buchstaben separat einzufärben und platzieren sie es in ihr InDesign Dokument.
(Um in CS5 zu vektorisieren: gehen sie unter Object > Interaktiv nachzeichnen > Nachzeichneroptionen.)
Additional option: Compound Path Release option if you are trying to colorize a font
In case you’d like to colorize a font: With the “Compound Path Release” option, you can release the paths and colorize individual parts of each letter separately. Zusatzinformation: Option “Zusammengesetzter Pfad zurückwandeln” beim einfärben von Schriften
Möchten sie einzelne Buchstaben einer Schrift einfärben: Mit der Option “Zusammengesetzter Pfad zurückwandeln” kann man die Verknüpfung aller Pfade lösen und jeder Teil innerhalb des Buchstaben einzeln einfärben.
Tutorial spoken in English & German / Schritt für Schritt Anleitung auf Deutsch und Englisch:
Tutorial in English and German / Anleitung in Deutsch und Englisch
Deutsche Version siehe unten!
English version:
Would you like to receive our tips for free in your e-mail box? Simply select FOLLOW to sign up with your e-mail address.
TIP OF THE WEEK: How to colorize a vectorized photo!
How to use the image trace option in Illustrator CS6 or CC, to vectorize and colorize a Photo – Bilingual instructions in English and German subtitles.
Step 1: Place your photo into Illustrator.
Step 2: Vectorise your photo > Window > Image Trace.
Step 3: Don’t forget to click on the button “EXPAND”.
Step 4: Edit your colors > Edit > Edit Colors.
Möchten Sie unsere gratis Tipps im e-mail erhalten? Schreiben Sie sich unter FOLLOW mit Ihrer e-mail Adresse ein.
TIPP DER WOCHE: Wie ein vektorisiertes Bild einfärbt
Tutorial: Wie man mit dem Bildnachzeichner in Illustrator CS6 oder CC arbeitet, damit ein Foto vektorisiert und einfärbt.Zweisprachige Anleitung in Englisch mit deutschen Untertiteln.
1: Platzieren Sie Ihr Bild in Illustrator.
2: Vektorisieren Sie Ihr Photo > Fenster > Bildnachzeichner.
3: Vergessen Sie nicht auf “UMWANDELN” zu klicken.
4: Färben Sie Ihr Vektorbild ein unter > Bearbeiten > Farben bearbeiten.