Mit Adobe Illustrator und dem Touch-Type-Textwerkzeug kreativ arbeiten.
Tutorial presented by Miriam Selmi Reed, REEDesign.ch
Wie man mit Hilfe des Touch-Type-Textwerkzeugs in Adobe Illustrator kreative “Wortspielereien” und Logos erstellen kann. Weitere gratis Affinity & Adobe Tutorials findest du auf i-adobe.com
Tutorial presented by Miriam Selmi Reed, REEDesign.ch
Wie man in Adobe Illustrator mit Hilfe der Verzerrungshülle und einem Gitter Musterfüllungen verzerren und verformen kann. Weitere gratis Affinity & Adobe Tutorials findest du auf i-adobe.com
Below you’ll find my personal ILLUSTRATOR Hitparade which I’m using while teaching this program.
Unten findet ihr meine persönliche ILLUSTRATOR Hitparade, welche ich benutze während ich dieses Programm unterrichte.
Seit vielen Jahren bin ich als Grafikerin/Illustratorin für Werbung, Mode, Film und Animation tätig. Arbeitsbeispiele könnt ihr hier finden: Miriam Selmi Reed
Illustration for DVD cover by Miriam Selmi Reed. www.selmi.net Illustrationstechnik: eine Mischung von Photoshop & Illustrator mit Hilfe von: Artikel über Smartobjekte
Die Tutorials sind von Peter Jäger, Roger Turnherr, Peter Müller und Miriam S. Reed von: com2publish.ch
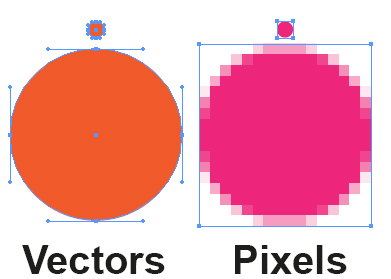
Digitale Fotos bestehen aus Pixel. Vergrössert man das Foto, wird das Bild unscharf und verpixelt.
Vektor Bilder werden mathematisch erstellt. Vergrössert man eine Vektor Datei, bleiben die Kanten scharf.
BASIC Key Topics -Kennen der Grundfunktionen von Illustrator -Sicherer Umgang in der Navigation der Oberfläche -Beherrschen der grundlegenden Konzepten der Vektorgrafik: Pfade, Zeichenstift, Pathfinder, Objekte/Ebenen/Eigenschaften, Flächen/Konturen, Text -Aufbauen und Kontrollieren von Illustrator-Dateien -Selbständiges Zeichnen und Ausgeben von einfachen Grafiken in Adobe Illustrator CC
Mit SCHNITTMASKENarbeiten: Basisbuch: Seiten 251 – 252 / Handbuch: 391 – 394 In Illustrator gibt es zwei Arten von Schnittmasken. Eine wird den Objekten zugewiesen (Beschnittgruppe). Die andere wird der Ebene zugewiesen und ist in den Ebenen als Zuschneidungspfad zu erkennen. TIPP: unter OBJEKT > SCHNITTMASKE > ERSTELLEN kann man Ebenenunabhängig arbeiten.
Mit Isolationsmodus arbeiten Basisbuch: Seite 289 / Handbuch: 395
Mit FARBEN arbeiten und in Farbfelder speichern: Basisbuch: Seiten 198 – 203 / Handbuch: 223 – 238 TIPP: mit GLOBALEN FARBEN arbeiten. Im Gegensatz zu lokalen Farben haben die GLOBALEN Farben den Vorteil, dass man diese gleichzeitig ändern kann. D.h. wenn ich dieselbe GLOBALE Farben in verschiedenen Objekten benutzt und in den Farbfelder gespeichert habe, kann ich diese dort verwalten; die Änderung wird dann in allen Objekten vorgenommen welches dieses Gelb benutzen. Info: Pantone Farben sind automatisch Global.
Mit VERLÄUFEN arbeiten: Basisbuch: Seite 206 – 214 / Handbuch: 297 – 310
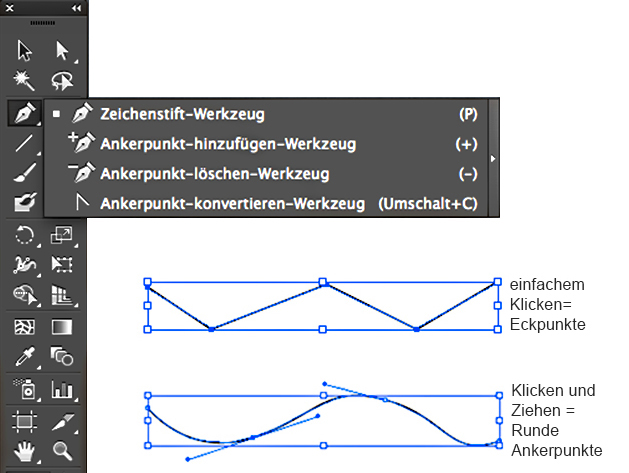
Umgang mit TEXT: Basisbuch: Seiten 318 – 343 / Handbuch: 489 – 521 TIPP: Wir unterscheiden zwischen Punkttext, dieser entsteht indem man mit dem Text-Werkzeug KLICKT und aus diesem Punkt schreibt. Dieser lässt sich wie ein Objekt verformen. Der Flächentext, wenn wir mit dem Text-Werkzeug einen Rahmen aufziehen und in diese Fläche schreiben. Ein Pfadtext, der entlang einer Kurve läuft.
ADVANCED Key Topics -Professionelle Handhabung von Illustrator CC -Verständnis für Illustrator-Konzepte entwickeln und selbständig Lösungen für Probleme erarbeiten -Das selbständige Arbeiten auch mit vielen Objekten kennenlernen -«Künstlerische» Funktionen zum Malen und fotorealistischen Gestalten umsetzen können -Effiziente Methoden zum Aufbau komplexerer Illustrationen erlernen
Arbeiten mit mehreren Zeichenflächen: Basisbuch: Seite 29 – 36 / Handbuch: 72– 74 Globale Bearbeitung über mehrere Zeichenflächen hinweg: Basisbuch: Seiten 138 – 139 / Handbuch: 296 + 616 TIPP: unter ANSICHT > ANSICHT ZUSCHNEIDEN > werden Objekte die über den Rand hinausragen ausgeblendet. Globaler oder lokaler Lineal: Basisbuch: Seite 36 / Handbuch: 85- 90
Liebe alle,
Diesen Sonntag 17. Jan. findet der erste Creative-Brunch statt.
Besucht mich von 11 bis 11:30 Uhr (Zürich Zeit) unter: 1_SundayCreativeBrunch
Auf Link klicken, Mikrofon und Kamera zulassen und los gehts!
Die Ziele dieses Creative-Brunches:
“Kreatives Arbeiten mit Text”
mit Adobe Indesign, Photoshop und/oder Illustrator.
Hier noch ein Film aus alten Zeiten zur Inspiration:
Wir freuen uns auf die neue Zusammenarbeit mit Peter Jäger und com2publish.ch!
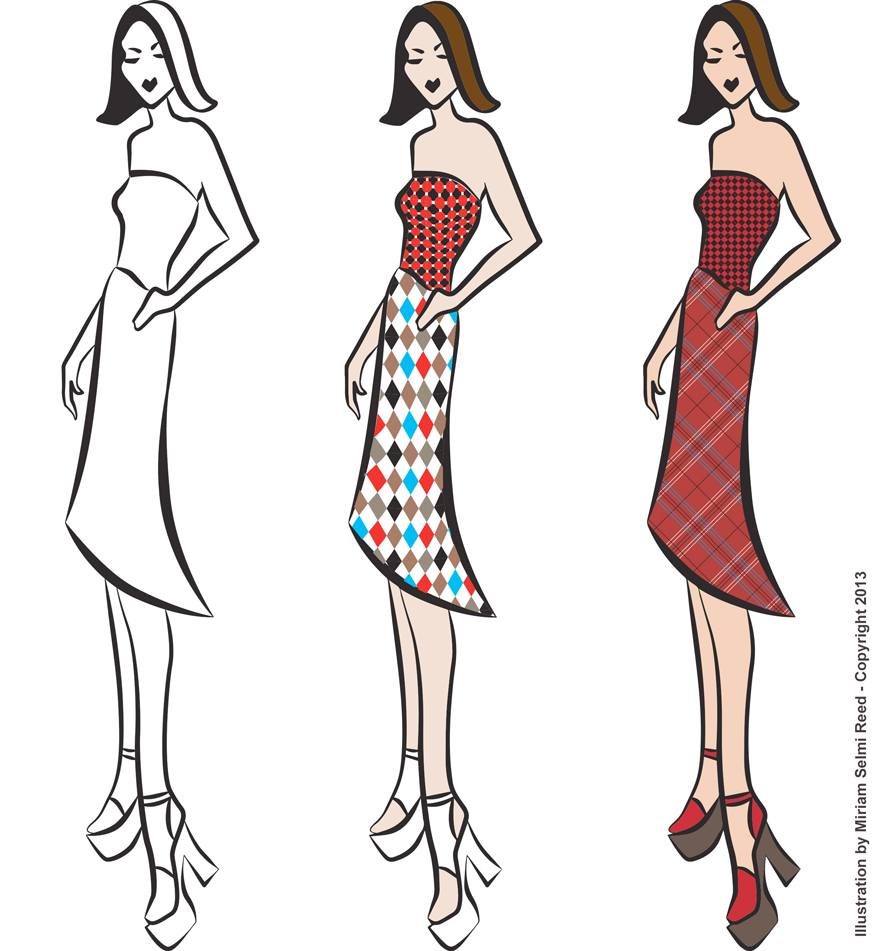
Mit Adobe Illustrator eine Figurine vektorisieren, Muster erstellen und mit einem Gitter eine 3D Wirkung erzeugen. Unser Lernfilm, klick auf diesen Link von com2publish mit Übungsdatei:Mode-Figurine selber Illustrieren mit Adobe Illustrator
Liebe alle, hier mein digisnack Webinar mit ZOOM von digicomp über Adobe Indesign.
Viel Spass beim Zuschauen, eure Miriam
Ein Thema in aller Munde: ADOBE InDesign im Vergleich zu AFFINITY Publisher.
Mein nächster Kurs am 30. August 2024 heisst somit: “Buchlayout mit InDesign oder Affinity Publisher” und wird durch den Schweizer Buchhändler- und Verleger-Verband SBVV durchgeführt. Freue mich auf euch – ein spannender Workshop!
Kurstag: Freitag, 30. August 2024 – 09.15 bis 17.00 Uhr
Anmeldeschluss: 22.08.2024
Preise: SBVV-Mitglieder: nur CHF 320.00
Nichtmitglieder: nur CHF 380.00
As instructors of Adobe programs and creative professionals, we’ve assembled this blog as easy reference for our students and clients.” Miriam Selmi Reed & Michael Alan Reed
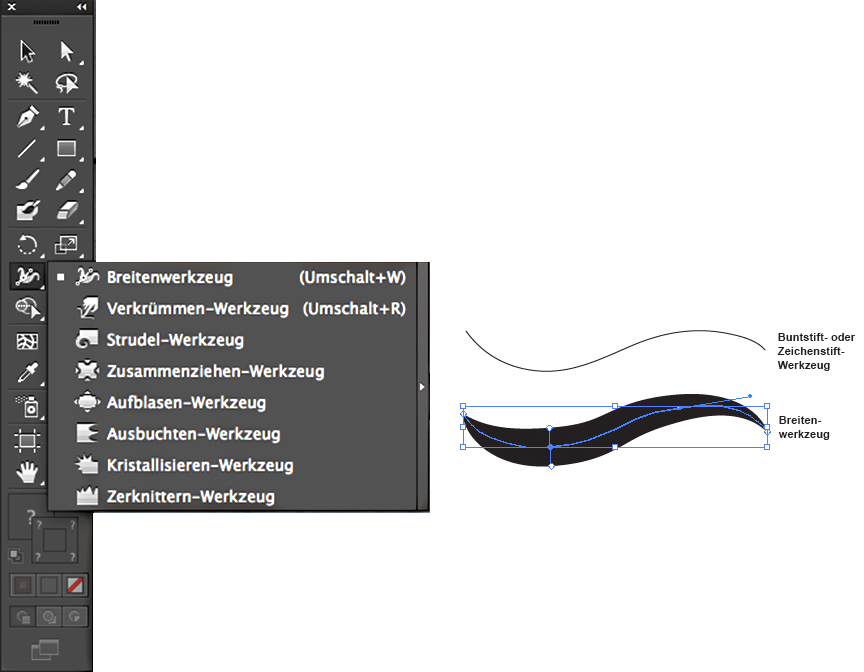
English version: Once you’ve prepared your illustration, comes the WIDTH TOOL into play:
1. Open your Illustration in Adobe Illustrator
2. Select your outlines with the Width Tool.
3. Drag on the points to adjust your line width.
Illustrations by Miriam Selmi Reed – Courtesy of Illustration Source
Deutsche Version: Wenn deine Illustration gezeichnet ist, kommt das BREITEN-WERKZEUG ins Spiel:
1. Öffne deine Illustration in Adobe Illustrator
2. Wähle deine Linien mit dem Breiten-Werkzeug.
3. Ziehe an den Punkten um die gewünschte Linienbreite zu erhalten.
Illustration technique: watercolor, acrylic and pencil combined with digital mixed media using Adobe Photoshop and Illustrator.Copyright by Illustration Source, New York City.
Illustrations-Technik: Aquarell, Acryl mit Farbstift, gemischt mit Adobe Photoshop und Illustrator. Copyright by Illustration Source, New York City.
Miriam Selmi Reed is represented by Illustration Source, New York City. Portfolio and contact: Illustration Source NYC
As instructors of Adobe programs and creative professionals, we’ve assembled this blog as easy reference for our students and clients.” Miriam Selmi Reed & Michael Alan Reed
NEW! Webinar online in English: Learn how to draw digitally with tips & tricks in combination with Photoshop.
Interested? Send me an e-mail – greetings, Mimi Reed
NEU! Webinar online in Deutsch: Digital zeichnen lernen mit Tipps & Tricks, in Kombination mit Photoshop.
Interessiert? Schreib mir ein e-mail – Grüsse, Mimi Reed
3D is on the way… Here are a couple of cool easy 3D programs to check out. Deutsch: 3D ist auf dem Weg… Unten findest du ein paar coole und einfache 3D Programme zum anschauen. Free 3D program for Mac and Windows: BLENDER
Cool and easy way to animate your drawings with GREASE PENCIL 2.8 – have a look: Deutsch: Wie du deine Zeichnungen mit GREASE PENCIL 2.8 animieren kannst:
Another 3D program called SKETCH UP is not for free but easy to use and therefore interesting to check out: Info on The 3D Program SKETCH UP Film: SKETCH UP TUTORIAL Deutsch: Ein anderes 3D Programm mit dem Namen SKETCH UP ist zwar nicht gratis aber total einfach zum lernen. Der Film-Link oben zeigt ein Tutorial.
Since you might have ADOBE CREATIVE CLOUD, you might know about the Perspective Tool in Adobe Illustrator.
Information: Perspective in Adobe Illustrator Deutsch: Da du vermutlich die ADOBE CREATIVE CLOUD hast, kennst du vermutlich das Perspektiven Werkzeug von Adobe Illustrator.
copyright by Miriam Selmi Reed – REEDesign.ch
Our 3D and animation infos will be continued soon – stay tuned!
As instructors of Adobe programs and creative professionals, we’ve assembled this blog as easy reference for our students and clients.” Miriam Selmi Reed & Michael Alan Reed
English version:
1. Open your Illustration in Adobe Illustrator
2. Select your Perspective Grid Tool. The 2 Point-Perspective pops-up.
3. Write some text, choose a color and select the BLUE Widget on the left.
4. Select your text with the Perspective Selection Tool and move it on to the grid. Now you can adjust the size.
5. Switch to the ORANGE Widget for the raster to the right and do the same there. Explore!
1. Öffne deine Illustration in Adobe Illustrator
2. Wähle das Perspektiven Raster-Werkzeug. Das 2 Punkt-Perspektiven-Raster erscheint.
3. Schreibe deinen Text, suche eine Farbe aus und klick auf das BLAUE Widget links oben.
4. Wähle den Text mit dem Perspektiven-Auswahl-Werkzeug und ziehe ihn auf den Raster.
5. Wechsle zum Orangen Widget, welches für das rechte Raster zuständig ist und mach dasselbe dort. Viel Spass beim ausprobieren.
View the artists’s homage on the topic: PERSPECTIVE
Illustration technique: watercolor, acrylic and pencil combined with digital mixed media using Adobe Photoshop and Illustrator.Copyright by Illustration Source, New York City.
Illustrations-Technik: Aquarell, Acryl mit Farbstift, gemischt mit Adobe Photoshop und Illustrator. Copyright by Illustration Source, New York City.
“As instructors of Adobe programs and creative professionals, we’ve assembled this blog as easy reference for our students and clients.” Miriam Selmi Reed & Michael Alan Reed
Deutsche Version siehe unten! Photoshop Tip: I normally use the perspective option in Photoshop, to tilt the floor; as shown in my Illustration below. I open my Photoshop file and go to EDIT > TRANSFORM and choose PERSPECTIVE. With this method, I can alter the PERSPECTIVE as I wish; by simply pulling the anchor points to change it. Hit ENTER once you’re done. Illustrator Tip: I’ve traced the outlines with Adobe Illustrator using Adobe CC: New Tracing Tools in Adobe Illustrator ALL tips of this Blog combined in one 72 pages PDF for easy download: i-adobe book in English – Preview & download here
Illustration by Miriam Selmi Reed / Courtesy of Illustration Source
Deutsche Version: Photoshop Tip: Ich benutze die Perspektiven-Option in Photoshop, um den Boden perspektivisch nach hinten zu kippen; wie man oben bei meiner Illustration sieht. Ich öffne meine Photoshop-Datei und gehe zu BEARBEITEN > TRANSFORMIEREN und wähle Perspektivisch. Mit dieser Methode kann ich die PERSPEKTIVE ändern indem ich an den Hebeln ziehe. Wichtig: mit der ENTER Taste bestätigen. Illustrator Tipp: Ich habe die neuen Zeichnungswerkzeuge von Adobe CC benutzt um die Illustration unten zu zeichnen: Neue Zeichnungswerkzeuge in Adobe Illustrator Alle Tipps von diesem Blog kombiniert in einem 72-Seiten PDF zum herunterladen: i-adobe book in Deutsch – Vorschau & Download hier
Miriam Selmi Reed is represented by Illustration Source, New York City. Portfolio and contact: Illustration Source NYC
Illustration technique: watercolor, acrylic and pencil combined with digital mixed media using Adobe Photoshop and Illustrator.Copyright by Illustration Source, New York City.
Illustrations-Technik: Aquarell, Acryl mit Farbstift, gemischt mit Adobe Photoshop und Illustrator. Copyright by Illustration Source, New York City.
Your source for commissioned illustration: ORIGINAL ART STUDIOS in New York City.
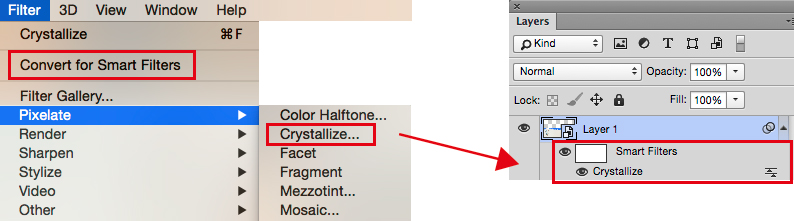
Deutsche Version siehe unten! Photoshop Tipp > SMART FILTERS: When I’m using Filters in Adobe Photoshop as shown on my Illustration below, I first go under MENU > FILTER > Convert for Smart Filters. With this method, I can apply every filter and work non-destructive. I open my layers and click on my Smart-Filter-icon which opens the previous chosen filter settings so I can make my adjustments.
More tipps on how to work with SMART OBJECTS : COMBINE Adobe Illustrator with Photoshop! ALL tips of this Blog combined in one 72 pages PDF for easy download: i-adobe book in English – Preview & download here
Deutsche Version Photoshop Tip > SMART FILTER: Wenn ich in Adobe Photoshop Filter benutze – siehe unten – dann gehe ich unter MENU > FILTER > Konvertieren für Smart Filter. Mit dieser Methode arbeite ich nicht-Destruktiv , und kann somit jeden Filter löschen oder nach Wunsch verändern. Dazu öffne ich mein Ebenen-Bedienfeld und klicke auf meinen Smart-Filter-Icon, damit sich der vorher gewählte Filter wieder öffnet und ich Änderungen vornehmen kann.
Mehr Tipps wie man mit SMART OBJEKTEN arbeitet : kombiniere Adobe Illustrator mit Photoshop! Alle Tipps von diesem Blog kombiniert in einem 72-Seiten PDF zum herunterladen: i-adobe book in Deutsch – Vorschau & Download hier
ARTIST OF THE MONTH – SIS in NYC:
Courtesy of Illustration Source
Miriam Selmi Reed is represented by Illustration Source, New York City. Portfolio and contact: Illustration Source NYC
Illustration technique: watercolor, acrylic and pencil combined with digital mixed media using Adobe Photoshop and Illustrator.Copyright by Illustration Source, New York City.
Illustrations-Technik: Aquarell, Acryl mit Farbstift, gemischt mit Adobe Photoshop und Illustrator. Copyright by Illustration Source, New York City.
Deutsche Version siehe unten! Photoshop Tip: I love to mix Photoshop and Illustrator, as shown on my Illustration below. I copy my Illustrator drawing and place it as a SMART OBJECT into my Photoshop file. With this method, I can work non-destructive and make as many changes as I wish. It shows an interesting mixture between pixels and sharp vector outlines!
More on this topic: How to use SMART OBJECTS
Deutsche Version Photoshop Tipp: Ich mische gerne Photoshop and Illustrator, wie man unten bei meiner Illustration sieht. Ich kopiere meine Illustrator Zeichnung und platziere es als SMART OBJEKT in meine Photoshop Datei. Mit dieser Methode, kann ich nicht-destruktive arbeiten und so viele Änderungen machen wie ich will. Zudem zeigt es eine interessante Mischung zwischen Pixel und harten Vektor Linien.
Mehr über dieses Thema: Wie man SMART OBJEKTE benutzt
Courtesy of Illustration Source
View the artists’s homage on the topic: THE GRADUATE
Miriam Selmi Reed is represented by Illustration Source, New York City. Portfolio and contact: Illustration Source NYC
Illustration technique: watercolor, acrylic and pencil combined with digital mixed media using Adobe Photoshop and Illustrator.Copyright by Illustration Source, New York City.
Illustrations-Technik: Aquarell, Acryl mit Farbstift, gemischt mit Adobe Photoshop und Illustrator. Copyright by Illustration Source, New York City.
Your source for commissioned illustration: ORIGINAL ART STUDIOS in New York City.
Tutorial in English and German / Anleitung in Deutsch und Englisch
Deutsche Version siehe unten!
English: How I form the photo pattern in Adobe Illustrator: I go under MENU > OBJECT > ENVELOPE DISTORT > ENVELOPE OPTIONS and choose “Distort Pattern Fills”.
Then I go to MENU > ENVELOPE DISTORT > MAKE WITH MESH and select the Rows and Columns I want.
Then I choose the Direct Selection Tool (White Arrow) and move the points until I get the shape I want!
Deutsch: Wie ich das Muster in Adobe Illustrator verziehe und forme: Ich gehe unter MENÜ > OBJEKT > HÜLLEN > HÜLLEN-OPTIONEN und wähle “Musterfüllungen verzerren” .
Dann gehe ich zu MENÜ > OBJEKT > GITTER > HÜLLENGITTER und wähle meine Zeilen und Spalten.
Dann nehme ich das Direkt-Auswahl-Werkzeug (Weisser Pfeil) und ziehe an den Punkten bis ich mein gewünschtes Resultat erreicht habe!
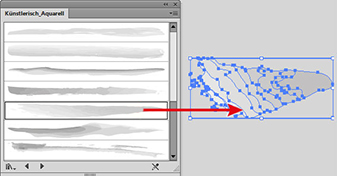
English: How I make my own brushes in Illustrator: The brushes used in the illustration below are part of the “Artistic Watercolor Brushes” found under MENU > WINDOW > BRUSHES > Library. I drag the brush I like out of the Library on to the drawing board.
Then I make changes to the brush and drag it into my regular Brushes-Window . There are 3 different brush-options, I prefer the Art Brush myself. Then I select the box the “Colorization Method > Tints”, so I can color my brush stroke later on.
Deutsch: Wie ich meine eigenen Pinsel in Illustrator erstelle: Ich benutze meistens einen bestehenden Pinsel unter MENÜ > FENSTER > PINSEL. Die Pinsel die ich unten bei meiner Illustration benutzte, sind Teil der “Künstlerisch Aquarell Palette” in der Pinselbibliothek. Ich ziehe einen Pinsel der mir gefällt aus der Pinsel-Bibliothek auf die Zeichenfläche.
Dann verändere ich den Pinselstrich so wie ich ihn haben möchte und ziehe ihn in mein normales Pinselbedienfeld . Es gibt 3 verschiedene Pinsel-optionen die man ausprobieren sollte. Ich ziehe den Bildpinsel vor. Wichtig ist einzig die Option Methode “Einfärben > Farbtöne” anzuwählen, damit ich den Pinsel auch später nach Bedarf anders einfärben kann.
Miriam Selmi Reed is represented and licensed by Illustration Source – Courtesy of Illustration Source
View the artists’s homage on the topic: TAKE FLIGHT
Miriam Selmi Reed is represented by Illustration Source, New York City. Portfolio and contact: Illustration Source NYC
Illustration technique: watercolor, acrylic and pencil combined with digital mixed media using Adobe Photoshop and Illustrator.Copyright by Illustration Source, New York City.
Illustrations-Technik: Aquarell, Acryl mit Farbstift, gemischt mit Adobe Photoshop und Illustrator. Copyright by Illustration Source, New York City.
Tutorial in English and German / Anleitung in Englisch und Deutsch
Deutsche Version siehe unten!
English version:
Open a new document in Adobe Illustrator CS6 or CC:
1. Go to MENU > OBJECT > PATTERN > MAKE.
Create your pattern inside the blue box. Illustrator is going to create your pattern as a repeat automatically.
2. Once you are done, simply select the DONE button, this way Illustrator adds the pattern (repeat) into your Swatch Library. Now you can fill your fashion silhouette or object with your pattern.
3. To make a change to your newly created pattern: Go to OBJECT > PATTERN > EDIT PATTERN. Make your changes and click on DONE if you like to save over the old pattern or click on SAVE A COPY in case you like to add a new swatch and keep the previous one.
For more tips watch the step-by-step Tutorial:
Our new i-adobe book is available online – in English – including tutorials on 72 pages – Preview & download here!
Deutsche Version:
Öffnen Sie ein neues Dokument in Adobe Illustrator CS6 oder CC:
1. Gehen Sie zu MENÜ > OBJEKT > MUSTER > ERSTELLEN. Illustrator erstellt automatisch ihr Muster als Rapport innerhalb des blauen Rahmens.
2. Sobald Sie mit Ihrem Muster fertig sind, klicken Sie oben auf FERTIG. Damit wird Ihr Muster (Rapport) in Ihr Farbfeld-Bedienfeld eingefügt. Jetzt können Sie Ihr Muster in Ihr Objekt oder Illustration als Flächefarbe einfüllen.
3. Falls Sie Ihr Muster ändern möchten: Gehen Sie zu OBJEKT > MUSTER > MUSTER BEARBEITEN. Klicken Sie auf FERTIG wenn Sie das alte Muster überspeichern wollen oder klicken Sie auf KOPIE SPEICHERN wenn Sie es als neues Muster speichern wollen.
Schritt-für-Schritt Anleitung auf Englisch mit deutschen Untertitel:
Unser neues i-adobe book ist erhältlich online – in Deutsch – inklusive Tutorials auf 72 Seiten – Vorschau & Download hier!
Tutorial in English and German / Anleitung in Deutsch und Englisch
Deutsche Version siehe unten! English version:
Would you like to receive our tips for free in your e-mail box? Simply select FOLLOW to sign up with your e-mail address.
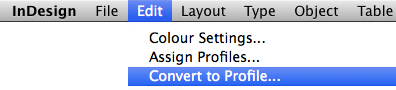
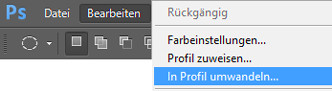
TIP OF THE WEEK: What is the difference between assign a color profile or to convert a color profile?
Here it is in Photoshop: Menu > Edit > Convert to Profile (right above: Assign Profile!)
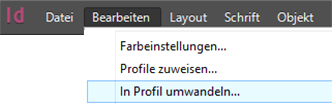
In InDesign: Menu > Edit > Convert to Profile (right above: Assign Profile!)
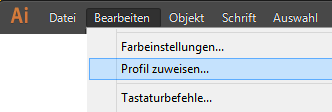
And here in Illustrator: Menu > Edit > Assign Profile (Convert to does NOT exist!)
Tip: To assign a color profile only changes the appearance on the monitor. You can try that out, in that you are opening “Assign Profile”, and activate “Preview” while choosing different CMYK-profiles – the view on the monitor changes! If you open the Info-window as well, you can see, that the CMYK values are NOT changing.
If you CONVERT a CMYK color profil; your CMYK values will change!
Möchten Sie unsere gratis Tipps in Ihrem e-mail erhalten? Schreiben Sie sich unter FOLLOW mit Ihrer e-mail Adresse ein.
TIPP DER WOCHE: Was ist der Unterschied zwischen Farbprofil zuweisen oder umwandeln?
Hier ist es in Photoshop: Bearbeiten > in Profil umwandeln (gleich oberhalb: Profil zuweisen!)
In InDesign: Menu > Barbeiten > in Profil umwandeln (gleich oberhalb: Profil zuweisen!)
Und hier in Illustrator: Menu > Bearbeiten > Profil zuweisen (Umwandeln existiert nicht!)
Tipp: Das Zuweisen des Profils ändert nur die Darstellung am Bildschirm. Das kann man sehr gut ausprobieren, in dem man den Dialog “Profil zuweisen” öffnet, die checkbox “Vorschau” aktiviert und nacheinander verschiedene CMYK-Profile anwählt – die Bildschirmdarstellung verändert sich! Wenn man aber das Info-Bedienfeld offen hat, sieht man, dass sich die CYMK-Werte in der Datei NICHT verändern.
Wenn man aber ein CMYK Profil in ein anderes “umwandelt” werden die CYMK-Werte geändert!
Tutorial in English and German / Anleitung in Deutsch und Englisch
Deutsche Version siehe unten! English version:
TIP OF THE WEEK: How to make simple animations
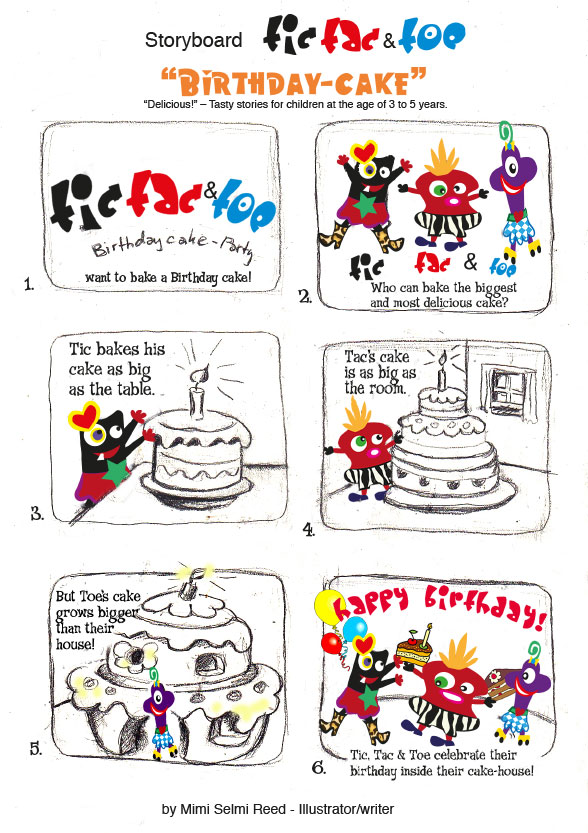
1. Tip: Draw a storyboard or write your concept in advance – see sample below:
2. in my case: to feel the characters and their movements I made a simple animated GIF using the timeline in Adobe Photoshop:
-Draw your characters in several positions
-Open them in Adobe Photoshop and go to WINDOW > TIMELINE Tutorial: How to create frame animations in Photoshop
-save it as an ANIMATED GIF with a loop – under FILE > EXPORT > Save for Web:
Copyright by Mimi Selmi Reed – for TigerBooks Germany
In order to complete the following animated ebook, I’ve used tigercreate, which runs similar like every animation program by using a timeline with frames:
Written, illustrated and animated by Mimi Selmi Reed & sound design by Mike Reed REEDesign.ch – all rights reserved. Z-DOG for Tigerbooks Germany.
Deutsche Version:
TIPP DER WOCHE: Wie man einfache Animationen erstellen kann
1. Tipp: Zeichnen Sie ein Storyboard oder schreiben Sie ein Konzept im voraus – siehe Beispiel:
2. Um ein Gespür für meine Charakteren und ihre Bewegungen zu erhalten, erstellte ich kurz ein animiertes GIF mit einer Zeitleiste in Adobe Photoshop:
-Zeichnen Sie ihre Charakteren in mehreren Positionen
-Öffnen Sie diese in Adobe Photoshop und gehen Sie zu FENSTER > ZEITLEISTE Tutorial: Erstellen von Frame-Animationen in Photoshop
-speichern Sie es als ANIMIERTES GIF mit einem Loop – unter DATEI > EXPORTIEREN > Speichern für Web:
Copyright by Mimi Selmi Reed – for TigerBooks Germany
Um dieses animierte ebook fertigzustellen, benutzte ich tigercreate, welches ähnlich funktioniert wie jedes Animations Programm. Nämlich mit einer Zeitleiste:
Written, illustrated and animated by Mimi Selmi Reed & sound design by Mike Reed REEDesign.ch – all rights reserved. Z-DOG for Tigerbooks Germany.
Illustrator Tipp > WIDTH TOOL: When I’m using any lines as shown on my Illustration below, I usually use the Width Tool. The Width Tool in Adobe Illustrator is ideal to give your lines character: select the line and drag with the mouse to define the width of your choice.
Deutsche Version:
Illustrator Tip > BREITEN-WERKZEUG: Wenn ich bei meinen Illustrationen (siehe unten) verschiedene Linienstärken benutze, dann benutze ich das Breiten-Werkzeug. Das Breitenwerkzeug in Adobe Illustrator ist ideal um einer simplen Linie einen Pinsel-Charakter zu geben: die Linie anklicken und mit der Maus ZIEHEN bis die Linie breiter wird.
Miriam Selmi Reed represented and licensed by Illustration Source – Courtesy of Illustration Source
Miriam Selmi Reed is represented by Illustration Source, New York City. Portfolio and contact: Illustration Source NYC
Illustration technique: watercolor, acrylic and pencil combined with digital mixed media using Adobe Photoshop and Illustrator.Copyright by Illustration Source, New York City.
Illustrations-Technik: Aquarell, Acryl mit Farbstift, gemischt mit Adobe Photoshop und Illustrator. Copyright by Illustration Source, New York City.
Your source for commissioned illustration: ORIGINAL ART STUDIOS in New York City.