Photoshop resolution / Auflösung

Tutorial in English and German / Anleitung in Deutsch und Englisch

Deutsche Version siehe unten!
divider

English version:

TIP OF THE WEEK: How to reduce or enlarge a Photoshop file

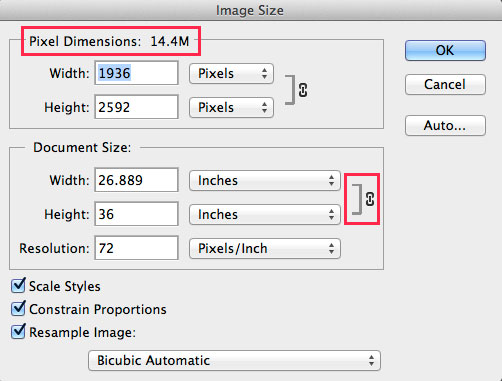
Below I show the steps of my job; to prepare my illustration at a 300 dpi resolution, 7 inches wide for Adobe InDesign. Go to MENU > IMAGE > IMAGE SIZE:

reduceImage

In my example I use 7 inches Width, because I will place this image in my InDesign document with this size. In your case, you simply use your desired Width (or Height) and place it into your InDesign document at a 100%. With this method you will retain the 300 dpi resolution for the professional printing press.

divider

Deutsche Version:

TIPP DER WOCHE: Wie man ein Bild in Photoshop vergrössert oder verkleinert.

Unten zeige ich die Arbeitsschritte; wie ich meine Illustration auf 300 dpi ändere und als 15 cm breites Bild für Adobe InDesign vorbereite. Gehen Sie zu MENÜ > BILD > BILDGRÖSSE:

reduceImageD

In meinem Beispiel benutze ich 15 cm Breite, weil ich dieses Bild mit diesen Massen in meinem InDesign Dokument benötige. Benutzen Sie in Ihrem Fall Ihre gewünschten Masse und platzieren Sie es zu 100% Grösse in Ihr InDesign Dokument. Mit dieser Methode werden Sie die 300 dpi für die professionelle Offset-Druckmaschine beibehalten.

Advertisement

Pixel is King!

English version:

Would you like to receive our tips for free in your e-mail box? Simply select FOLLOW to sign up with your e-mail address.

TIP OF THE WEEK: How to change the image size of a photo in Adobe Photoshop

divider

Teaching Photoshop for so many years, we’ve come across the same issues over and over again. One of the major problems especially for beginners is; how to re-size an image to 300 Pixels/Inch for print. Actually it is VERY simple: All a user has to understand is that Photoshop is based on pixels.
Simply pay attention to the “Pixel Dimensions” while changing the size of the image. The Pixel Dimensions should always remain the same! Reason: if Photoshop deletes Pixels or adds on Pixels, our image quality changes for the worse, gets blurry etc.

Step 1: Open the image in Photoshop CS6. Go to MENU > IMAGE > IMAGE SIZE.
Pay attention to the Pixel Dimensions which should remain the same. The Width and Height are linked together.

1E

Step 2: Click off the Box “Resample Image” now the Width, Height and Resolution are linked together. Pay attention to the Pixel Dimensions on top. They are the same as before.

2E

Step 3: Type in the Resolution field 300 Pixels/Inch for print. Notice that the Pixel Dimensions stay the same.
This means that we have changed the size of the image BUT, the Pixel Dimensions remain the same, so we have optimal quality for print.

3E

Keep in mind that DPI is not PPI is not LPI and although there are many opinions as to the best re-sizing methods, one should at least utilize and compare the results of the 6 different re-sampling methods available at the bottom of the Photoshop image size dialog box, as the Automatic default setting “Bicubic Automatic” may not always be optimal.

TIP 2: how to enlarge an image in Photoshop CC