Tutorial in English and German – Anleitung in Deutsch und Englisch
Deutsche Version siehe unten!
![]()
English version:
Let’s try to keep it as simple as possible for beginners and open Adobe Photoshop to get familiar with the different color options.
Open your Color Picker by double-clicking the Foreground Color on the Tool bar. There you can see the HSB colors (Hue, Brightness, Saturation), the RGB colors (for monitors, such as web) incl. the HEX code, the CMYK colors (for the printing process) and the LAB colors.
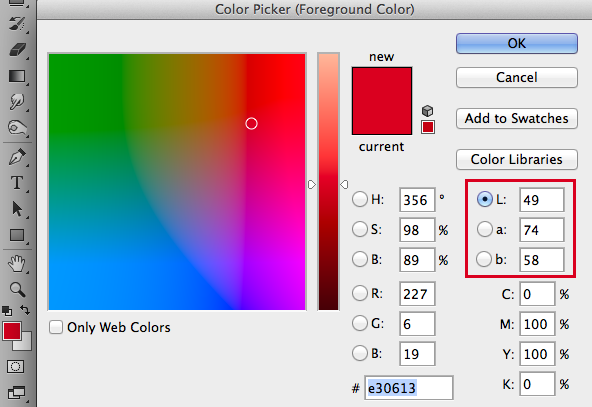
In short, Lab colors are based on a mathematical color model. The L stands for the brightness, the a and b for the color information. In the a chanel you’ll find the pixel information for red/green, in the b chanel for blue/yellow.
You can change the brightness in the Lab color mode separately from the colors, this is neither with RGB nor with CMYK possible. To get the best result, change your image to 16 Bit and then go to Image > Mode > Color and select Lab Color. With this change you won’t loose color information since the Lab mode has even more colors than RGB.
Then start working with your Curves to alter the brightness of your image and leave the colors as is. This is very practical! Just don’t forget to change the Color Mode back to RGB and go back 8 Bit at the end when you’re done.
More infos on color profiles: Color Profiles
More infos on RGB / sRGB colors: RGB / sRGB
![]()
Deutsche Version:
Wir versuchen das ganze so einfach wie möglich für Anfänger zu halten, daher öffnen wir mal Photoshop und schauen uns alle Farbmöglichkeiten an.
Öffnen Sie Ihren Farbwähler mit einem Doppelklick auf die Vordergrundfarbe unten auf Ihrer Werkzeugleiste. Dort können Sie die HSB Farben (Hue, Brightness, Saturation), die RGB Farben (für Monitore, z.B. für Webseiten) inkl. HEX Code, die CMYK Farben (Prozessfarben für die Druckerei) und die LAB Farben.

Kurz erklärt, basieren die LAB Farben auf einem mathematischen Farbmodell. Das L steht für Helligkeit, das a und b für die Farbinformationen. Im a Kanal findet man die Pixel Infos für rot/grün, im b Kanal für blau/gelb.
Im Lab Mode kann man die Helligkeit separat von den Farben verändern, dies ist bei den RGB und CMYK Modellen nicht möglich. Am besten zuerst das Foto auf 16 Bit umwandeln um optimale Bildqualität zu erhalten und dann unter Bild > Modus > Farbe auf den Lab Modus wechseln. Damit gibt es keinen Qualitätsverlust wie von RGB auf CMYK, da der Lab Farbraum einiges grösser ist als der RGB Farbraum.
Dann kann man mit den Gradatationskurven arbeiten, nur um die Helligkeit des Bildes zu verändern. Eine praktische Sache! Am Schluss ist es einfach wichtig nicht zu vergessen, den Bildmodus wieder auf RGB zu setzen und auf 8 Bit zurückzustellen.
Weitere Infos zu Farbprofilen: Farbprofile
Weitere Infos zu RGB / sRGB Farben: RGB / sRGB


