Photoshop Frequenztrennung

Empfohlenes Lehrmittel: www.rheinwerk-verlag.de (Thema Hautretusche: Seiten 293 – 300)

Diese Technik kommt von Natalia Tafarell – das Tutorial von Peter Jäger findet ihr auf: com2publish.ch

Um eine Hautretusche professionell zu retuschieren empfiehlt sich oft eine Frequenztrennung. Siehe Seite 315

Der Grund ist einfach: die Struktur der Haut wird damit von der Farbinformation getrennt.
Erst danach beginnt die eigentliche Retusche.

  • Öffnen eines hochaufgelösten Bildes in Photoshop.
  • Duplizieren der Ebene und z.B. mit “Farben” benennen.
  • Nochmals die Ebene duplizieren und z.B. mit “Struktur” benennen.
  • Ebene “Farben” aktivieren und unter Filter > Weichzeichnungsfilter > Gaußscher Weichzeichner wählen und beim Radius 7 Pixel eingeben:
  • Die obere Ebene “Struktur” aktivieren das Bild für den Hochpassfilter vorbereiten.
  • Unter Bild > Korrekturen > Helligkeit/Kontrast folgende Werte eingeben:
  • Danach unter Filter > Sonstige Filter > Hochpass wählen und wieder beim Radius 7 Pixel eingeben:
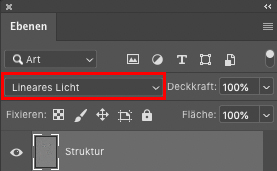
  • In der Ebene “Struktur” beim Mischmodus “Lineares Licht” wählen um den Hochpass zu testen.


    Dann auf der Struktur-Ebene mit dem retuschieren beginnen. (Mit der Option “Aufnehmen: Aktuelle Ebene”)
    Mit den üblichen Retusche-Werkzeugen wie z.B. Bereichsreparatur-Pinsel, Reparatur-Pinsel usw.
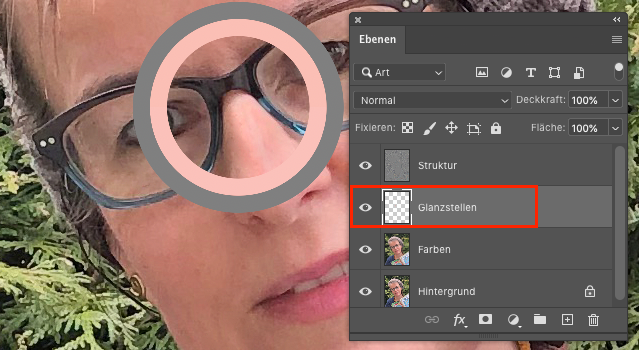
    Siehe Tutorial von Adobe: Retusche-Werkzeuge kennenlernen und nutzen!
  • Um Glanzstellen zu reduzieren; eine neue Ebene unter der Struktur Ebene erstellen und z.B. mit “Glanzstellen” benennen. Mit einem Pinsel, Deckkraft ca. 20 bis 50% und einer 0% Härte die Glanzstellen sanft übermalen. Tipp: Mit der Alt-Taste aktiv erscheint das Pipetten-Werkzeug, womit man den Hautton aufnehmen und übertragen kann.

Diese Vorgehensweise und weitere Tutorials findet ihr bei Peter Jäger auf: com2publish.ch


Bei Hautretuschen gilt wie immer “weniger ist mehr” und üben, üben, üben …

Viel Spass mit Photoshop!

Miriam S. Reed

Meine persönlichen Adobe Tipps als praktisches eBook (PDF):

i-adobe Ebook inklusive Filme, auf 72 Seiten auf Deutsch: SICHERER DOWNLOAD

i-adobe Ebook including films, 72 pages, is available in English: EASY DOWNLOAD

Advertisement

Retouch!

As instructors of Adobe programs and creative professionals, we’ve assembled this blog as easy reference for our students and clients.” Miriam Selmi Reed & Michael Alan Reed

Deutsche Version – siehe unten!

1. Open your image in Adobe Photoshop.
2. Open your layers under Window > Layers.
3. Add a new empty layer on top.
4. Select either the Stamp-Tool or the Healing-Brush-Tool.
5. Make sure you select the command ALL LAYERS on top!
6. When clicking the ALT Key, the Healing-Brush-Tool (or Stamp-Tool) samples the part you are selecting. Have a look below.
7. Then you click on the part you wish to retouch. No worries: you are stamping on an empty layer, use the eraser tool if you need to make corrections.

Sharing infos & tips: iADOBE FORUM Our tips: i-adobe eBook in English

Illustration by Miriam Selmi Reed – Courtesy of Illustration Source

Deutsche Version:

1. Öffne dein Bild in Adobe Photoshop.
2. Öffne deine Ebenen unter Menu > Ebenen.
3. Erstelle eine neue leere Ebene ganz oben.
4. Wähle entweder das Stempel-Werkzeug oder den Bereichsreparatur-Pinsel.
5. Ganz wichtig: oben in der Steuerung ALLE EBENEN auswählen!
6. Wenn du den ALT Key drückst, wird der Bereichsreparatur-Pinsel (oder Stempel) den Teil aufnehmen den du haben willst. Siehe oben.
7. Danach klickst du auf den Teil den du retuschieren willst. Keine Sorge: du stempelst auf einer leeren Ebene, falls nötig, benutzt du den Radiergummi für Korrekturen.

Tipp! Adobe Photoshop für Tutorial-Freunde: Die komplette Übersetzung von Englisch zu Deutsch: Übersetzung Englisch > Deutsch in Photoshop CC

Tausche dich aus im iADOBE FORUM! Unsere Tipps: i-adobe eBook in Deutsch

divider

Courtesy of Illustration Source

View the artists’s homage on the topic: TIME!

Illustration technique: watercolor, acrylic and pencil combined with digital mixed media using Adobe Photoshop and Illustrator.Copyright by Illustration Source, New York City.

Illustrations-Technik: Aquarell, Acryl mit Farbstift, gemischt mit Adobe Photoshop und Illustrator. Copyright by Illustration Source, New York City.

Tip of the week: Retouch Layer / Tipp der Woche: Retuschenebene

divider

TIP OF THE WEEK: how I retouch my illustrations using the Stamp Tool and Healing Brush Tool in Photoshop CC or CS6. I place on an empty layer on top – while I select the option ALL LAYERS in the Control Bar – then I click the ALT key to sample and start stamping. 😉

Miriam Selmi Reed is represented and licensed by Illustration Source – Courtesy of Illustration Source

Miriam Selmi Reed is represented and licensed by Illustration Source – Courtesy of Illustration Source

TIPP DER WOCHE: Wie ich meine Illustrationen retuschiere mit dem Stempel Werkzeug oder dem Reparaturpinsel ist einfach. Ich benutze eine leere Ebene die ich ganz oben einfüge. Dann drücke ich die ALT Taste um einen sauberen Bereich aufzunehmen – mit der Option ALLE EBENEN aufnehmen in der Steuerung – und stemple vor mich hin. 😉
divider

Miriam Selmi Reed is represented and licensed by Illustration Source - Courtesy of Illustration Source

Miriam Selmi Reed is represented and licensed by Illustration Source – Courtesy of Illustration Source

View the artists’s homage on the topic: MENTAL HEALTH

Miriam Selmi Reed is represented by Illustration Source, New York City. Portfolio and contact: Illustration Source NYC

Illustration technique: watercolor, acrylic and pencil combined with digital mixed media using Adobe Photoshop and Illustrator.Copyright by Illustration Source, New York City.

Illustrations-Technik: Aquarell, Acryl mit Farbstift, gemischt mit Adobe Photoshop und Illustrator. Copyright by Illustration Source, New York City.

divider

Your source for commissioned illustration: ORIGINAL ART STUDIOS in New York City.

OAS

Portfolio Original Art Studios, New York City: MIRIAM SELMI REED

Original Art Studios

Happy to announce that I just became part of the ORIGINAL ART STUDIOS in New York City.

OAS

Portfolio Original Art Studios, New York City: MIRIAM SELMI REED

Courtesy of Illustration Source

Illustration by Miriam Selmi Reed | Courtesy of Illustration Source, all rights reserved

Find out more or request a catalog – email: oas@illustrationsource.com
© Original Art Studios, 2015 | 15 East 32nd Street 7th Floor, New York, NY 10016 | USA | Illustration Source | Portfolio > Illustrationsource.com

divider

TIP OF THE WEEK: how I retouch my illustrations using the Stamp Tool and Healing Brush Tool in Photoshop CC or CS6. I place on an empty layer on top – while I select the option ALL LAYERS in the Control Bar – then I click the ALT key to sample and start stamping. 😉

Illustration by Miriam Selmi Reed / Courtesy of Illustration Source, all rights reserved

Illustration by Miriam Selmi Reed / With courtesy of Illustration Source, all rights reserved

TIPP DER WOCHE: Wie ich meine Illustrationen retuschiere mit dem Stempel Werkzeug oder dem Reparaturpinsel ist einfach. Ich benutze eine leere Ebene die ich ganz oben einfüge. Dann drücke ich die ALT Taste um einen sauberen Bereich aufzunehmen – mit der Option ALLE EBENEN aufnehmen in der Steuerung – und stemple vor mich hin. 😉

What are LAB colors good for? / Für was benutzt man LAB Farben?

Tutorial in English and German – Anleitung in Deutsch und Englisch

Deutsche Version siehe unten!
divider

English version:
Let’s try to keep it as simple as possible for beginners and open Adobe Photoshop to get familiar with the different color options.
Open your Color Picker by double-clicking the Foreground Color on the Tool bar. There you can see the HSB colors (Hue, Brightness, Saturation), the RGB colors (for monitors, such as web) incl. the HEX code, the CMYK colors (for the printing process) and the LAB colors.

Screen Shot 2014-05-11 at 4.42.20 PM

In short, Lab colors are based on a mathematical color model. The L stands for the brightness, the a and b for the color information. In the a chanel you’ll find the pixel information for red/green, in the b chanel for blue/yellow.

You can change the brightness in the Lab color mode separately from the colors, this is neither with RGB nor with CMYK possible. To get the best result, change your image to 16 Bit and then go to Image > Mode > Color and select Lab Color. With this change you won’t loose color information since the Lab mode has even more colors than RGB.

Then start working with your Curves to alter the brightness of your image and leave the colors as is. This is very practical! Just don’t forget to change the Color Mode back to RGB and go back 8 Bit at the end when you’re done.

More infos on color profiles: Color Profiles

More infos on RGB / sRGB colors: RGB / sRGB

divider

Deutsche Version:
Wir versuchen das ganze so einfach wie möglich für Anfänger zu halten, daher öffnen wir mal Photoshop und schauen uns alle Farbmöglichkeiten an.
Öffnen Sie Ihren Farbwähler mit einem Doppelklick auf die Vordergrundfarbe unten auf Ihrer Werkzeugleiste. Dort können Sie die HSB Farben (Hue, Brightness, Saturation), die RGB Farben (für Monitore, z.B. für Webseiten) inkl. HEX Code, die CMYK Farben (Prozessfarben für die Druckerei) und die LAB Farben.

colors

Kurz erklärt, basieren die LAB Farben auf einem mathematischen Farbmodell. Das L steht für Helligkeit, das a und b für die Farbinformationen. Im a Kanal findet man die Pixel Infos für rot/grün, im b Kanal für blau/gelb.

Im Lab Mode kann man die Helligkeit separat von den Farben verändern, dies ist bei den RGB und CMYK Modellen nicht möglich. Am besten zuerst das Foto auf 16 Bit umwandeln um optimale Bildqualität zu erhalten und dann unter Bild > Modus > Farbe auf den Lab Modus wechseln. Damit gibt es keinen Qualitätsverlust wie von RGB auf CMYK, da der Lab Farbraum einiges grösser ist als der RGB Farbraum.

Dann kann man mit den Gradatationskurven arbeiten, nur um die Helligkeit des Bildes zu verändern. Eine praktische Sache! Am Schluss ist es einfach wichtig nicht zu vergessen, den Bildmodus wieder auf RGB zu setzen und auf 8 Bit zurückzustellen.

Weitere Infos zu Farbprofilen: Farbprofile

Weitere Infos zu RGB / sRGB Farben: RGB / sRGB