Möchten Sie unsere gratis Tipps im e-mail erhalten? Schreiben Sie sich unter FOLLOW mit Ihrer e-mail Adresse ein.
TIPP DER WOCHE: Passen Sie Ihren Text magnetisch am Grundlinienraster an.
Der Grundlinienraster bei Adobe InDesign ist perfekt um Ihren Text darauf magnetisch auszurichten!
Hier die 4 einfachen Schritte wie man den Raster auf den Zeilenabstand des Textes ausrichtet und Ihren Grundlinienraster nach Wunsch anpassen kann:
Schritt 1: Öffnen Sie InDesign und bestimmen Ihre Dokumentvorgaben, unter Ränder bestimmen Sie Ihren Abstand von oben (in unserem Fall 24mm):
Schritt 2: Ziehen Sie einen Textrahmen auf und füllen diesen mit Platzhaltertext. Bestimmen Sie zusätzlich Ihre Schrift nach Wahl sowie den Zeilenabstand (in unserem Fall 16 Punkt). Gehen Sie zu Fenster > Ansicht > Raster & Hilfslinien > Grundlinienraster einblenden.
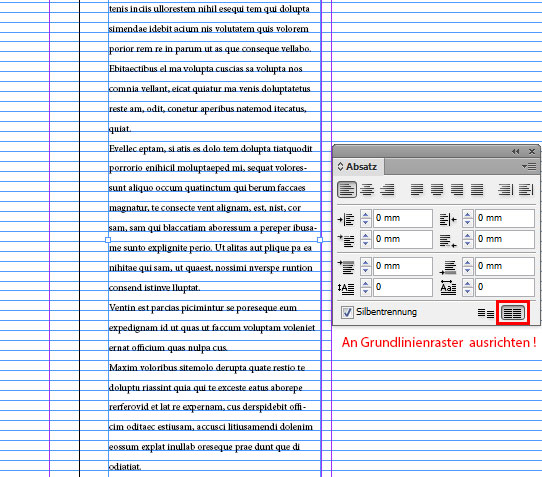
Schritt 3: Wählen Sie Ihren Text mit dem Textwerkzeug an und gehen zum Absatzbedienfeld. Dort wählen Sie die Funktion An Grundlinienraster ausrichten.
Dieselbe Funktion finden Sie wenn Sie ein neues Absatzformat erstellen.
Schritt 4: Wählen Sie Ihre Voreinstellungen und verändern unter Raster die Einstellungen entsprechend Ihren Layoutvorgaben die Sie vorher gewählt haben. (PC: Menü > Bearbeiten > Voreinstellungen / Mac: Menü > InDesign > Voreinstellungen).
Bei Anfang wählen Sie denselben Rand von oben den sie am Anfang beim erstellen des Dokuments gewählt haben (in unserem Fall 24mm). Unter Einteilung alle: den Zeilenabstand den Sie voher gewählt haben (in unserem Fall 16 Punkt).
Sobald Sie OK klicken passt sich der Grundlinienraster Ihrem Zeilenabstand an!
Unser neues i-adobe book ist erhältlich online – in Deutsch – inklusive Tutorials auf 72 Seiten – Vorschau & Download hier!
i-Adobe interactive book / Cover illustration: Michael Alan Reed
Would you like to receive our tips for free in your e-mail box? Simply select FOLLOW to sign up with your e-mail address.
TIP OF THE WEEK: Align your text to your baseline grid!
The Baseline Grid in Adobe InDesign is perfect to align your text!
Here are the 4 easy steps to align your text to the Baseline Grid and alter the grid in your InDesign > Preferences:
Step 1: Open a document in InDesign and choose your presets; under Margins select you border from the Top as you wish:
Step 2: Select the Type Tool, draw a text frame and fill it with Placeholder Text. Select your font type as well as your Leading. Go to View > Grids & Guides > Show Baseline Grid.
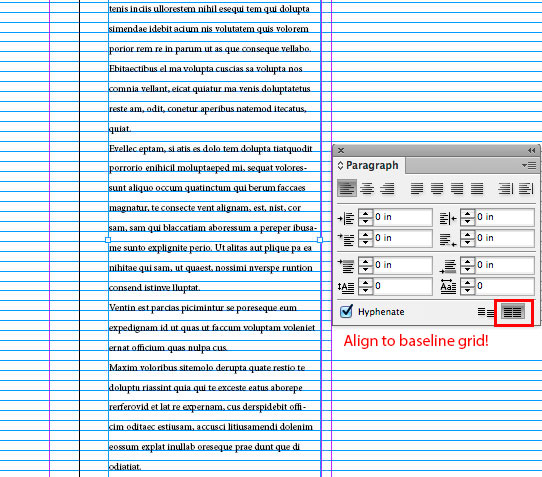
Step 3: Select your text with the type tool and go to Window > Type & Tables > Paragraph. There you select the function Align to Baseline Grid.
You’ll find the same option when you create a new Paragraph Style.
Step 4: Go to your InDesign Preferences and select Grids: the settings are the same as you’ve chosen previously. Under Start, you select the same Margins from the Top and under Increment Every the same Leading you’ve already chosen for your text. For PC the Preferences can be found under Edit > Preferences / Mac: InDesign > Preferences.
As soon as you click OK, your Baseline Grid will automatically adjust to your leading!
Our new i-adobe book is available online – in English – including tutorials on 72 pages – Preview & download here!
i-Adobe interactive book / Cover illustration: Michael Alan Reed
Wir wünschen allen Kunden, Freunden und Verwandten frohe Festtage und “ein super 2014”!
We wish all our clients, friends and relatives happy holidays and a splendid 2014!
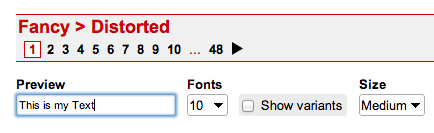
2. In our case the font is from the Category > Fancy > Distorted. You can type your text into the PREVIEW field to see how it looks.
3. Select your font with the Selection Tool and go to TYPE > “Create Outlines”.
4. With the “Compound Path Release” option, you can release the paths and colorize individual parts of each letter separately.
Tutorial spoken in German & English:
*IMPORTANT: Be aware that not every font is for free! Read the information before you hit the DOWNLOAD button. Donationware > Donate to author should be taken seriously. Free for personal use should not be used for commercial purposes.
Deutsche Version:
Möchten Sie unsere gratis Tipps im e-mail erhalten? Schreiben Sie sich unter FOLLOW mit Ihrer e-mail Adresse ein.
TIPP DER WOCHE: Kreatives Gestalten mit Schriften!
Illustrator trick: “Schrift in Pfade umwandeln” und “Zusammengesetzter Pfad zurückwandeln”
1. Laden Sie eine coole gratis* Schrift von dafont.com herunter.
2. In unserem Fall ist die Schrift von der Kategorie > Fancy > Distorted. Sie können Ihren Text ins PREVIEW Feld tippen um eine Vorschau zu sehen.
3. Wählen Sie Ihre Font mit dem Auswahlwerkzeug an und gehen unter SCHRIFT > “in Pfade umwandeln”.
4. Mit der Option “Zusammengesetzter Pfad zurückwandeln” kann man die Verknüpfung aller Pfade lösen und jeder Teil innerhalb des Buchstaben einzeln einfärben.
Schritt für Schritt Anleitung auf Deutsch und Englisch:
*WICHTIG: Nicht jede Schrift ist Gratis! Bevor Sie auf den DOWNLOAD Knopf klicken, sollten Sie die Bedingungen genau lesen. Donationware > Donate to author heisst; dass man dafür auch bezahlen sollte. Free for personal use; die Schrift sollte nicht für kommerzielle Zwecke benutzt werden.
MUSE is part of the Adobe Creative Cloud! If you have a lower version such as CS6, you might be able to download the MUSE app for a low fee.
As with InDesign, you can simply use master pages and layers. Once you are done with your webdesign, you can either choose Preview or Export as HTML and upload the data to your FTP server.
Deutsche Version:
Möchten Sie unsere gratis Tipps im e-mail erhalten? Schreiben Sie sich unter FOLLOW mit Ihrer e-mail Adresse ein.
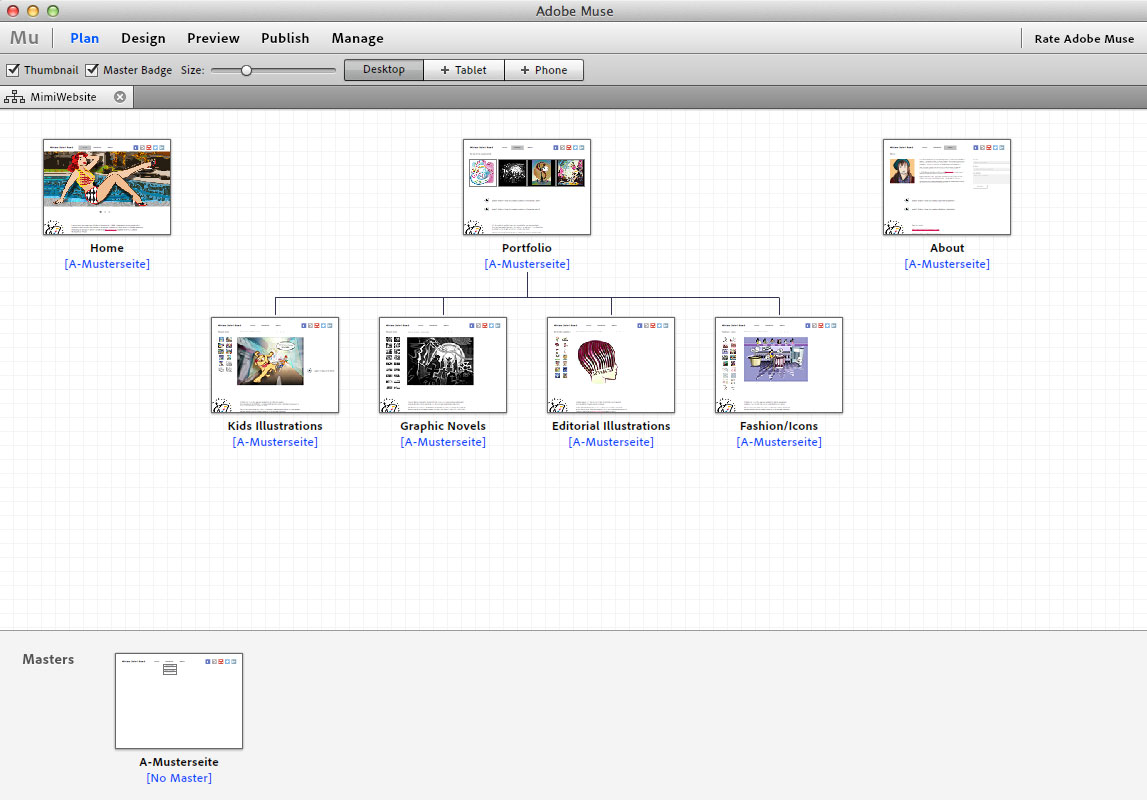
TIPP DER WOCHE: Erstellen Sie Ihre eigene Webseite mit Adobe Muse!
Sollten Sie InDesign kennen, können Sie Ihre nächste Webseite auf einfache Weise mit Adobe MUSE gestalten auch ohne Programmierkenntnisse.
Sie können sogar ein Hero-Banner mit Adobe MUSE erstellen!
MUSE ist Teil der Adobe Creative Cloud! Es sollte aber auch möglich sein, das MUSE App einzeln bei Adobe herunterzuladen.
Es funktioniert einfach: wie in InDesign können Sie Mustersteiten und Ebenen verwenden. Wenn Sie mit Ihrem Design fertig sind, können Sie entweder Vorschau oder Export als HTML anwählen und dann auf Ihren FTP server laden.
Contact Illustration Source and start licensing the best conceptual illustration available.
Illustration Source – 15 East 32nd Street 7th Floor – New York, NY 10016