Wie man mit Illustrator zeichnet

Möchten Sie unsere gratis Tipps im e-mail erhalten? Schreiben Sie sich unter FOLLOW mit Ihrer e-mail Adresse ein.

divider

Adobe Illustrator ist in erster Linie ein Programm um Zeichnungen und Logos/Signete zu erstellen. Das Programm besteht nicht aus Pixel, sondern ist ein Vektor-Programm in welchem mit Ankerpunkten gearbeitet wird.

Das Zeichenstift-Werkzeug ist dazu ideal, denn es zeichnet Pfade mit Ankerpunkten:
Mit einem einfachem KLICK mit der Maus wird ein eckiger Ankerpunkt gesetzt, zieht man aber während dem KLICKEN mit der Hand und drückt weiterhin die Maus, entstehen Ankerpunkte mit Hebel, mit denen Rundungen möglich sind.

Das Zeichenstift-Werkzeug ist ideal um Flächen zu zeichnen. Ganz einfach: Ankerpunkte setzen und eine Form zeichnen bis man wieder zum ersten Ankerpunkt kommt, die Fläche abschliessen und eine Flächenfarbe wählen.

ZeichenstiftWerkzeug

Video Tutorial für Anfänger:

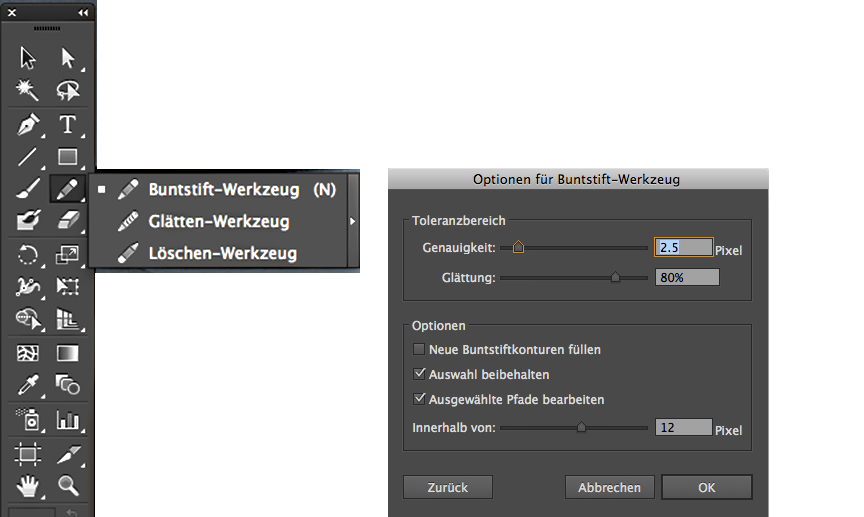
Der Buntstift zeichnet Linien die man mit dem Breitenwerkzeug gut kombinieren kann.
Die Optionen zum Bunstift: DOPPELKLICK auf den Buntstift in der Werkzeug-Leiste.

Der Buntstift zeichnet offene Pfade und ist ideal für Linien. Möchte man mit dem Buntstift eine Fläche zeichnen, müssen am Schluss die Ankerpunkte am Ende der Form zusammengefügt werden. Menü > Objekt > Pfad > Zusammengefügen oder per Kurzbefehl: ctrl+J für PC / command+J für Mac.

Buntstift-Werkzeug

Video Tutorial für Anfänger:

Das Breitenwerkzeug in Adobe Illustrator CS6 ist ideal um einer simplen Linie einen Pinsel-Charakter zu geben: die Linie anklicken und mit der Maus ZIEHEN bis die Linie breiter wird.

BreitenwerkzeugTool

Der Buntstift und das Zeichenstift-Werkzeug sind ideal um genaue Konturen zu zeichnen, mit dem Breitenwerkzeug kann man einen Pinsel imitieren. Aber um malerische Effekte mit Strukturen zu erzeugen wie z.B, Aquarell, eignet sich jedoch der Pinsel besser. Die Optionen dazu kann man unter Menü > Fenster > Pinsel holen. Im selben Bedienfeld findet man unten links das Icon für die Adobe Pinsel-Bibliothek, die man frei benutzen kann.

PinselOptionen

Wie man eigene Pinsel erstellen kann oder bestehende Pinsel ändern, folgt in einem späteren Tutorial.
FOLLOWERS von i-adobe.com erhalten jedes neue Tutorial automatisch per e-mail.

divider

Weitere Lernvideos für Fortgeschrittene:
Zeichnen mit Illustrator für Fortgeschrittene

How to draw in Illustrator

Would you like to receive our tips for free in your e-mail box? Simply select FOLLOW to sign up with your e-mail address.

divider

Adobe Illustrator is primarily a vector based design tool to draw clean shapes and to create resizable Logos. Whereas Photoshop is raster based and therefore pixel dependent, Illustrator is using vector shapes made out of anchor points.

Therefore the Pen Tool in Illustrator is ideal to draw paths with anchor points:
With a simple mouse CLICK, you are setting corner anchor-points. If you are clicking AND dragging with the mouse at the same time, you’ll get round anchor-points with levers, with those are round corner points and curves possible.

The Pen Tool is ideal to draw closed shapes. It’s easy! Draw your shape while setting your points until you reach the first anchor-point again; select it to close the shape and choose a fill color.

PenTool

Video Tutorial for beginners:

The Pencil Tool draws lines which you can combine with the Width Tool.
To open the options for the Pencil Tool: Double click the Pencil Tool icon in the tool sidebar. The same way you may open the Brush options if needed.

The Pencil Tool is ideal to draw lines. If you do need to close the open path into a shape;
you either have to select both end-points and go under Menu > Object > Path > Join or use the shortcut ctrl+J for PC / command+J for Mac.

pencilTool

Video Tutorial for beginners:

The Width Tool in Adobe Illustrator CS6 is ideal to give your line a Brush stroke character: select the line and drag with the mouse until the line becomes wider.

WidthTool

The Pen Tool and Pencil Tool are both ideal to draw clean shapes and lines. The Width Tool can help to simulate a brush line. Although to achieve structures and water color effects; the Brush Tool would be a better choice!

The Brush Tool and its options are easily to find under Menu > Window > Brushes.
On the bottom of the Brush-Option, you may find the icon for the Adobe Brush Library with all kinds of artistic brushes.

Brushes

How to create your own Brushes or alter existing Brushes in the Adobe Library, will be shown in a future tutorial.
I-Adobe FOLLOWERS are going to receive updates on this topic automatically by e-mail.

divider

Additional tutorials for advanced users:
Drawing in Illustrator for advanced users

Today’s Concept

Image by Miriam Selmi Reed. Courtesy of Illustration Source.

Courtesy of Illustration Source.

Go to > Today’s Concept: Give me the Keys

Image by Miriam Selmi Reed. Courtesy of Illustration Source.

Copyright by Illustration Source. All rights reserved.
15 East 32nd Street 7th Floor, New York, NY 10016 USA
Contact: sales@illustrationsource.com

Interactive PDF in Adobe InDesign

Tutorial in English and German / Anleitung in Deutsch und Englisch

English version:

Would you like to receive our tips for free in your e-mail box? Simply select FOLLOW to sign up with your e-mail address.

TIP OF THE WEEK: How to create an Interactive PDF in Adobe InDesign.

Many people ask us if it is possible to use InDesign like Power Point. The answer is simple: make an interactive PDF!

1. Open Adobe InDesign CS6 or CC

2. Design your layout with several single pages

OPTION: Under Window > Interactive; you might find possibilities like Hyperlinks etc.

TIP: Under Window > Pages; click on the top right drop-down arrow, go look into the Page Attributes > Page Transitions > Choose, there you can see a PREVIEW of the cool page transitions InDesign has to offer.

pagetransitionsFINAL

3. Export your interactive PDF. File > Export > Format: Adobe PDF (Interactive); as you can see you can also choose your Page Transitions there! Important: choose Image Handling and your correct Resolution.

interactivePDF

Open Acrobat and enjoy the show!

divider

Deutsche Version:

Möchten Sie unsere gratis Tipps im e-mail erhalten? Schreiben Sie sich unter FOLLOW mit Ihrer e-mail Adresse ein.

TIPP DER WOCHE: Wie man ein Interaktives PDF mit Adobe InDesign erstellt.

Viele Leute fragen uns immer wieder ob man InDesign wie Power Point benutzen kann. Die Antwort ist einfach: machen Sie ein interaktives PDF!

1. Öffnen Sie Adobe InDesign CS6 oder CC

2. Gestalten Sie Ihre Präsentation mit mehreren Einzelseiten.

OPTION: Unter Fenster > Interaktiv; finden Sie Möglichkeiten wie z.B. Hyperlinks zu Webseiten usw.

TIPP: Unter Fenster > Seiten; im Seitenbedienfeld klicken Sie oben rechts auf den Pfeil, dort finden Sie die Seitenattribute > Seitenübergänge > Wählen, wo man eine VORSCHAU der Seitenübergänge anschauen kann die InDesign offeriert.

pagetransitionsFINAL

3. Exportieren Sie Ihr Interaktives PDF. Datei > Exportieren > Format: Adobe PDF (Interaktive).
Sie können auch dort Ihre Seitenübergänge wählen!
Wichtig: wählen Sie Ihre gewünschte Bildhandhabung und korrekte Auflösung.

interactivePDF

Öffnen Sie Ihr Adobe Acrobat und geniessen Sie Ihre Präsentation!

Create patterns / erstellen von Mustern in Illustrator

Tutorial in English and German / Anleitung in Englisch und Deutsch

Deutsche Version siehe unten!
divider

English version:

Open a new document in Adobe Illustrator CS6 or CC:

1. Go to MENU > OBJECT > PATTERN > MAKE.
Create your pattern inside the blue box. Illustrator is going to create your pattern as a repeat automatically.

pattern

2. Once you are done, simply select the DONE button, this way Illustrator adds the pattern (repeat) into your Swatch Library. Now you can fill your fashion silhouette or object with your pattern.

Print

3. To make a change to your newly created pattern: Go to OBJECT > PATTERN > EDIT PATTERN. Make your changes and click on DONE if you like to save over the old pattern or click on SAVE A COPY in case you like to add a new swatch and keep the previous one.

For more tips watch the step-by-step Tutorial:

divider

Deutsche Version:

Öffnen Sie ein neues Dokument in Adobe Illustrator CS6 oder CC:

1. Gehen Sie zu MENÜ > OBJEKT > MUSTER > ERSTELLEN. Illustrator erstellt automatisch ihr Muster als Rapport innerhalb des blauen Rahmens.

muster

2. Sobald Sie mit Ihrem Muster fertig sind, klicken Sie oben auf FERTIG. Damit wird Ihr Muster (Rapport) in Ihr Farbfeld-Bedienfeld eingefügt. Jetzt können Sie Ihr Muster in Ihr Objekt oder Illustration als Flächefarbe einfüllen.

3. Falls Sie Ihr Muster ändern möchten: Gehen Sie zu OBJEKT > MUSTER > MUSTER BEARBEITEN. Klicken Sie auf FERTIG wenn Sie das alte Muster überspeichern wollen oder klicken Sie auf KOPIE SPEICHERN wenn Sie es als neues Muster speichern wollen.

Schritt-für-Schritt Anleitung auf Englisch mit deutschen Untertitel:

Featured Concept : Government

MiriamSelmiReed
Illustrated by Miriam Selmi Reed – Mixed digital & traditional media

We invite you to view how our artists show the Government’s role in our lives.
Illustration Source provides you with speed and convenience. The artists represented by Illustration Source are some of the best illustrators working today.

Go to > Featured Concept ; Government

Copyright 2013 Illustration Source. All rights reserved.
15 East 32nd Street 7th Floor, New York, NY 10016 USA
email: sales@illustrationsource.com