Colors / Farben in Adobe InDesign

Tutorial in English and German / Anleitung in Deutsch und Englisch

Deutsche Version siehe unten!
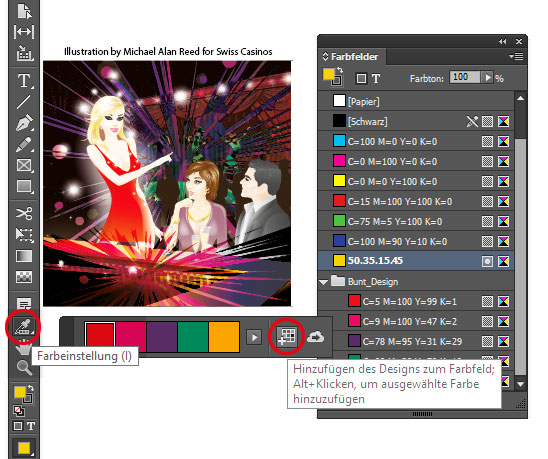
Tip of the week: How to use the Color Theme Tool to select the main colors of your image.

– Open Indesign CC and place your image.
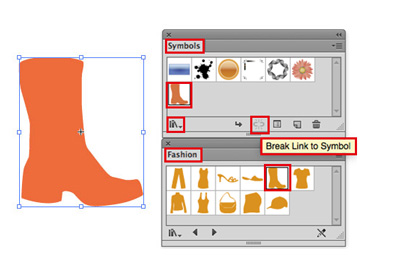
– Select the Color Theme Tool and click on the image.
– The main 5 colors will be added to your Swatches.
(Go to WINDOW > COLOR > SWATCHES)

Here is a tutorial directly from Adobe: Indesign Color Themes

farben1e

Here are your possibilities:
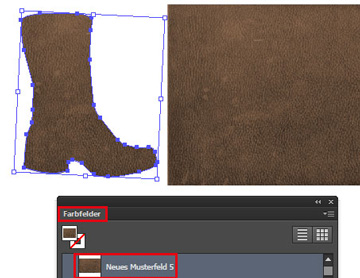
– Select the arrow to choose different color combinations.
(Colorful, Bright, Dark, Muted)
– You can add this as a Theme to your Swatches.
– You can use these colors for a matching Gradient!

farben2e

divider

Our new i-adobe Ebook is available here – in English – including films on 72 pages:
EASY DOWNLOAD

Unser neues i-adobe book ist hier erhältlich – in Deutsch – inklusive Filme auf 72 Seiten: SICHERER DOWNLOAD

divider

Deutsche Version

Tipp der Woche: Wie man mit dem Farbeinstellungs-Werkzeug Farben aus einem Foto herausfiltern kann.

– Öffne Indesign CC und platziere ein Bild.
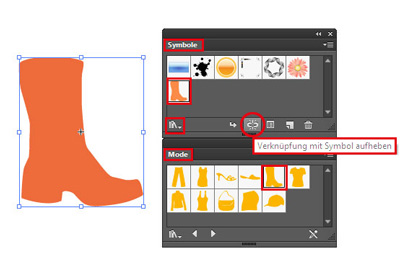
– Wähle das Farbeinstellungs-Werkzeug und klicke auf das Bild.
– Die 5 Hauptfarben werden in die Farbfelder “aufgenommen”.
(Siehe FENSTER > FARBE > FARBFELDER)

Hier ist ein Tutorial dazu direkt von Adobe: Farbpaletten in Indesign

farben1

Hier sind die Möglichkeiten:
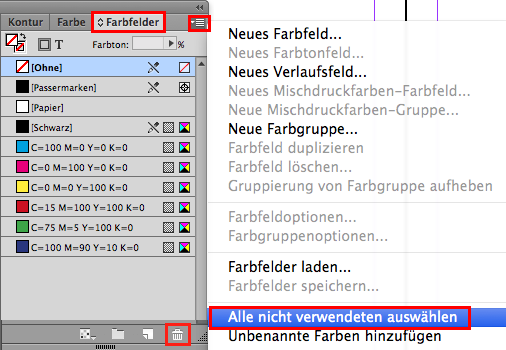
– Unter dem Pfeil kann man verschiedene Farbkombinationen anwählen.
(Bunt, Hell, Dunkel oder Gedeckt)
– Man kann diese in die Farbfelder als Farbgruppe aufnehmen.
– Praktisch: man kann diese Farben z.B. für einen passenden Verlauf benutzen!

farben2

Advertisement

Illustrator Workshop: Symbols 1

Tutorial in English and German / Anleitung in Deutsch und Englisch

Deutsche Version siehe unten!
divider

English Version:
How I use Symbols in Adobe Illustrator: I go under MENU > WINDOW > SYMBOLS and choose a Fashion Symbol which you can find in the Symbol-Library. Very important: to click on the icon “Break Link to Symbol”.

1E

Then I place a leather-photo (tiff or jpg) and select Embed on top.

2E

I select the leather photo and drag it into my Illustrator Swatch Box to create a New Pattern Swatch. (Menu > Window > Swatches)
4E

Then I select my Symbol (Boot) and click on the leather pattern to fill.
Next time I will show how to form the leather pattern inside the boot to make it more 3D!

divider

Our new i-adobe Ebook is available here – in English – including films on 72 pages:
EASY DOWNLOAD

Unser neues i-adobe book ist hier erhältlich – in Deutsch – inklusive Filme auf 72 Seiten: SICHERER DOWNLOAD

divider

Deutsche Version:
Wie ich Symbole in Adobe Illustrator benutze: Ich gehe unter MENÜ > FENSTER > SYMBOLE und wähle ein Mode-Symbol welche man in den Symbol-Bibliotheken finden kann. Sehr wichtig: auf das icon klicken “Verknüpfung mit Symbol aufheben”.

1

Dann platziere ich ein Leder-Foto (tiff oder jpg) und klicke oben in der Steuerung auf Einbetten .

2

Ich wähle das Leder-Foto an und ziehe es in meine Illustrator Farbfelder um ein neues Musterfeld zu erstellen. (Menü > Fenster > Farbfelder)
4

Dann wähle ich mein Symbol (Stiefel) und fülle es mit meinem neuen Ledermuster indem ich auf das neue Musterfeld klicke. Nächstes Mal werde ich zeigen wie ich das Ledermuster um den Stiefel forme damit es mehr 3D wirkt.

Create patterns / erstellen von Mustern in Illustrator

Tutorial in English and German / Anleitung in Englisch und Deutsch

Deutsche Version siehe unten!
divider

English version:

Open a new document in Adobe Illustrator CS6 or CC:

1. Go to MENU > OBJECT > PATTERN > MAKE.
Create your pattern inside the blue box. Illustrator is going to create your pattern as a repeat automatically.

pattern

2. Once you are done, simply select the DONE button, this way Illustrator adds the pattern (repeat) into your Swatch Library. Now you can fill your fashion silhouette or object with your pattern.

Print

3. To make a change to your newly created pattern: Go to OBJECT > PATTERN > EDIT PATTERN. Make your changes and click on DONE if you like to save over the old pattern or click on SAVE A COPY in case you like to add a new swatch and keep the previous one.

For more tips watch the step-by-step Tutorial:

divider

Our new i-adobe book is available online – in English – including tutorials on 72 pages – Preview & download here!

divider

Deutsche Version:

Öffnen Sie ein neues Dokument in Adobe Illustrator CS6 oder CC:

1. Gehen Sie zu MENÜ > OBJEKT > MUSTER > ERSTELLEN. Illustrator erstellt automatisch ihr Muster als Rapport innerhalb des blauen Rahmens.

muster

2. Sobald Sie mit Ihrem Muster fertig sind, klicken Sie oben auf FERTIG. Damit wird Ihr Muster (Rapport) in Ihr Farbfeld-Bedienfeld eingefügt. Jetzt können Sie Ihr Muster in Ihr Objekt oder Illustration als Flächefarbe einfüllen.

3. Falls Sie Ihr Muster ändern möchten: Gehen Sie zu OBJEKT > MUSTER > MUSTER BEARBEITEN. Klicken Sie auf FERTIG wenn Sie das alte Muster überspeichern wollen oder klicken Sie auf KOPIE SPEICHERN wenn Sie es als neues Muster speichern wollen.

Schritt-für-Schritt Anleitung auf Englisch mit deutschen Untertitel:

divider

Unser neues i-adobe book ist erhältlich online – in Deutsch – inklusive Tutorials auf 72 Seiten – Vorschau & Download hier!

divider

Clean up Swatches automatically / Farbfelder automatisch aufräumen lassen!

Tutorial in English and German / Anleitung in Deutsch und Englisch

Deutsche Version siehe unten!
divider

English version:

Would you like to receive our tips for free in your e-mail box? Simply select FOLLOW to sign up with your e-mail address.

TIP OF THE WEEK: How to clean up color Swatches in InDesign and Illustrator

Ever had a huge amount of colors in your Swatch-box in an InDesign or Illustrator document and had no idea which colors to delete?

In order to provide the printer or another designer a clean working file, it is advisable to remove unnecessary color swatches.

The answer is simple: Go to MENU > WINDOW > and open the Swatches.
1. Select all Unused. 2. Click on the trash can.
All colors which you didn’t use in your document are now deleted in your swatch box automatically!

UnusedSwatches

divider

TIP 2: How to use Global Colors in Adobe Illustrator – here is a cool trick: GLOBAL COLORS

divider

Deutsche Version:

Möchten Sie unsere gratis Tipps in Ihrem e-mail erhalten? Schreiben Sie sich unter FOLLOW mit Ihrer e-mail Adresse ein.

TIPP DER WOCHE: Wie man in Adobe InDesign und Illustrator Farbfelder aufräumt

Hatten Sie jemals Ihre Farbfelder in InDesign oder Illustrator so vollgeladen mit Farben, dass Sie nicht mehr wussten, welche Farben in Ihrer Datei verwendet wurden?

Die Lösung ist einfach: gehen Sie zu MENU > FENSTER > und öffnen Sie das Bedienfeld Farbfelder.
1. Alle nicht verwendeten auswählen. 2. Klicken Sie auf den Papierkorb.
Alle Farben die in Ihrem Dokument nicht benutzt werden, wurden somit aus Ihrem Farbfeld-Bedienfeld automatisch gelöscht!

Um der Druckerei oder einem anderen Designer eine saubere Datei zu schicken, ist es ratsam, unnötige Farbfelder zu löschen.

NichtgebrauchteFarbfelder

divider

TIPP 2: Wie man globale Farben in Illustrator benutzt. Ein cooler Trick: GLOBALE FARBEN

divider

Any support is greatly appreciated – Jede Unterstützung freut uns: PayPal Donate Button

divider

Create patterns / erstellen von Mustern in Illustrator

Tutorial in English and German / Anleitung in Englisch und Deutsch

Deutsche Version siehe unten!
divider

English version:

Open a new document in Adobe Illustrator CS6 or CC:

1. Go to MENU > OBJECT > PATTERN > MAKE.
Create your pattern inside the blue box. Illustrator is going to create your pattern as a repeat automatically.

pattern

2. Once you are done, simply select the DONE button, this way Illustrator adds the pattern (repeat) into your Swatch Library. Now you can fill your fashion silhouette or object with your pattern.

Print

3. To make a change to your newly created pattern: Go to OBJECT > PATTERN > EDIT PATTERN. Make your changes and click on DONE if you like to save over the old pattern or click on SAVE A COPY in case you like to add a new swatch and keep the previous one.

For more tips watch the step-by-step Tutorial:

divider

Deutsche Version:

Öffnen Sie ein neues Dokument in Adobe Illustrator CS6 oder CC:

1. Gehen Sie zu MENÜ > OBJEKT > MUSTER > ERSTELLEN. Illustrator erstellt automatisch ihr Muster als Rapport innerhalb des blauen Rahmens.

muster

2. Sobald Sie mit Ihrem Muster fertig sind, klicken Sie oben auf FERTIG. Damit wird Ihr Muster (Rapport) in Ihr Farbfeld-Bedienfeld eingefügt. Jetzt können Sie Ihr Muster in Ihr Objekt oder Illustration als Flächefarbe einfüllen.

3. Falls Sie Ihr Muster ändern möchten: Gehen Sie zu OBJEKT > MUSTER > MUSTER BEARBEITEN. Klicken Sie auf FERTIG wenn Sie das alte Muster überspeichern wollen oder klicken Sie auf KOPIE SPEICHERN wenn Sie es als neues Muster speichern wollen.

Schritt-für-Schritt Anleitung auf Englisch mit deutschen Untertitel: