Wrap text around a circle / Rundtext

Tutorial in English and German / Anleitung in Deutsch und Englisch

English version:

Would you like to receive our tips for free in your e-mail box? Simply select FOLLOW to sign up with your e-mail address.

divider

TIP OF THE WEEK: One way to wrap text around a circle in Adobe Illustrator.

1. Draw a circle.

2. Select your Type on a Path Tool, select the path of your circle and type your text.

jpg1D

3. With your Selection Tool select the text. COPY the text (go to EDIT) and Paste in Front (EDIT) which makes an exact copy in the same position.

JPG3D

… select the long single handle and drag it around until the copied text is properly set below!

4. Select the Text below and and go to FONT > TYPE ON A PATH > TYPE ON A PATH OPTIONS and choose the following:

JPG4E

TIP: depending on the arrangement of your text, you might have to click on the box FLIP or choose a different Align to Path option. Click on the PREVIEW button to have a look!

5. To move the text closer to the path, go to WINDOW > TYPE > CHARACTER and set the Baseline Shift accordingly.
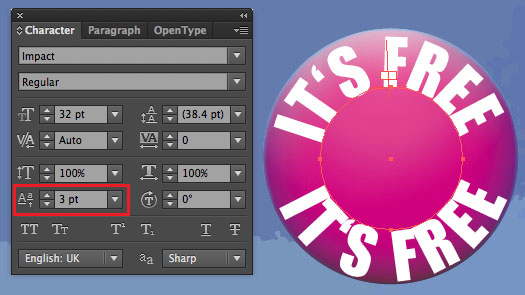
JPG5E

This is the result!

divider

Deutsche Version:

Möchten Sie unsere gratis Tipps im e-mail erhalten? Schreiben Sie sich unter FOLLOW mit Ihrer e-mail Adresse ein.

divider

TIPP DER WOCHE: Wie man einen Rundtext in Illustrator erstellen kann

1. Zeichnen Sie einen Kreis.

2. Wählen Sie das Pfadtext-Werkzeug, klicken auf den Pfad des Kreises und schreiben Sie Ihren Text.

jpg1D

3. Wählen mit dem Auswahl-Werkzeug den Rundtext an. Unter Bearbeiten > Kopieren und wieder unter Bearbeiten > Davor Einfügen erstellen Sie eine exakte Kopie auf derselben Position.

JPG3D

… dann ZIEHEN Sie am langen HEBEL herum bis Ihr neuer zweiter Text unten angepasst ist!

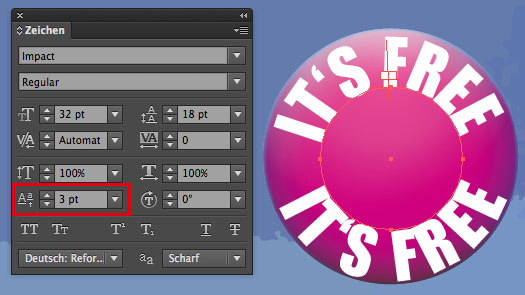
4. Wählen Sie nun den unteren Text an und gehen zu MENU > SCHRIFT > PFADTEXT > PFADTEXTOPTIONEN und geben die folgenden Koordinaten ein:

JPG4D

TIPP: Je nach dem wie Ihr Text läuft, müssen Sie die Box SPIEGELN anklicken oder eine andere An Pfad ausrichten Option wählen. Ausprobieren und auf VORSCHAU klicken!

5. Um den Text näher an die Pfadlinie zu stellen gehen Sie zu MENU > FENSTER > SCHRIFT > ZEICHEN und ändern den Grundlinienversatz nach Wunsch.

JPG5D

Hier ist der fertige Rundtext!

MONEY

Courtesy of Illustration Source

Courtesy of Illustration Source

View the artists’s homage on the topic MONEY

Miriam Selmi Reed is represented by Illustration Source, New York City. Portfolio and contact: Illustration Source NYC

Illustration technique: Traditional painting combined with digital mixed media such as Adobe Photoshop. Copyright by Illustration Source, New York City.

Illustrations-Technik: Acrylbild gemischt mit Adobe Photoshop. Copyright by Illustration Source, New York City.

new ADOBE MUSE templates / Vorlagen

Tutorial in English and German / Anleitung in Deutsch und Englisch

English version:

Would you like to receive our tips for free in your e-mail box? Simply select FOLLOW to sign up with your e-mail address.

TIP OF THE WEEK: ADOBE MUSE new templates

It’s never been so easy to create websites. Adobe MUSE, part of Adobe CC makes it possible. You also maybe able to rent Adobe MUSE for a low monthly fee if you don’t have CC.

Here are some great new templates to choose from:
Adobe MUSE: ADOBE MUSE TEMPLATES!

Some cool widgets to choose from: BRAND NEW COOL WIDGET

More on Adobe MUSE and our own websites created in Adobe MUSE:
More info at i-adobe.com: Adobe Muse Websites and more Info

divider

Deutsche Version:

Möchten Sie unsere gratis Tipps im e-mail erhalten? Schreiben Sie sich unter FOLLOW mit Ihrer e-mail Adresse ein.

TIPP DER WOCHE: ADOBE MUSE neue Vorlagen

Es war noch nie so einfach Webseiten zu erstellen. Adobe MUSE, Teil der Adobe CC macht es möglich. Man sollte Adobe MUSE auch monatlich einzeln für wenig Geld mieten können, sollten Sie kein Creative Cloud Abo haben.

Hier sind ein paar coole neue Vorlagen zum anschauen:
Adobe MUSE: ADOBE MUSE TEMPLATES!

Ein paar neue Widgets zum anschauen: BRAND NEW COOL WIDGET

Mehr Info wegen Adobe MUSE und unsere eigenen Webseiten erstellt mit Adobe MUSE:
Mehr Info auf i-adobe.com: Adobe Muse Webseiten und mehr Info

Graphs / Diagramme in Illustrator CS6

Tutorial in English and German / Anleitung in Deutsch und Englisch

English version:

Would you like to receive our tips for free in your e-mail box? Simply select FOLLOW to sign up with your e-mail address.

divider

TIP OF THE WEEK: How to create Graphs and Charts in Adobe Illustrator.

How to create your Graph:
1. Select your Graph Tool and click where you want to create your graph.
2. Define the dimensions of your graph: Enter a width and height for the graph, and click OK.
3. Enter the data for the graph in the Graph Data window and click the Apply button.

Graph1

To change the graph: Select the entire graph with the Selection Tool, and then choose Object > Graph > Data.

How to change the graph type:
1. Select a graph with the Selection Tool.
2. Choose Object > Graph > Type.
3. Graph Type dialog box: click the button that corresponds to the desired graph type, and click OK.

GraphType

How to create a column design:
1. Create a rectangle as the object in the design. Paint the rectangle as desired.
2. Select the rectangle with the Selection Tool.
3. Choose Object > Graph > Design.
4. Click New Design. Rename it if needed.

GraphDesign

Select your Graph and choose Object > Graph > Column and choose your New Design.

Column

Tip: I personally prefer to colorize my columns manually using the Direct Selection Tool.

divider

Deutsche Version:

Möchten Sie unsere gratis Tipps im e-mail erhalten? Schreiben Sie sich unter FOLLOW mit Ihrer e-mail Adresse ein.

divider

TIPP DER WOCHE: Wie man Diagramme in Illustrator erstellt

Wie man ein Diagramm erstellt:
1. Wählen Sie ein Diagramm-Werkzeug aus und klicken auf die Position wo Sie Ihr Diagramm erstellt haben wollen.
2. Legen Sie die Abmessungen des Diagramms fest: in welcher Größe das Diagramm eingefügt werden soll und klicken Sie auf OK.
3. Geben Sie die Daten für das Diagramm im Diagrammdaten-Fenster ein und klicken Sie auf die Schaltfläche Anwenden.

Graph1

Um die Grafik im Nachhinein wieder zu ändern: Wählen Sie das Diagramm mit dem Auswahl-Werkzeug an und gehen zu Objekt > Diagramm > Daten.

Wie man die Diagramm-Art ändert:
1. Wählen Sie Ihr Diagramm mit dem Auswahl-Werkzeug an.
2. Gehen Sie zu Objekt > Diagramm > Art.
3. Diagrammattribute: Klicken Sie bei ART auf das Diagramm Ihrer Wahl und bestätigen Sie mit OK.

Diagrammattribute

Wie man ein Design für ein Balkendiagramm erstellt:
1. Erstellen Sie ein Rechteck als Platzhalter für Ihr Design. Färben Sie dieses nach Ihren Wünschen ein.
2. Wählen Sie Ihr gestaltetes Rechteck mit dem Auswahl-Werkzeug aus.
3. Gehen Sie zu Objekt > Diagramm > Designs.
4. Klicken Sie auf Neues Design. Wählen Sie Umbennen um Ihr Design zu betiteln.

Diagramm-Design

Wählen Sie Ihr Balkendiagramm und gehen zu Objekt > Diagramm > Balken und wählen Ihr neues Design.

<DiagrammBalken

Tipp: I persönlich benutze das Direktauswahl-Werkzeug und färbe meine Diagramme lieber selber ein.

Today’s topic: I’m All Ears

Courtesy of Illustration Source

Courtesy of Illustration Source

View the artists’s homage on the topic I’m All Ears

Miriam Selmi Reed is represented by Illustration Source, New York City. Portfolio and contact: Illustration Source NYC

Illustration technique: Charcoal, acrylic and pencil combined with digital mixed media using Smart Objects / Filter in Adobe Photoshop and Illustrator. Copyright by Illustration Source, New York City.

Illustrations-Technik: Kreide, Acryl mit Farbstift, gemischt mit Adobe Illustrator und Photoshop sowie Smart-Objekte / Filter. Copyright by Illustration Source, New York City.

Embed images in Illustrator – Einbetten von Bildern in Illustrator

Tutorial in English and German / Anleitung in Deutsch und Englisch

English version:

Would you like to receive our tips for free in your e-mail box? Simply select FOLLOW to sign up with your e-mail address.

TIP OF THE WEEK: Embed your images in Adobe Illustrator

The easiest way to avoid missing links in Adobe Illustrator CS4, CS5 and CS6: Simply select the image and click on the button on top EMBED image. With this method you embed your image as part of your Illustrator document and it’s not linked to your image file anymore. Which means: you can now send your Illustrator to someone else without getting a “missing link” error.

VERKE1

VERKE2

The advantage of Adobe Illustrator CC: you can now package your Illustrator document! PACKAGE OPTION IN ILLUSTRATOR CC

divider

Deutsche Version:

Möchten Sie unsere gratis Tipps im e-mail erhalten? Schreiben Sie sich unter FOLLOW mit Ihrer e-mail Adresse ein.

TIPP DER WOCHE: Einbetten von Bildern in Adobe Illustrator

Um fehlende Verknüpfungen in Adobe Illustrator CS4, CS5 and CS6 zu vermeiden, gibt es eine einfache Lösung.
Wählen Sie Ihr Bild an und klicken Sie oben auf den Button EINBETTEN. Mit dieser Methode werden Sie Ihr Bild in Ihr Illustrator Dokument einbetten und es gibt keine Verknüpfungen mehr mit Ihrer Bilddatei. D.h. Sie können jetzt Ihre Illustrator Datei an andere Parteien schicken, ohne dass diese Personen “Fehlermeldungen” von fehlenden Verknüpfungen erhalten.

VERKD1

VERKD2

Hier ist der Vorteil von Illustrator CC: Sie können neu Ihre Illustrator Datei auch verpacken! VERPACKEN IN ILLUSTRATOR CC

Be On The Lookout

Courtesy of Illustration Source

Courtesy of Illustration Source

View the artists’s homage on the topic Be On The Lookout

Miriam Selmi Reed is represented by Illustration Source, New York City. Portfolio and contact: Illustration Source NYC

Illustration technique: Traditional painting combined with digital mixed media using Smart Objects in Adobe Photoshop and Illustrator. Copyright by Illustration Source, New York City.

Illustrations-Technik: Acrylbild gemischt mit Adobe Illustrator und Photoshop sowie Smart-Objekten. Copyright by Illustration Source, New York City.