Adobe InDesign Workshop

Wie man eine Sprechblase erstellen kann:

Tutorial presented by Miriam Selmi Reed, REEDesign.ch

Das Pathfinder-Bedienfeld wird gezeigt, wie man Flächen- und Konturfarben anwendet und wie man Farben im Bedienfeld Farbfelder speichern kann. Zusätzlich wird das Effekten-Bedienfeld vorgestellt, wie man – auf nicht-destruktive Weise – einen Schlagschatten hinzufügen kann. Weitere gratis Affinity & Adobe Tutorials findest du auf i-adobe.com

Adobe Indesign Workshop

Wie man mit Adobe InDesign kreative Pfeile erstellen kann:

Film by Miriam Selmi Reed, REEDesign.ch

Zusätzlich wird gezeigt wie man mit dem Effekten-Bedienfeld auf nicht-destruktive Weise Schlagschatten und andere Effekte hinzufügen kann. Weitere gratis Affinity & Adobe Tutorials findest du auf i-adobe.com

Adobe Illustrator

Tipp zum Sonntag: Wie ich mit dem Aussehen-Bedienfeld Effekte Steuern kann!

Meine persönlichen Adobe Tipps findet ihr auch als praktisches eBook (PDF):

i-adobe Ebook inklusive Filme, auf 72 Seiten auf Deutsch: SICHERER DOWNLOAD

i-adobe Ebook including films, 72 pages, is available in English: EASY DOWNLOAD

Viel Spass mit Adobe Illustrator.

Best regards, Miriam Selmi Reed

After Effects – LOVE it

As instructors of Adobe programs and creative professionals, we’ve assembled this blog as easy reference for our students and clients.” Miriam Selmi Reed & Michael Alan Reed

English version:
Below you may have a look at our latest animation / trailer, done with Adobe After Effects.
Here’s a link to a great tutorial on After Effects for beginners directly from Adobe: AFTER EFFECTS Tutorial

Sharing infos: iADOBE FORUM Our tips for easy download: i-adobe eBook in English

Animation for our trailer for LICHTBOX – by Michael Alan Reed – REEDesign.ch


Trailer for LICHTBOX.CH © 2018 Funk & Meier AG, Obfelden

Composition, video & audio – www.reedesign.ch
Programs: Adobe After Effects CC, Apple Logic Pro, Adobe Photoshop

divider

Deutsche Version:
Oben sieht man wie wir mit Adobe After Effects unseren neuesten Trailer erstellt haben.
Hier ist ein Link mit einem super Tutorial für After Effects Anfänger, direkt von Adobe (mit Deutschen Untertiteln): AFTER EFFECTS Tutorial

Tausche dich aus im iADOBE FORUMAlle unsere Tipps als: i-adobe eBook in Deutsch

Tip of the week: Retouch Layer / Tipp der Woche: Retuschenebene

divider

TIP OF THE WEEK: how I retouch my illustrations using the Stamp Tool and Healing Brush Tool in Photoshop CC or CS6. I place on an empty layer on top – while I select the option ALL LAYERS in the Control Bar – then I click the ALT key to sample and start stamping. 😉

Miriam Selmi Reed is represented and licensed by Illustration Source – Courtesy of Illustration Source

Miriam Selmi Reed is represented and licensed by Illustration Source – Courtesy of Illustration Source

TIPP DER WOCHE: Wie ich meine Illustrationen retuschiere mit dem Stempel Werkzeug oder dem Reparaturpinsel ist einfach. Ich benutze eine leere Ebene die ich ganz oben einfüge. Dann drücke ich die ALT Taste um einen sauberen Bereich aufzunehmen – mit der Option ALLE EBENEN aufnehmen in der Steuerung – und stemple vor mich hin. 😉
divider

Miriam Selmi Reed is represented and licensed by Illustration Source - Courtesy of Illustration Source

Miriam Selmi Reed is represented and licensed by Illustration Source – Courtesy of Illustration Source

View the artists’s homage on the topic: MENTAL HEALTH

Miriam Selmi Reed is represented by Illustration Source, New York City. Portfolio and contact: Illustration Source NYC

Illustration technique: watercolor, acrylic and pencil combined with digital mixed media using Adobe Photoshop and Illustrator.Copyright by Illustration Source, New York City.

Illustrations-Technik: Aquarell, Acryl mit Farbstift, gemischt mit Adobe Photoshop und Illustrator. Copyright by Illustration Source, New York City.

divider

Your source for commissioned illustration: ORIGINAL ART STUDIOS in New York City.

OAS

Portfolio Original Art Studios, New York City: MIRIAM SELMI REED

Cool Illustrator Effects

Tutorial in English and German / Anleitung in Deutsch und Englisch

Deutsche Version siehe unten!
divider

English version:

Would you like to receive our tips for free in your e-mail box? Simply select FOLLOW to sign up with your e-mail address.

TIP OF THE WEEK: Cool Illustrator Effects!

Did you ever try the cool Illustrator effects in CS6 or Creative Cloud?

1. Draw a small star or any simple shape you like
2. Go to MENU > EFFECT > DISTORT & TRANSFORM > TRANSFORM
3. Type in the numbers of your choice or use the same numbers as shown below
4. Click the Preview Button

effectE1

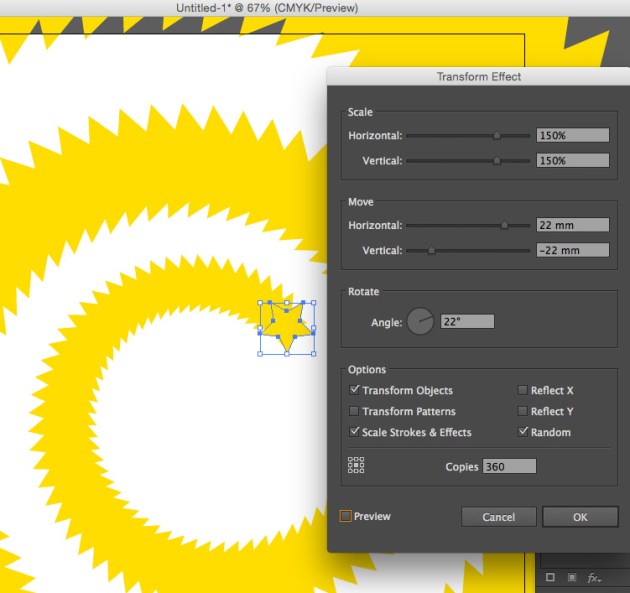
5. Click OK, if you like the Preview

EffectE2

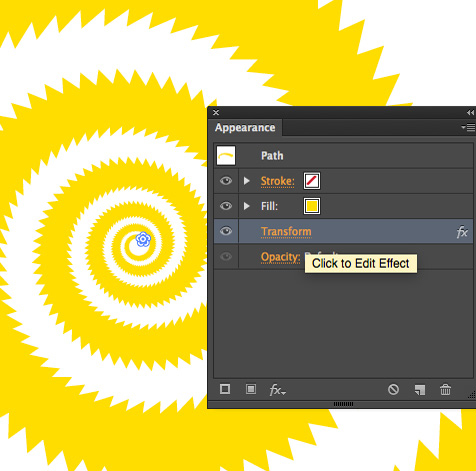
You want to change your effect? Simply go to MENU > WINDOW > APPEARANCE and click on Transform FX to open the same Effect-Window again.
To delete an effect; simply drag it to the trash can.

EffectE3

There are many effects you can try – since you can change them anytime with the APPEARANCE window, it’s really fun to try them all 🙂

divider

TIP 2: additional tutorial for Adobe InDesign Effects: INDESIGN EFFECTS

divider

Deutsche Version:

Möchten Sie unsere gratis Tipps in Ihrem e-mail erhalten? Schreiben Sie sich unter FOLLOW mit Ihrer e-mail Adresse ein.

TIPP DER WOCHE: Cool Illustrator Effekte!

Haben Sie jemals die coolen Illustrator Effekte in CS6 oder Creative Cloud ausprobiert?

1. Zeichnen Sie einen kleinen Stern oder Form nach Wunsch
2. Gehen Sie zu MENU > EFFEKT > VERZERRUNGS- UND TRANSFORMATIONSFILTER > TRANSFORMIEREN
3. Tippen Sie Ihre Nummern ein oder nehmen die gleichen wie unten im Bild
4. Klicken Sie auf Vorschau

effectD1

5. Klicken Sie OK, wenn Ihnen die Vorschau gefällt

EffectE2

Möchten Sie Ihren Effekt ändern? Gehen Sie zu MENU > FENSTER > AUSSEHEN und klicken Sie auf Transformieren FX um dasselbe Effekte-Bedienfeld wieder zu öffnen und Änderungen vorzunehmen.
Mit dem Auge können Sie den Effekt temporär ausschalten und den Effekt ganz löschen ist einfach; klicken Sie auf den Papierkorb.

Mit dem Aussehen-Bedienfeld können Sie jeden Effekt modifizieren oder löschen.
Dies betrifft auch 3-D Effekte, Schlagschätten usw.

EffectD3

Es gibt endlos viele Effekte – da Sie diese jederzeit löschen oder ändern können, macht es Spass so viele wie möglich auszuprobieren 🙂

divider

TIPP 2: Zusätzliche Anleitung für Adobe InDesign Effekte: INDESIGN EFFEKTE

divider

Be On The Lookout

Courtesy of Illustration Source

Courtesy of Illustration Source

View the artists’s homage on the topic Be On The Lookout

Miriam Selmi Reed is represented by Illustration Source, New York City. Portfolio and contact: Illustration Source NYC

Illustration technique: Traditional painting combined with digital mixed media using Smart Objects in Adobe Photoshop and Illustrator. Copyright by Illustration Source, New York City.

Illustrations-Technik: Acrylbild gemischt mit Adobe Illustrator und Photoshop sowie Smart-Objekten. Copyright by Illustration Source, New York City.

InDesign Effects

Tutorial in English and German / Anleitung in Deutsch und Englisch

Deutsche Version siehe unten!
divider

English version:
Open your InDesign CS6 or CC document with a placed image and a headline.
Select as Fill color white and a Font color from the top Control Bar or under Menu > Window > Color > Swatches.

see example:
ParisBegin

Select your text box with your Selection Tool. Then go to MENU > OBJECT > EFFECTS and select your Settings for: Fill > Opacity > 40 %

ParisEnglish1

and Settings for: Text > Transparancy: Drop Shadow, Inner Glow, Bevel & Emboss etc.

ParisEnglish2

Here it is; the Font has added on Effects and the White fill color is now transparent. You may change them at any time using the same steps above.

ParisFinal

divider

Deutsche Version:
Öffnen Sie Ihr CS6 oder CC InDesign Dokument mit einem platzierten Bild und einem Titel.
Wählen Sie als Flächenfarbe Weiss und eine Farbe für den Text oben in der Steuerung oder unter Menü > Fenster > Farbe > Farbfelder.

siehe Beispiel:
ParisBegin

Wählen Sie Ihre Textbox mit dem Auswahlwerkzeug an. Dann gehen Sie zu MENÜ > OBJEKT > EFFEKTE und wählen Ihre Einstellungen für: Fläche > Deckkraft: 40 %

Paris1German

und Einstellungen für: Text > Transparenz: Schlagschatten, Schein nach Innen, Abgeflachte Kante und Relief usw.

ParisGerman2

Hier ist das Resultat; der Titel zeigt Effekte und die Flächenfarbe Weiss als Transparenz. Man kann alles jederzeit mit denselben Arbeitschritten wieder ändern.

ParisFinal