Which PDF should I take? / Welches PDF soll ich nehmen?

Tutorial in English and German / Anleitung in Deutsch und Englisch

English version: (Deutsche Version siehe unten)

Would you like to receive our tips for free in your e-mail box? Simply select FOLLOW to sign up with your e-mail address.

Tip of the week: Choose the correct PDF!

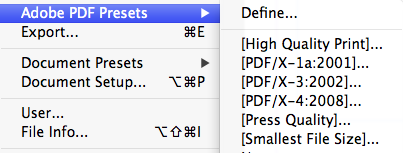
It’s very simple, InDesign CS5, CS6 and CC you have 5 main PDF Formats to choose from:

Screen Shot 2014-08-17 at 4.55.02 PM

IMPORTANT: Before you export a PDF-file, you should always talk to your printer about the resolution and the color profile!

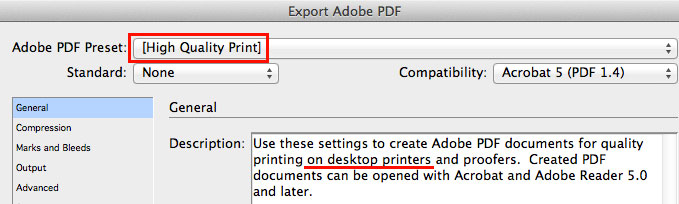
1. Go under FILE > Adobe PDF Presets > High Quality Print
Which is a PDF for quality printing on desktop printers.

HighQuality

2. Go under FILE > Adobe PDF Presets > PDF/X-3, PDF/X-4
Which are for professional printing presses which have ISO standard for graphic content exchange. IMPORTANT: always ask your printer which PDF/X to choose.
PDF/X 4 includes support for live transparency.
More info on how to export a PDF/X: How to export a PDF/X

3. Go under FILE > Adobe PDF Presets > Press Quality
Creates PDF files for high-quality print production such as for digital printing.

PressQuality

4. Go under FILE > Adobe PDF Presets > Smallest File Size
Choose this PDF for on-screen display, Websites and to attach to an e-mail.

More info directly at ADOBE Help: PDF Options

More info on Presets directly at ADOBE Help: PDF Presets

divider

Deutsche Version:

Möchten Sie unsere gratis Tipps im e-mail erhalten? Schreiben Sie sich unter FOLLOW mit Ihrer e-mail Adresse ein.

Tipp der Woche: Wählen Sie das korrekte PDF!

Es ist simpel einfach. InDesign CS5, CS6 und CC haben Sie 5 PDF Formate zum auswählen:

Bildschirmfoto 2014-08-17 um 17.01.15

Hinweis: Bevor Sie eine Adobe PDF-Datei erstellen, sollten Sie mit der Druckerei die Ausgabeauflösung und sonstige Einstellungen (Farbprofil) klären!

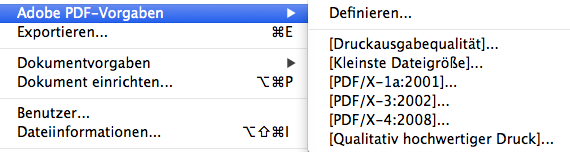
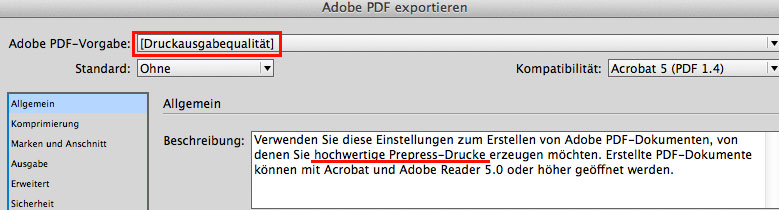
1. Gehen Sie unter DATEI > Adobe PDF Vorgaben > Druckausgabequalität.
Dies erstellt PDF-Dateien für die Druckausgabe in hoher Qualität (z. B. für den Digitaldruck).

Druckasugabequalitaet

2. Gehen Sie unter DATEI > Adobe PDF Vorgaben > Kleinste Dateigrösse. Dieses PDF ist ideal für Webseiten und falls Sie Ihrem Kunden das PDF in einem e-mail schicken möchten.

3. Gehen Sie unter DATEI > Adobe PDF Vorgaben > PDF/X-3, PDF/X-4
Diese sind für professionelle Offset Druckmaschinen die ISO Standard kompatibel sind. WICHTIG: Fragen Sie immer welches PDF/X Ihre Offsetdruckerei möchte!
Mehr Info wie man ein PDF/X exportiert: Wie man ein PDF/X exportiert

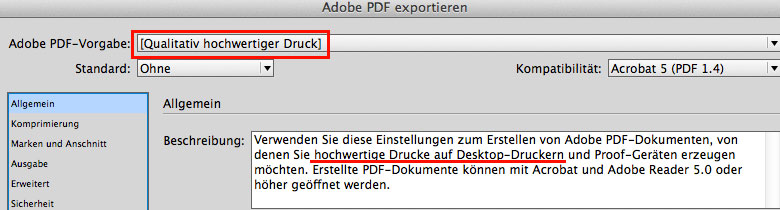
4. Gehen Sie unter DATEI > Adobe PDF Vorgaben > Qualitativ hochwertiger Druck.
Dies erstellt PDF-Dateien für hochwertige Drucke auf Desktop-Druckern.

hochwertigerDruck

Mehr Info direkt bei ADOBE Help: PDF Optionen

Mehr Info über die PDF Vorgaben bei ADOBE Help: PDF Vorgaben

Today’s topic: CAN WE TALK

Courtesy of Illustration Source

Courtesy of Illustration Source

View the artists’s homage on the topic CAN WE TALK

Miriam Selmi Reed is represented by Illustration Source, New York City. Portfolio and contact: Illustration Source NYC

Illustration technique: Watercolor and pencil combined with digital media using Smart Objects and Filters in Photoshop and Illustrator. Copyright by Illustration Source, New York City.

Illustrations-Technik: Aquarell mit Farbstift, gemischt mit Illustrator und Photoshop sowie Smart-Objekten und Smart-Filtern. Copyright by Illustration Source, New York City.

Tip of the Week: Rotate Spread / Druckbögen drehen

Tutorial in English and German / Anleitung in Deutsch und Englisch

English version:
Tip of the week: Here’s how to rotate a Page Spread in Adobe InDesign CS6 and CC.

1. Open an InDesign Document with a main page and 2 page spreads.

HUMTYD1

2. Select the Page Spread you’d like to rotate and select under the drop-down arrow of the Pages window the Page Attributes > Rotate Spread View > 180 degrees.

HumtyE2

And here it is: the page spread below is now rotated by 180 degrees and facing the other way.

HumtyE3

THE HUMPTY JACKSON COMIC, illustrated by Miriam Selmi Reed and written by Michael Alan Reed: HUMPTY JACKSON COMIC Copyright by Round Robin editrice, Rome, Italy / All rights reserved.

divider

Deutsche Version:

1. Öffnen Sie ein CS6 oder CC InDesign Dokument mit einer Cover-Seite und 2 Doppelseiten.

HUMTYD1

2. Wählen Sie die Doppelseite an welche Sie drehen möchten. Gehen Sie im Seitenbedienfeld ins Untermenü unter Seitenattribute > Druckbogenansicht drehen > 180 Grad.

HumtyD2

Und hier ist das Resultat: die untere Doppelseite ist jetzt neu um 180 Grad gedreht.

HumtyD3

THE HUMPTY JACKSON COMIC illustriert bei Miriam Selmi Reed und geschrieben bei Michael Alan Reed: HUMPTY JACKSON COMIC Copyright by Round Robin editrice, Rome, Italy / All rights reserved.

InDesign Effects

Tutorial in English and German / Anleitung in Deutsch und Englisch

Deutsche Version siehe unten!
divider

English version:
Open your InDesign CS6 or CC document with a placed image and a headline.
Select as Fill color white and a Font color from the top Control Bar or under Menu > Window > Color > Swatches.

see example:
ParisBegin

Select your text box with your Selection Tool. Then go to MENU > OBJECT > EFFECTS and select your Settings for: Fill > Opacity > 40 %

ParisEnglish1

and Settings for: Text > Transparancy: Drop Shadow, Inner Glow, Bevel & Emboss etc.

ParisEnglish2

Here it is; the Font has added on Effects and the White fill color is now transparent. You may change them at any time using the same steps above.

ParisFinal

divider

Deutsche Version:
Öffnen Sie Ihr CS6 oder CC InDesign Dokument mit einem platzierten Bild und einem Titel.
Wählen Sie als Flächenfarbe Weiss und eine Farbe für den Text oben in der Steuerung oder unter Menü > Fenster > Farbe > Farbfelder.

siehe Beispiel:
ParisBegin

Wählen Sie Ihre Textbox mit dem Auswahlwerkzeug an. Dann gehen Sie zu MENÜ > OBJEKT > EFFEKTE und wählen Ihre Einstellungen für: Fläche > Deckkraft: 40 %

Paris1German

und Einstellungen für: Text > Transparenz: Schlagschatten, Schein nach Innen, Abgeflachte Kante und Relief usw.

ParisGerman2

Hier ist das Resultat; der Titel zeigt Effekte und die Flächenfarbe Weiss als Transparenz. Man kann alles jederzeit mit denselben Arbeitschritten wieder ändern.

ParisFinal

The Eyes Have It

Miriam Selmi Reed represented and licensed by Illustration Source / courtesy of Illustration source

Courtesy of Illustration Source

View the artists’s homage on the topic THE EYES HAVE IT!

Miriam Selmi Reed is represented by Illustration Source, New York City. Portfolio and contact: Illustration Source NYC

Illustration technique: Traditional painting combined with digital mixed media using Smart Objects in Photoshop and Illustrator. Copyright by Illustration Source, New York City.

Illustrations-Technik: Acrylbild gemischt mit Illustrator und Photoshop sowie Smart-Objekten. Copyright by Illustration Source, New York City.