sRGB… Adobe RGB ?

Tutorial in English / Deutsch:

Deutsche Version siehe unten!
divider

English Version:

Whether an image is intended for either print or digital use, the end result will vary greatly depending on your choice of color profile.

Adobe RGB has a wider gamut than sRGB, and covers more green colors in the CMYK gamut which sRGB is unable to accommodate as you can see in the image below.

If I intend to use my file for websites and use it in Microsoft Word later on, I keep my PSD files in my original sRGB with all my layers intact.
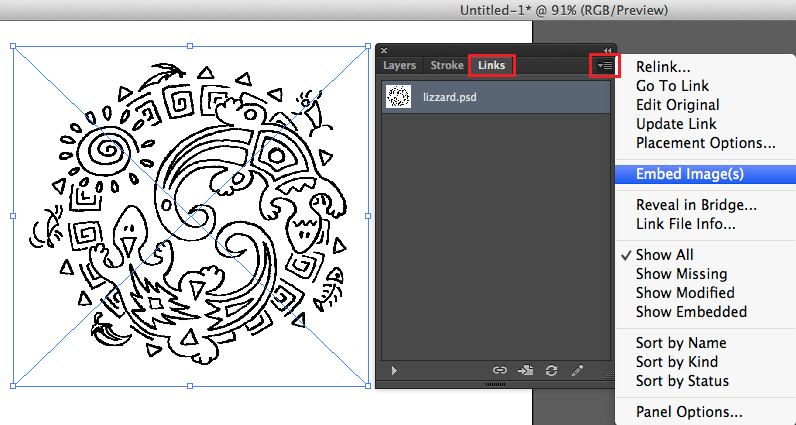
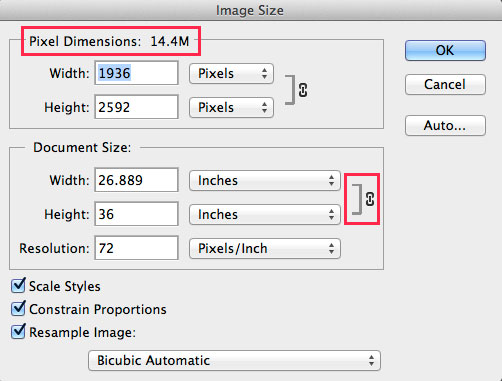
Then I’ll make a copy for the printer, flatten my layers in Photoshop and go to Edit > Convert to Profile and select the color CMYK profile of my choice. The choice of the CMYK color profile depends on my printer, which means direct communication with the printing company.

RGB-2E

More important infos about color profiles: Color Profiles

Tip on LAB colors in Adobe Photoshop: LAB COLORS in Adobe Photoshop

divider

Deutsche Version:

Egal, was für ein Bild es zu bearbeiten gilt, die Aufmerksamkeit sollte immer auf das Endprodukt fokussiert sein. D.h. je nach dem ob mein Bild später gedruckt wird oder nur auf dem Bildschirm erscheinen wird, spielt eine grosse Rolle.

sRGB ist ideal für crossmedialen Einsatz für verschiedenen Ausgabesysteme und Programme wie Microsoft und Web. Adobe RGB hat im grünen Bereich einen grösseren Farbraum, ist ansonsten aber fast identisch.

Wenn ich ein Bild später auf einer WEBSEITE zeigen oder in MICROSOFT Programmen benutzen möchte, behalte ich meine Photoshop Datei im Original sRGB.
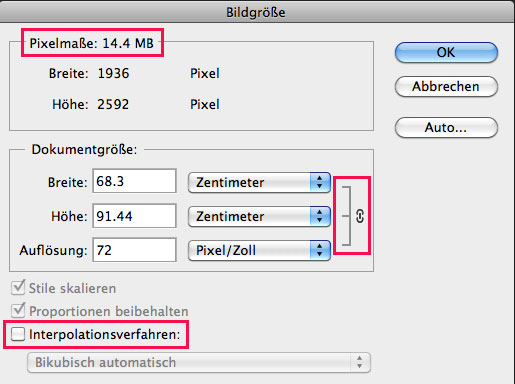
Dann mache ich eine Kopie für die Druckerei. In Photoshop gehe ich unter Bearbeiten > In Profil umwandeln und wähle mein CMYK Farbprofil. Die Wahl meines CMYK Farbprofils wird von meiner Druckerei bestimmt. Der Grund ist einfach, je nach Papierwahl und je nach Druckmaschine ändert sich das Farbprofil. D.h. direkte Kommunikation mit der Druckerei ist notwendig.

RGB-2D


Hier ein wichtiger Tipp:
Bilddaten Crossmedial aufbereiten

Mehr Tipps betreffend Farbprofile: Farbprofile

Tipp über LAB Farben in Adobe Photoshop: LAB FARBEN in Adobe Photoshop

Pixel is also Queen!

Info in English and German – Info in Deutsch und Englisch

English version:
Having just conducted an on-site training seminar at a former student’s corporate headquarters, we encountered another element of confusion in defining file size and/or resolution as needed for printing processes.

In case you are unable to view the file information in a program like Adobe InDesign or Illustrator that provides “effective PPI” info, or Photoshop which allows professional resizing methods, you can also mathematically “measure” a file.

Simply select the image file and click Command i (mac) or perform a “right click” with the mouse (pc) to view the file information for it’s pixel Width x pixel Height dimension i.e. (3000px x 3000px)

PixelFileInfo

Simply divide (/) these dimensions by the intended resolution – 300dpi (Pixel Per Inch) or 118dpc (Pixel Per Centimeter) for printing processes = 10 inch by 10 inch or 25.4 centimeter by 25.4 centimeter, which is the actual printed image size.

PixelPerInch

PixelPerCenti

DEUTSCHE Version:
Sollten sie keine dieser Programme wie Adobe InDesign oder Illustrator zur Verfügung haben” um die effektive PPI” information herauszufinden, oder Photoshop in welchem wir professionell die Bildgrösse ändern können, dann können sie auch “mathematisch die Grösse einer Datei messen”.

Ganz einfach: Klicken sie auf ihre Bilddatei und wählen die Tasten Command und i (Mac) oder “Rechtsklick” mit der Maus (PC) um die Pixel Breite x Pixel Höhe zu sehen (Unter Eigenschaften > Details). In unserem Beispiel: (3000px x 3000px)

PixelFileDeutsch

Teilen sie ganz einfach (/) diese Grösse mit ihrer Resolution für den Druckprozess – 300dpi (Pixel Per Inch = Zoll) oder 118dpc (Pixel per Zentimeter). Damit erhalten sie die richtige Druckgrösse = 10 Inch/Zoll x 10 Inch/Zoll oder 25.4 Zentimeter x 25.4 Zentimeter.

PixelPerZOLL

PixelPerZENT

Mixing Photoshop & Illustrator

Tutorial in English / Deutsch:

Deutsche Version siehe unten!
divider

English version:

Would you like to receive our tips for free in your e-mail box? Simply select FOLLOW to sign up with your e-mail address.

divider

TIP OF THE WEEK: Vectorize your pixel image or embed your Photo in Illustrator to avoid missing links!

Option 1: Vectorize your pixel image in Illustrator CS6.
In three simple steps:
1. Place a Photoshop document (jpg, tiff, psd) into Illustrator CS6.
2. Go to Menu > Window > Image Trace, choose your Preset, select under Advanced your Options and click on Trace.
3. When you are done, don’t forget to click on Expand.

imagetrace

Option 2: Embed your image!
In one easy step:
1. Select your image. Go to Window > Links > choose the side option > Embed Image(s).
This way your photo is part of your Illustrator document and won’t show as a missing link.
embed

Tutorial in English with german subtitles for advanced users: How to vectorize and colorise a photo

divider

Deutsche Version:

Möchten Sie unsere gratis Tipps im e-mail erhalten? Schreiben Sie sich unter FOLLOW mit Ihrer e-mail Adresse ein.

divider

TIPP DER WOCHE: Vektorisieren Sie Ihr Pixel Bild oder betten Sie Ihr Foto in Illustrator ein um Probleme mit Verknüpfungen zu vermeiden!

Option 1: Vektorisieren Sie Ihr Pixel Bild in Illustrator CS6.
In drei einfachen Schritten:
1. Platzieren Sie Ihre Photoshop Datei (jpg, tiff, psd) in Ihr Illustrator CS6 Dokument.
2. Gehen Sie zu Menü > Fenster > Bildnachzeichner, wählen Sie Ihre Vorgabe, wählen zudem unter Erweitert Ihre Optionen und klicken auf Nachzeichnen.
3. Wenn Sie fertig sind, ist es wichtig auf Umwandeln zu klicken. Damit wird Ihr Foto vektorisiert.

Bildnachzeichner

Option 2: Betten Sie Ihr Foto ein!
Mit einem einfachen Schritt:
1. Wählen Sie Ihr Bild an und gehen zu Fenster > Verknüpfungen > wählen Sie im Bedienfeld Eingebettete Bilder. Damit wird Ihr Pixel-Bild Teil Ihrer Illustrator Datei und ist nicht mehr mit dem platzierten Original-Bild verknüpft.

einbetten

Tutorial in Englisch mit deutschen Untertitel für Fortgeschrittene: Wie man ein Foto vektorisiert und einfärbt

Get smart with Smart Objects!

Tutorial in English and German / Anleitung in Englisch und Deutsch

Deutsche Version siehe unten!
divider

English version:

Would you like to receive our tips for free in your e-mail box? Simply select FOLLOW to sign up with your e-mail address.

In case you are into mixing Adobe programs, such as Photoshop and Illustrator, using SMART OBJECTS might be an option for you!

TIP OF THE WEEK: Placing Illustrator Images as Smart Objects into Photoshop CC or CS6.

In two simple steps!
1. Open your Illustrator document with a simple Icon, Illustration or Logo.
2. Copy your Object and place it as Smart Object into Photoshop.

SmartObject1

3. Click OK to confirm the placement. In the Layers you’ll find the Smart Oject as a small icon. By clicking on the small icon, the original file opens again in Illustrator.

SmartObjct2

If you make a change there and hit Save, the changes will be automatically transferred into your Photoshop Document because both programs are now connected.

Simple and Easy!

divider

Our new i-adobe book is available online – in English – including tutorials on 72 pages! Have a look: Preview & secure online Shop!

divider

Deutsche Version:

Möchten Sie unsere gratis Tipps im e-mail erhalten? Schreiben Sie sich unter FOLLOW mit Ihrer e-mail Adresse ein.

Falls Sie gerne Adobe Programme – wie Photoshop und Illustrator – mischen möchten, wäre das benutzen von SMART OBJEKTEN eine Option.

TIPP DER WOCHE: Platzieren von Illustrator Bilder als Smart Objekte in ein Photoshop CC oder CS6 Dokument.

In nur zwei einfachen Schritten!
1. Öffnen Sie Ihr Illustrator Dokument mit einem Icon, Illustration oder Logo.
2. Kopieren Sie Ihr Objekt und fügen es als Smart Objekt in Ihre Photoshop Datei ein.

SMartObjekt1

3. Klicken Sie auf OK um die Platzierung zu bestätigen. In Ihren Ebenen finden Sie nun Ihr Smart Objekt als kleines Icon. Wenn Sie auf dieses Icon klicken, öffnet sich das Original Dokument wieder in Illustrator.

SmartObjekt2

Sollten Sie in dieser neu geöffneten Illustrator Datei wieder eine Änderung machen und auf Speichern klicken, werden die Änderungen automatisch in Ihre Photoshop Datei übernommen. Das heisst: Beide Programme sind jetzt mit diesem Smart-Objekt verbunden!

divider

Unser neues i-adobe book ist erhältlich online – in Deutsch – inklusive Tutorials auf 72 Seiten! BESTELLUNG mit Käuferschutz: Vorschau und sicherer Onlineshop!

divider

Photoshop CS6: Schnittmaske und Einstellungsebene

Deutsche Version:

Möchten Sie unsere gratis Tipps im e-mail erhalten? Schreiben Sie sich unter FOLLOW mit Ihrer e-mail Adresse ein.

TIPP DER WOCHE: Schnittmasken in Adobe Photoshop CS6

divider

Schritt 1: Öffnen Sie Ihr Bild in Photoshop CS6 und wählen “Tontrennung” in den Einstellungsebenen.
1D

Schritt 2: Schreiben Sie Ihren Text möglichst gross und fett.
2D

Schritt 3: Duplizieren Sie Ihr Bild, schieben diese Ebene ganz nach oben und
wählen “Schnittmaske erstellen”.
Um unseren Effekt zu erzielen, wählten wir zusätzlich die Option “Lichtpunkt”.
3D

Und hier ist das fertige Resultat:
4

Photoshop CS6: Clipping mask and adjustment layer option

English version:

Would you like to receive our tips for free in your e-mail box? Simply select FOLLOW to sign up with your e-mail address.

TIP OF THE WEEK: Clipping mask in Adobe Photoshop CS6

divider

Step 1: Open your image in Photoshop CS 6 and add on “Posterize” in your adjustment layer.
1

Step 2: add on some bold, large Text.
2

Step 3: Duplicate your image, move that layer on top and select “Create Clipping Mask”.
To adjust the effect, we selected “Pin Light” from the layer blending mode.
3

and here is the result:
4

Pixel is King!

English version:

Would you like to receive our tips for free in your e-mail box? Simply select FOLLOW to sign up with your e-mail address.

TIP OF THE WEEK: How to change the image size of a photo in Adobe Photoshop

divider

Teaching Photoshop for so many years, we’ve come across the same issues over and over again. One of the major problems especially for beginners is; how to re-size an image to 300 Pixels/Inch for print. Actually it is VERY simple: All a user has to understand is that Photoshop is based on pixels.
Simply pay attention to the “Pixel Dimensions” while changing the size of the image. The Pixel Dimensions should always remain the same! Reason: if Photoshop deletes Pixels or adds on Pixels, our image quality changes for the worse, gets blurry etc.

Step 1: Open the image in Photoshop CS6. Go to MENU > IMAGE > IMAGE SIZE.
Pay attention to the Pixel Dimensions which should remain the same. The Width and Height are linked together.

1E

Step 2: Click off the Box “Resample Image” now the Width, Height and Resolution are linked together. Pay attention to the Pixel Dimensions on top. They are the same as before.

2E

Step 3: Type in the Resolution field 300 Pixels/Inch for print. Notice that the Pixel Dimensions stay the same.
This means that we have changed the size of the image BUT, the Pixel Dimensions remain the same, so we have optimal quality for print.

3E

Keep in mind that DPI is not PPI is not LPI and although there are many opinions as to the best re-sizing methods, one should at least utilize and compare the results of the 6 different re-sampling methods available at the bottom of the Photoshop image size dialog box, as the Automatic default setting “Bicubic Automatic” may not always be optimal.

TIP 2: how to enlarge an image in Photoshop CC

Pixel ist König!

Deutsche Version:

Möchten Sie unsere gratis Tipps im e-mail erhalten? Schreiben Sie sich unter FOLLOW mit Ihrer e-mail Adresse ein.

TIPP DER WOCHE: Bilder korrekt in der Grösse in Photoshop anpassen

divider

Seit vielen Jahren unterrichten wir Photoshop, daher bemerken wir immer wieder dieselben Probleme. Eines davon ist wie man Pixelbilder korrekt in der Grösse auf 300 Pixels/Zoll für den Druck anpasst.

Eigentlich ist es simpel: Der Benutzer muss einfach verstehen, dass die Pixelmasse IMMER gleich bleiben sollten.
D.h. man kann die Bildgrösse in der Breite und Höhe verändern, die Pixelmasse sollten aber gleich bleiben. Grund: Wenn Photoshop Pixels löscht oder dazufügt, verschlechtert sich die Bildqualität und das Bild wird unscharf.

Schritt 1: Öffnen Sie das Bild in Photoshop CS6. Gehen Sie zu MENÜ > BILD > BILDGRÖSSE.
Beachten Sie die Pixelmasse die nun immer gleich bleiben sollten. Die Breite und Höhe sind miteinander verknüpft.

1D

Schritt 2: Wählen Sie die Check Box “Interpolationsverfahren” ab. Damit werden die Breite, Höhe und Auflösung (Pixel) miteinander verknüpft. Beachten Sie oben die Pixelmasse: sie verändern sich nicht.

2D

Schritt 3: Tippen Sie im Feld “Auflösung” 300 Pixel/Zoll für den Druck. Beachten Sie die Pixelmasse oben: sie bleiben immer noch gleich.
Das heisst: Wir änderten zwar die Grösse des Bildes, ABER die Pixelmasse bleiben gleich und wir haben eine optimale Qualität für den Offsetdruck.

3D

DPI ist nicht das dasselbe wie PPI und ist nicht dasselbe wie LPI, dieses Thema wird in einem zukünftigen Post gezeigt. Es gibt viele Möglichkeiten wie man Bilder in Photoshop vergrössert oder verkleinert, man sollte dazu auch noch die 6 verschiedenen Optionen unter dem “Interpolationsverfahren” in Betracht ziehen, da “Bikubisch automatisch” nicht immer die optimale Lösung ist.

TIPP 2: Wie man ein Bild in Photoshop CC vergrössert