
Illustration by Miriam S. Reed / Animation by Michael A. Reed reedesign.ch
Illustration by Miriam S. Reed / Animation by Michael A. Reed reedesign.ch
Was ist gutes Grafikdesign? Anhand Ihrer eigenen Bilder, Grafiken und Illustrationen erklärt die erfahrene Multimedia-Designerin und Adobe-Trainerin Miriam Selmi Reed, auf welche 7 Grundelemente es dabei ankommt. www.digicomp.ch/blog/2024/05/13/die-7-grundelemente-des-grafikdesigns

Jede Illustration oder Grafik beginnt mit dem kleinsten Gestaltungselement: dem Punkt.
Mehrere Punkte ergeben eine Linie und daraus Flächen, die zu Kunst, Bildern und Grafiken kombiniert werden können. Die Kunst des Grafikdesigns besteht nun darin, die Linien und Flächen so zu kombinieren, dass sie die Aufmerksamkeit der Betrachtenden auf sich ziehen.
Die Grundsätze des Grafikdesigns sind Regeln, die Grafikdesignerinnen und Grafikdesignern helfen, Ihre Designs so zu gestalten, dass diese optimal mit der Zielgruppe interagieren.
Die offiziellen sieben Grundelemente des Grafikdesigns sind:
Bei der Wahl der Linien spielen die Dicke, die Richtung sowie die Lage eine grosse Rolle.

Bei der Form gibt es freie oder geometrische Formen, diese können in 2D oder 3D umgesetzt werden.
Die Farbe wird nun zusätzlich eingesetzt, um die gewünschte Stimmung oder Emotion zu verstärken. Wenn man die Wirkung der Farben auf den Menschen besser versteht, kann man diese Kenntnis bewusst beim Gestalten einsetzen.
Jetzt geht es in Richtung Farbenlehre:

Es gibt verschiedene Farbtheorien. Eine der wichtigsten Farbtheorien sind die sieben Farbkontraste von Johannes Itten, insbesondere der Komplementärkontrast. Komplementärfarben liegen im Farbkreis direkt gegenüber und wirken stark und lebendig. Das beste Beispiel für einen Komplementärkontrast ist Rot und Grün.

Eine gut gewählte Struktur oder Textur kann das gewünschte Gefühl oder die Stimmung zusätzlich unterstützen. Da wir hauptsächlich digitale Designs erstellen, müssen wir Texturen wie rau, pelzig, glatt und weich simulieren.
Mit einer passenden Schrift kann man nun dem Design noch den letzten Schliff geben und die Stimmung des Designs beeinflussen. Dabei spielt natürlich auch die Stärke der Buchstaben eine Rolle.
Auch der Raum und der Abstand zwischen den Objekten spielt eine zentrale Rolle. Weissraum wird oft unterschätzt, kann aber einem Objekt die Chance geben, visuell stärker zu wirken. Ohne genügend Weissraum wirkt das Design überladen und beeinträchtigt die Verständlichkeit.
Nun kommt das passende Bild, das Foto oder die Illustration.

Bilder sind vermutlich die wirkungsvollsten Tools der Kommunikation. Wir brauchen Bilder, um das Interesse der Zielgruppe zu wecken. Wichtig ist, dass das Bild die richtige Geschichte erzählt und den Text inhaltlich korrekt unterstützt.
Bewegte Bilder wirken dabei stärker als statische. Diese können aber nur in digitalen Medien eingesetzt werden.
Das Wichtigste an einem guten Grafikdesign ist einfach, dass man mit Farben, Bildern und Texten etwas Einzigartiges ausdrückt und sich von der Masse abhebt. In vielen Fällen gilt dabei: weniger ist mehr.
Miriam Selmi Reed arbeitet seit vielen Jahren selbständig als eidg. dipl. Grafikerin und digitale Illustratorin in der Werbebranche sowie für KMU’s und Grossfirmen. In den USA studierte sie am Art Center College of Design und im American Animation Institute. Als Trainerin für die Adobe-Creative-Cloud-Programme unterstützt sie Menschen und Firmen in der visuellen Umsetzung von Projekten und bildet sich stetig im Bereich Film und Animation weiter. Als SVEB-1 Ausbilderin ist es ihr wichtig, die komplexen Adobe-Programme so einfach und verständlich wie möglich zu vermitteln. Das auch gerne in Deutsch oder Englisch. Miriam Selmi Reed beherrscht beide Sprachen auf muttersprachlichem Niveau.

Meine Illustration zum Thema “PEACE” – gezeichnet von Hand, auf dem IPad mit Adobe Fresco

Religionsgemeinschaften sollen vereint am Frieden arbeiten. Lesen Sie dazu das
Interview mit Thomas Wipf ab Seite 6. Illustration: Miriam Selmi Reed.
www.zhref.ch/intern/kommunikation/notabene/downloads/zhref-notabene-7-2022.pdf/
Seit vielen Jahren illustriere ich Kinderbücher zusammen mit Michael Alan Reed.
Im 2016 haben wir REEDaround Books gegründet mit dem Ziel zweisprachige Bücher zu publizieren, wobei Teil des Erlöses für gute Zwecke gespendet wird. Jahrelang haben wir damit VIER PFOTEN untersützt und seit ein paar Jahren nun das Bärenland in Arosa.
Online Bookstore: Baerenland Arosa
REEDaround Books: reedaround.com
Der Star unserer Ziggy Bücher ist leider – 16 jährig – vor einem Jahr verstorben, aber seine Seele lebt in den ZIGGY Büchern weiter und hilft nun anderen Tieren in Not. Wer den “echten” ZIGGY kennenlernen möchte: z-dog.org – RUN ZIGGY RUN !

Illustration by Miriam Selmi Reed / Animation by Michael Alan Reed REEDesign.ch
Schöne Festtage, Joyeux Noël’, Buon Natale and Bellas festas da Nadal!
Illustration & Animation (Adobe After Effects) by Michael Alan Reed

Mein nächster Adobe After Effects Basiskurs bei der Migros Klubschule.
Beginn: 01.02.2021 – 22.02.2021
After Effects ist eine Compositing- und Animationssoftware von Adobe. Mit ihr lassen sich Filmaufnahmen mit computergenerierten Bildern und Effekten zusammenfügen. Das Programm ist in seiner Oberfläche ähnlich wie Adobe Photoshop, bietet jedoch eine Zeitleiste an und die Möglichkeit durch Schlüsselbilder (keyframes) animieren zu können.
Hier findest du weitere Infos zum Kurs: Migros Klubschule After Effects Klasse
![]()
Seit dem Beginn der Corona-Krise, haben wir online Workshops mit ZOOM oder TEAMS durchgeführt. Wir können euch jederzeit online mit Adobe oder Affinity Fragen helfen. Ab sofort buchbar: WEBINARE und persönliche ONLINE Beratung
Das i-adobe Ebook inklusive Filme, auf 72 Seiten ist hier erhältlich: SICHERER DOWNLOAD
The i-adobe Ebook including films, is available here on 72 pages: EASY DOWNLOAD

PDF zum downloaden vom Publisher
![]()
Ich arbeite seit vielen Jahren mit Smart Objekten. Unten zeige ich euch zwei Illustrationen die ich mit AFFINITY Designer gezeichnet habe. Das Coole an AFFINITY Designer ist, dass ich im selben Programm von der Pixel-Persona in die Vektor-Persona wechseln kann.
I’ve been using Smart Objects for many years. Below you’ll find two of my new Illustrations created with AFFINITY Designer. The benefit of AFFINITY Designer: I can switch from the Pixel-Persona to the Vector-Persona in the same program. Tutorials: AFFINITY

Shown with Courtesy of Illustration Source, New York City, USA
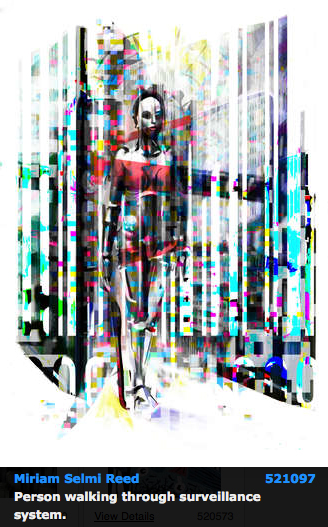
View Miriam Selmi Reed’s homage on the topic: CURRENT EVENTS
Miriam Selmi Reed is represented by Illustration Source, New York City.
Portfolio and contact: Illustration Source NYC
As instructors of Adobe programs and creative professionals, we’ve assembled this blog as easy reference for our students and clients.” Miriam Selmi Reed & Michael Alan Reed
English version
In my illustration below, I’ve used clipping masks and the adjustment layer “Posterize” in Adobe Photoshop: Step-by-step quick guide. ALL tips for easy download: i-adobe eBook in English
Deutsche Version
Bei meiner Illustration unten benutzte ich Schnittmasken und “Tontrennung” bei meinen Einstellungsebenen : Schritt-für-Schritt Anleitung. Alle Tipps zum herunterladen: i-adobe eBook in Deutsch
![]()

Courtesy of Illustration Source
View the artists’s homage on the topic SOCIAL MEDIA: Portfolio Illustration Source
![]()
Your source for commissioned illustration: ORIGINAL ART STUDIOS in New York City.

Portfolio Original Art Studios, New York City: MIRIAM SELMI REED
As instructors of Adobe programs and creative professionals, we’ve assembled this blog as easy reference for our students and clients.” Miriam Selmi Reed & Michael Alan Reed
English version:
Once you’ve prepared your illustration, comes the WIDTH TOOL into play:
1. Open your Illustration in Adobe Illustrator
2. Select your outlines with the Width Tool.
3. Drag on the points to adjust your line width.
TUTORIAL for Illustrator beginners: use the Pen Tool
Sharing infos & tips: iADOBE FORUM – Our tips: i-adobe eBook in English

Illustrations by Miriam Selmi Reed – Courtesy of Illustration Source
Deutsche Version:
Wenn deine Illustration gezeichnet ist, kommt das BREITEN-WERKZEUG ins Spiel:
1. Öffne deine Illustration in Adobe Illustrator
2. Wähle deine Linien mit dem Breiten-Werkzeug.
3. Ziehe an den Punkten um die gewünschte Linienbreite zu erhalten.
FILME & Anleitung für Illustrator Anfänger: das Zeichenstift-Werkzeug
Tausche dich aus im iADOBE FORUM! Unsere Tipps: i-adobe eBook in Deutsch
![]()

Courtesy of Illustration Source
View the artists’s homage on the topic: TIME!
Illustration technique: watercolor, acrylic and pencil combined with digital mixed media using Adobe Photoshop and Illustrator.Copyright by Illustration Source, New York City.
Illustrations-Technik: Aquarell, Acryl mit Farbstift, gemischt mit Adobe Photoshop und Illustrator. Copyright by Illustration Source, New York City.
Miriam Selmi Reed is represented by Illustration Source, New York City. Portfolio and contact: Illustration Source NYC

Illustration & animation by Michael Alan Reed – www.REEDesign.ch
Michael Alan Reed used Adobe Illustrator for his illustration, Photoshop with a “Lense-Flare-Effect” in the timeline to animate it and export as a GIF file. For (online) lessons in German or English feel free to contact us. HAPPY 2019 !

Here is how we animate / Hier findest du unsere Animation-Tipps auch in Deutsch:
Animate with: Adobe After Effects
Animate with: Adobe Photoshop
As instructors of Adobe programs and creative professionals, we’ve assembled this blog as easy reference for our students and clients.” Miriam Selmi Reed & Michael Alan Reed
English version:
Below is my personal way of working with ACTIONS as I like to repeat the same options in all my Photoshop images:
1. Open your image in Adobe Photoshop and select ACTIONS under WINDOW.
2. Create a NEW ACTION and select the RECORD button.
3. Make the changes you desire and work carefully as each step is being recorded.
4. Once you are done: Hit the STOP Button on the ACTION window.
5. Now open a new document, hit the PLAY button: the changes will be executed automatically!
Another way how to adjust several images quickly, here is a great tutorial from Adobe: How to edit multiple photos.
Sharing infos: iADOBE FORUM – Our tips for easy download: i-adobe eBook in English

Illustration by Miriam Selmi Reed – Courtesy of Illustration Source NYC
Deutsche Version:
Oben zeige ich mein persönlicher Tipp wie ich mit AKTIONEN arbeite, wenn ich dieselbe Optionen bei allen Bilder genau gleich einstellen will:
1. Öffne dein Bild in Adobe Photoshop und öffne das AKTIONEN-Bedienfeld unter FENSTER.
2. Erstelle eine AKTION und wähle AUFZEICHNUNG BEGINNEN.
3. Arbeite in ruhigem Tempo weiter und mache deine gewünschten Änderungen.
4. Klick auf den AUFZEICHNUNG BEENDEN Knopf beim AKTIONEN Bedienfeld.
5. Jetzt kannst du ein neues Dokument öffnen, den AUSWAHL AUSFÜHREN Knopf klicken: deine Änderungen werden sofort automatisch ausgeführt!
Hier eine andere Art wie man mehrere Fotos gleichzeitig verändert, ein Lerntutorial direkt von Adobe: Wie man Korrekturen bei einer Foto-Serie ausführen kann.
Tipp! Adobe Photoshop – Die komplette Übersetzung Englisch > Deutsch in Photoshop CC
Tausche dich aus im iADOBE FORUM – Alle unsere Tipps als: i-adobe eBook in Deutsch
![]()
Courtesy of Illustration Source NYC
CONCEPT DEBT: Editorial illustrations SIS New York City
![]()
Miriam Selmi Reed is represented by Illustration Source, New York City. Portfolio and contact: Illustration Source NYC
Portfolio Original Art Studios, New York City: MIRIAM SELMI REED
As instructors of Adobe programs and creative professionals, we’ve assembled this blog as easy reference for our students and clients.” Miriam Selmi Reed & Michael Alan Reed
Deutsche Version siehe unten!
English version:
In my illustration below, I’ve used my own brushes which I created myself in Adobe Illustrator CC: Step-by-step-Information.
Here is a Tutorial directly from Adobe covering this topic: HOW TO DRAW WITH ILLUSTRATOR
Any questions? Contact us at iADOBE FORUM! ALL tips for easy download: i-adobe eBook in English
![]()
NEW! Webinar online in English:
Learn how to draw digitally with tips & tricks in combination with Photoshop.
Interested? Send me an e-mail – greetings, Mimi Reed

NEU! Webinar online in Deutsch:
Digital zeichnen lernen mit Tipps & Tricks, in Kombination mit Photoshop.
Interessiert? Schreib mir ein e-mail – Grüsse, Mimi Reed
![]()
Deutsche Version:
Bei meiner Illustration unten benutzte ich meine eigenen Pinsel welche ich selber in Adobe Illustrator CC erstellte: Schritt-für-Schritt Anleitung.
Hier ist ein Tutorial direkt von Adobe über das Thema: WIE MAN MIT ILLUSTRATOR ZEICHNET
Hast du noch Fragen? Kontaktiere uns unter iADOBE FORUM! Alle Tipps zum herunterladen: i-adobe eBook in Deutsch
![]()

Courtesy of Illustration Source
![]()
Your source for commissioned illustration: ILLUSTRATION SOURCE in New York City.
Illustration Source, New York City: online Portfolio Miriam Selmi Reed
Original Art Studios, New York City: MIRIAM SELMI REED at OAS
TIP OF THE WEEK:
“How I use Smart Objects and Smart Filters in Adobe Photoshop”
Deutsche Version siehe unten!
In 3 simple steps!
1. Open your Adobe Illustrator document with a simple Icon, Illustration or Logo.
2. Copy your Object and place it as Smart Object into your Photoshop file.
3. Click OK to confirm the placement. In the Layers you’ll find the Smart Object as a small icon. By clicking on the small icon, the original file opens again in Illustrator which means: both files are linked with each other.
Or I simply select in Photoshop under Filter > the command CONVERT FOR SMART FILTERS before adding any Filter effects. With this method I can modify the filters as desired and work non-destructive.
A Tutorial including film from Adobe: SMART OBJECTS
Sharing infos: iADOBE FORUM – Our tips for easy download: i-adobe eBook in English
Deutsche Version:
TIPP DER WOCHE:
“Wie ich mit Smart Objekten und -Filtern in Adobe Photoshop arbeite”
In 3 einfachen Schritten!
1. Öffne dein Adobe Illustrator Dokument mit einem einfachen Icon, Illustration oder Logo.
2. Kopiere dein Object and platziere es als Smart Objekt in deine Photoshop Datei.
3. Klicke auf OK um es zu bestätigen. In deinen Ebenen findest du nun dein Logo als Smart-Objekt. Wenn du auf dieses Smart-Objekt-Icon klickst, öffnet sich dein Original wieder in Illustrator, d.h. die beiden Dateien sind miteinander verknüpft.
Oder: Ich gehe direkt in Photoshop unter Filter und wähle den Befehl > KONVERTIEREN ZU SMART FILTER – bevor ich Filtereffekte anwende. Damit kann ich jegliche Filter jederzeit verändern und arbeite nicht-destruktiv.
Ein Film mit deutschen Untertiteln direkt von Adobe: SMART OBJEKTE
Tausche dich aus im iADOBE FORUM – Alle unsere Tipps als: i-adobe eBook in Deutsch
Miriam Selmi Reed is represented and licensed by Illustration Source – Courtesy of Illustration Source
View the artists’s homage on the topic: STOCK MARKET
Miriam Selmi Reed is represented by Illustration Source, New York City. Portfolio and contact: Illustration Source NYC
Illustration technique: watercolor, acrylic and pencil combined with digital mixed media using Adobe Photoshop and Illustrator.Copyright by Illustration Source, New York City.
Illustrations-Technik: Aquarell, Acryl mit Farbstift, gemischt mit Adobe Photoshop und Illustrator. Copyright by Illustration Source, New York City.
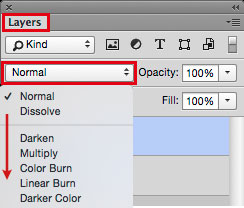
English version:
Adobe Photoshop Tip > BLENDING MODE: I love to use Blending Modes in my layers, as shown in the Illustration below. I first go under MENU > LAYERS > and select a different Blending Mode for the layer. With this method, I can apply different transparencies to my layers and work non-destructive.
Sharing infos: iADOBE FORUM – Our tips for easy download: i-adobe eBook in English

Illustration by Miriam Selmi Reed – Courtesy of Illustration Source
![]()
Deutsche Version:
Adobe Photoshop Tipp > MISCHMODUS: Ich benutze gerne den Mischmodus in Photoshop – wie bei der Illustration oben. Dazu gehe ich unter MENU > EBENEN > und stelle einen anderen Mischmodus für die Ebene ein. Mit dieser Methode arbeite ich nicht-Destruktiv, und kann somit jederzeit eine Transparenz nach Wunsch verändern.

Tausche dich aus im iADOBE FORUM – Alle unsere Tipps als: i-adobe eBook in Deutsch
![]()
Courtesy of Illustration Source
View the artists’s homage on the topic: GOVERNMENT
Miriam Selmi Reed is represented by Illustration Source, New York City. Portfolio and contact: Illustration Source NYC
Illustration technique: watercolor, acrylic and pencil combined with digital mixed media using Adobe Photoshop and Illustrator.Copyright by Illustration Source, New York City.
Illustrations-Technik: Aquarell, Acryl mit Farbstift, gemischt mit Adobe Photoshop und Illustrator. Copyright by Illustration Source, New York City.
As instructors of Adobe programs and creative professionals, we’ve assembled this blog as easy reference for our students and clients.” Miriam Selmi Reed & Michael Alan Reed
Deutsche Version – siehe unten!
1. Open your image in Adobe Photoshop.
2. Open your layers under Window > Layers.
3. Add a new empty layer on top.
4. Select either the Stamp-Tool or the Healing-Brush-Tool.
5. Make sure you select the command ALL LAYERS on top!
6. When clicking the ALT Key, the Healing-Brush-Tool (or Stamp-Tool) samples the part you are selecting. Have a look below.
7. Then you click on the part you wish to retouch. No worries: you are stamping on an empty layer, use the eraser tool if you need to make corrections.
Sharing infos & tips: iADOBE FORUM – Our tips: i-adobe eBook in English

Illustration by Miriam Selmi Reed – Courtesy of Illustration Source
Deutsche Version:
1. Öffne dein Bild in Adobe Photoshop.
2. Öffne deine Ebenen unter Menu > Ebenen.
3. Erstelle eine neue leere Ebene ganz oben.
4. Wähle entweder das Stempel-Werkzeug oder den Bereichsreparatur-Pinsel.
5. Ganz wichtig: oben in der Steuerung ALLE EBENEN auswählen!
6. Wenn du den ALT Key drückst, wird der Bereichsreparatur-Pinsel (oder Stempel) den Teil aufnehmen den du haben willst. Siehe oben.
7. Danach klickst du auf den Teil den du retuschieren willst. Keine Sorge: du stempelst auf einer leeren Ebene, falls nötig, benutzt du den Radiergummi für Korrekturen.
Tipp! Adobe Photoshop für Tutorial-Freunde: Die komplette Übersetzung von Englisch zu Deutsch: Übersetzung Englisch > Deutsch in Photoshop CC
Tausche dich aus im iADOBE FORUM! Unsere Tipps: i-adobe eBook in Deutsch
![]()
Courtesy of Illustration Source
View the artists’s homage on the topic: TIME!
Illustration technique: watercolor, acrylic and pencil combined with digital mixed media using Adobe Photoshop and Illustrator.Copyright by Illustration Source, New York City.
Illustrations-Technik: Aquarell, Acryl mit Farbstift, gemischt mit Adobe Photoshop und Illustrator. Copyright by Illustration Source, New York City.
Deutsche Version – siehe unten!
Most Animations are produced as cartoons in movies, TV, video games or commercials. Programs like Adobe Premiere Pro (for editing) and After Effects (for special effects & animation) are part of the Creative Cloud
Below is an animated After Effects project we’ve recently produced for Swissveg.ch
![]()
This link shows professionals in Hollywood as they work on films like OBLIVION and IRON MAN by using the program AFTER EFFECTS
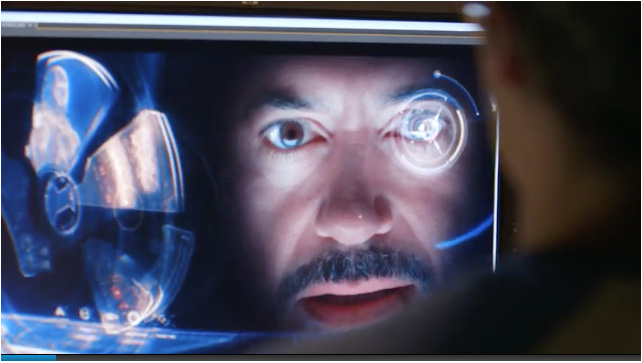
Dieser Link hier zeigt wie Profis bei den Spielfilmen OBLIVION und IRON MAN in Hollywood mit AFTER EFFECTS die gewünschten Effekte eingebaut wurden.
![]()
Der grösste Teil der Animationen werden für den Trickfilmbereich produziert; für Kino oder Fernsehen, für Video-Games oder für die Werbung. Programme wie Adobe Premiere Pro (für Filmschnitt) und After Effects (für Effekte und Animationen) gehören zur Creative Cloud
Hier ist unser neues After Effects Projekt für Swissveg.ch
After Effects ist sehr spannend und in Kombination mit dem Filmschnitt-Programm Premiere Pro kann man relativ schnell professionell eigene Filme fertigstellen.
NEWS: Erste AFTER EFFECTS Klasse in der Migros Klubschule Alltstetten und in Zürich!
Anmeldung und Infos: AFTER EFFECTS KURSE
As instructors of Adobe programs and creative professionals, we’ve assembled this blog as easy reference for our students and clients.” Miriam Selmi Reed & Michael Alan Reed
English version:
Below is my personal way of cutting out an image with hard edges:
1. Open your image in Adobe Photoshop.
2. Duplicate your layer and select it.
3. Click TWICE on to the layer-mask icon so you will get a VECTOR MASK.
4. Select your Pen-Tool and follow the shape you would like to cut out.
5. Once you are done; click on the layer below and make it invisible.
6. To make alterations on your vector path, simply open the Properties or use the Direct-Selection-Tool to alter the vector points.
Another possible way to cut out an image using the Quick-Selection-Tool
Sharing infos: iADOBE FORUM – Our tips for easy download: i-adobe eBook in English
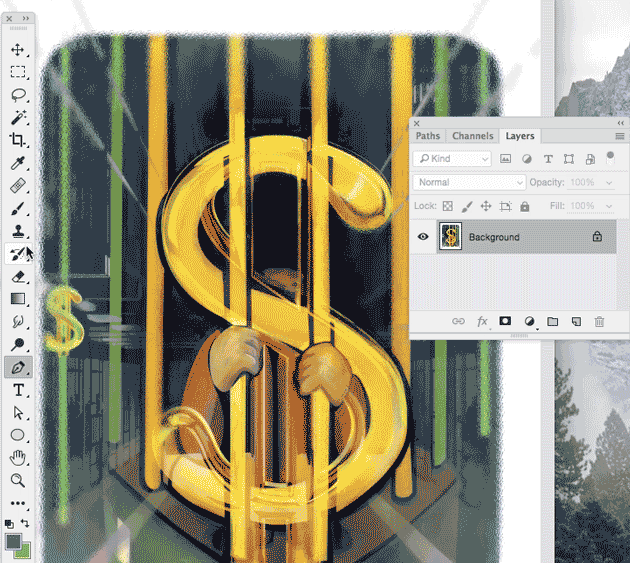
Illustration by Miriam Selmi Reed – Courtesy of Illustration Source NYC
Deutsche Version:
Oben zeige ich mein persönlicher Tipp wie ich Bilder mit harten Kanten freistelle:
1. Öffne dein Bild in Adobe Photoshop.
2. Dupliziere deine Ebene und wähle diese an.
3. Klicke ZWEIMAL auf das Ebenenmasken-Icon damit eine VEKTOR-MASKE entsteht.
4. Wähle dein Zeichenstift-Werkzeug und folge dem Objekt, welches du freistellen möchtest.
5. Wenn du fertig bist, mach die untere Ebene unsichtbar.
6. Um weitere Korrekturen vorzunehmen, öffne die Eigenschaften oder klicke mit dem Direkt-Auswahl-Werkzeug auf die Vektoren und verschiebe deren Position.
Ein anderer schneller Weg ein Bild freizustellen mit dem Schnell-Auswahl-Werkzeug
Tipp! Adobe Photoshop – Die komplette Übersetzung Englisch > Deutsch in Photoshop CC
Tausche dich aus im iADOBE FORUM – Alle unsere Tipps als: i-adobe eBook in Deutsch
![]()

Courtesy of Illustration Source
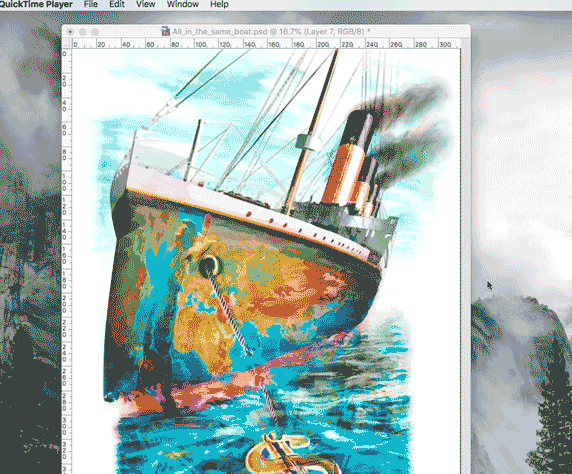
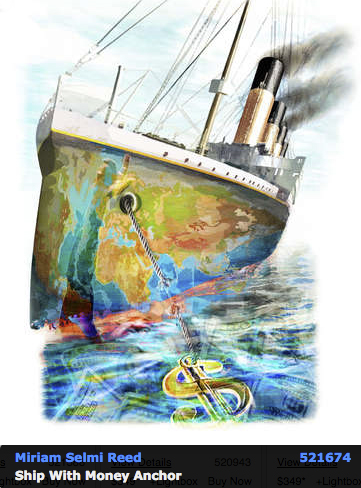
View the artists’s homage on the topic: Finance and Debt
Miriam Selmi Reed is represented by Illustration Source, New York City. Portfolio and contact: Illustration Source NYC
Illustration technique: watercolor, acrylic and pencil combined with digital mixed media using Adobe Photoshop and Illustrator.Copyright by Illustration Source, New York City.
Illustrations-Technik: Aquarell, Acryl mit Farbstift, gemischt mit Adobe Photoshop und Illustrator. Copyright by Illustration Source, New York City.
![]()
Your source for commissioned illustration: ORIGINAL ART STUDIOS in New York City.
Portfolio Original Art Studios, New York City: MIRIAM SELMI REED
As instructors of Adobe programs and creative professionals, we’ve assembled this blog as easy reference for our students and clients.” Miriam Selmi Reed & Michael Alan Reed
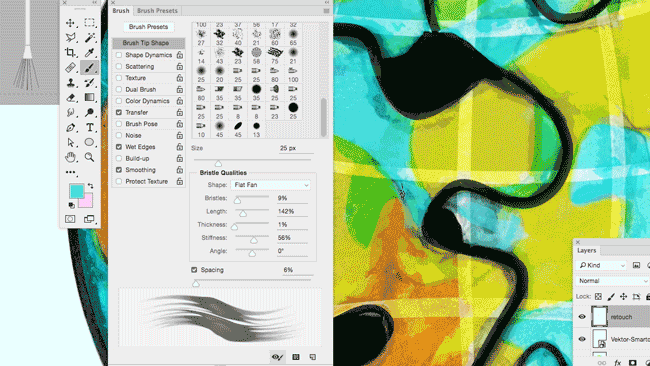
English version:
In my illustration below, I’ve used paint brushes and layer masks in Adobe Photoshop.
1. Open your picture in Adobe Photoshop CC
2. Open your brushes under > Window > Brush
3. Create a new layer on top where you can paint and make a layer mask for corrections:
Step-by-step-guide: How to make a layer mask. To make changes in your layer mask is simple: use your brush and paint directly into your layer mask using black or white!
Check out the Adobe Create Magazine: Tutorials. Any questions? Contact us at iADOBE FORUM – Our tips for easy download: i-adobe eBook in English
Deutsche Version:
In meiner Illustration benutzte ich die Pinsel und Ebenenmasken in Adobe Photoshop.
1. Öffne dein Bild in Adobe Photoshop CC
2. Öffne deine Pinsel unter > Fenster > Pinsel
3. Erstelle eine neue Ebene ganz oben zum pinseln und eine Ebenenmaske für allfällige Korrekturen: Schritt-für-Schritt Anleitung: Wie man eine Ebenenmaske erstellt. Man korrigiert eine Ebenenmaske ganz einfach indem man direkt mit einem weissen oder schwarzen Pinsel innerhalb der Maske malt!
Dann schau mal ins Adobe Create Magazine rein: Tutorials. Hast du Fragen? Kontaktiere uns unter iADOBE FORUM! Unsere Tipps zum herunterladen: i-adobe eBook in Deutsch
![]()
View the artists’s homage on the topic PEACE ON EARTH at Portfolio Illustration Source

Courtesy of Illustration Source
“As instructors of Adobe programs and creative professionals, we’ve assembled this blog as easy reference for our students and clients.” Miriam Selmi Reed & Michael Alan Reed
![]()
Deutsche Version siehe unten!
Photoshop Tip: I normally use the perspective option in Photoshop, to tilt the floor; as shown in my Illustration below. I open my Photoshop file and go to EDIT > TRANSFORM and choose PERSPECTIVE. With this method, I can alter the PERSPECTIVE as I wish; by simply pulling the anchor points to change it. Hit ENTER once you’re done.
Illustrator Tip: I’ve traced the outlines with Adobe Illustrator using Adobe CC: New Tracing Tools in Adobe Illustrator
ALL tips of this Blog combined in one 72 pages PDF for easy download: i-adobe book in English – Preview & download here
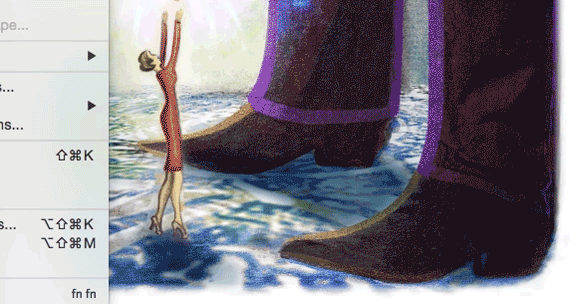
Illustration by Miriam Selmi Reed / Courtesy of Illustration Source
Deutsche Version:
Photoshop Tip: Ich benutze die Perspektiven-Option in Photoshop, um den Boden perspektivisch nach hinten zu kippen; wie man oben bei meiner Illustration sieht. Ich öffne meine Photoshop-Datei und gehe zu BEARBEITEN > TRANSFORMIEREN und wähle Perspektivisch. Mit dieser Methode kann ich die PERSPEKTIVE ändern indem ich an den Hebeln ziehe. Wichtig: mit der ENTER Taste bestätigen.
Illustrator Tipp: Ich habe die neuen Zeichnungswerkzeuge von Adobe CC benutzt um die Illustration unten zu zeichnen: Neue Zeichnungswerkzeuge in Adobe Illustrator
Alle Tipps von diesem Blog kombiniert in einem 72-Seiten PDF zum herunterladen: i-adobe book in Deutsch – Vorschau & Download hier
![]()
Courtesy of Illustration Source
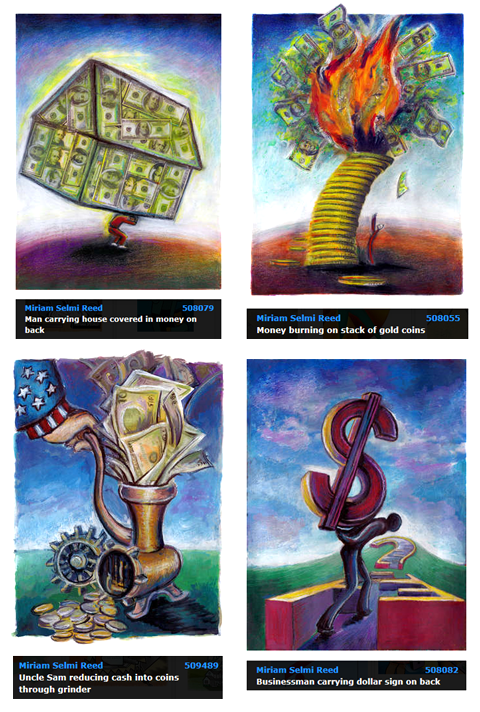
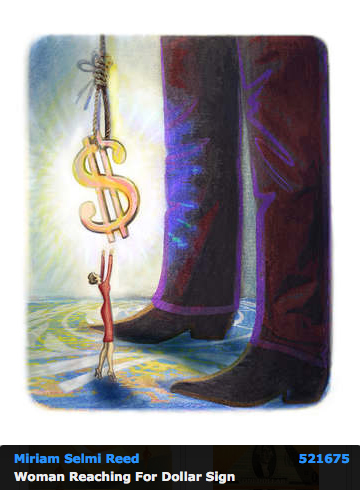
View the artists’s homage on the topic: MONEY
Miriam Selmi Reed is represented by Illustration Source, New York City. Portfolio and contact: Illustration Source NYC
Illustration technique: watercolor, acrylic and pencil combined with digital mixed media using Adobe Photoshop and Illustrator.Copyright by Illustration Source, New York City.
Illustrations-Technik: Aquarell, Acryl mit Farbstift, gemischt mit Adobe Photoshop und Illustrator. Copyright by Illustration Source, New York City.
![]()
Your source for commissioned illustration: ORIGINAL ART STUDIOS in New York City.
Portfolio Original Art Studios, New York City: MIRIAM SELMI REED
