Open Source programs, Affinity, VIVA Designer

COMING SOON: WEBINARS on i-adobe!

divider

Information in English and German / Information in Deutsch und Englisch

Deutsche Information siehe unten!
divider

Info in English:

I’m a big fan of Adobe programs, but have you ever heard of the new program AFFINITY, VIVA Designer or the Open Source program SCRIBUS? Here are the links to check them out:

NEW PROGRAMS:
Professional photo editing & graphic design software for MAC & PC (Beta version): AFFINITY PHOTO & DESIGNER

Affinity

Economically priced high end DTP program: VIVA DESIGNER

OPEN SOURCE PROGRAMS:
SCRIBUS: LAYOUT Open Source-program!
GIMP: Image Manipulation Program!
INKSCAPE: Open source vector graphics program!

divider

Information in Deutsch:

Ich bin ein grosser Fan von Adobe Programmen, möchte euch aber trotzdem die Programme AFFINITY, VIVA Designer und SCRIBUS vorstellen. Unten sind die Links dazu:

Professionelle Software für Bildbearbeitung & Grafikdesign auf dem Mac & neu auf dem PC (Beta Version): AFFINITY PHOTO & DESIGNER in Deutsch

Affinity

Kostengünstiges High-End DTP-Programm: VIVA DESIGNER

divider

GRATIS PROGRAMME:
SCRIBUS: LAYOUT Open Source Gratis-Programm!
SCRIBUS download deutsche Version für mac!
GIMP: Gratis Bildbearbeitungs-Programm – Download Link zur deutschen Version
INKSCAPE: Erstellen und zeichnen von Vektorgrafiken

divider

Show Photoshop Channels in Color / Photoshop Kanäle in Farbe zeigen

Tutorial in English and German / Anleitung in Deutsch und Englisch

Deutsche Version siehe unten!
divider

English version:

Tip of the week: How to show the Channels in Photoshop in Color!
(The normal setting only shows them in greyscale)

It’s 1 simple step:
On a PC go to EDIT > PREFERENCES > INTERFACE and click on the box
SHOW CHANNELS IN COLOR.

On a Mac go to PHOTOSHOP > PREFERENCES > INTERFACE and click on the box
SHOW CHANNELS IN COLOR.

channelE1

Open WINDOW > CHANNELS … the channels are now shown in color!

channelse2

divider

Deutsche Version:

Tip of the week: Wie man die Kanäle in Photoshop farbig sehen kann!
(Normalerweise sieht man diese leider nur in Graustufen)

Es ist ein einfacher Schritt:
Auf einem PC gehen Sie zu BEARBEITEN > VOREINSTELLUNGEN > BENUTZEROBERFLÄCHE und klicken Sie auf die Box FARBAUSZÜGE IN FARBE ANZEIGEN.

Auf einem Mac gehen Sie zu PHOTOSHOP > VOREINSTELLUNGEN > BENUTZEROBERFLÄCHE und klicken Sie auf die Box FARBAUSZÜGE IN FARBE ANZEIGEN.

ChannelD1

Öffnen Sie unter FENSTER > KANÄLE… die Kanäle werden neu in Farbe gezeigt!

ChannelsD2

divider

Our new i-adobe book is available online – in English – Preview & download here!

Unser neues i-adobe book ist erhältlich online – in Deutsch – Vorschau & Download hier!

InDesign: Optical alignment for text! / Text optisch ausgleichen!

Deutsche Version siehe unten!

English version:
Open InDesign, place some text, select it and go to MENU > FONT > STORY. There you select the box “Optical Margin Alignment.” Adjust it to your visual taste and you’ll see how the text aligns differently once selected!

alignment

Additional Infos directly from Adobe: Formatting texts with Indesign

divider

Our new i-adobe book is available online – in English – Preview & download here!

Unser neues i-adobe book ist erhältlich online – in Deutsch – Vorschau & Download hier!

divider

Deutsche Version:
Öffnen Sie InDesign, platzieren Ihren Text und gehen unter MENÜ > SCHRIFT > TEXTABSCHNITT. Im Bedienfeld Textabschnitt aktivieren Sie die Box “Optischer Randausgleich”. Passen Sie dort die Punktzahl Ihren Wünschen an > die Schrift gleicht sich automatisch optisch aus!

alignmentD

Weitere Tipps direkt via Adobe: Texte formatieren mit Adobe Indesign

Illustrator brushes / Pinsel

English:
How I make my own brushes in Illustrator: The brushes used in the illustration below are part of the “Artistic Watercolor Brushes” found under MENU > WINDOW > BRUSHES > Library. I drag the brush I like out of the Library on to the drawing board.

artisticbrush

Then I make changes to the brush and drag it into my regular Brushes-Window . There are 3 different brush-options, I prefer the Art Brush myself. Then I select the box the “Colorization Method > Tints”, so I can color my brush stroke later on.

newbrush

divider

Our new i-adobe book is available online – in English – Preview & download here!

Unser neues i-adobe book ist erhältlich online – in Deutsch – Vorschau & Download hier!

divider

Deutsch:
Wie ich meine eigenen Pinsel in Illustrator erstelle: Ich benutze meistens einen bestehenden Pinsel unter MENÜ > FENSTER > PINSEL. Die Pinsel die ich unten bei meiner Illustration benutzte, sind Teil der “Künstlerisch Aquarell Palette” in der Pinselbibliothek. Ich ziehe einen Pinsel der mir gefällt aus der Pinsel-Bibliothek auf die Zeichenfläche.

kuenstlerisch

Dann verändere ich den Pinselstrich so wie ich ihn haben möchte und ziehe ihn in mein normales Pinselbedienfeld . Es gibt 3 verschiedene Pinsel-optionen die man ausprobieren sollte. Ich ziehe den Bildpinsel vor. Wichtig ist einzig die Option Methode “Einfärben > Farbtöne” anzuwählen, damit ich den Pinsel auch später nach Bedarf anders einfärben kann.

neuerpinsel

divider


Miriam Selmi Reed is represented and licensed by Illustration Source - Courtesy of Illustration Source

Miriam Selmi Reed is represented and licensed by Illustration Source – Courtesy of Illustration Source

View the artists’s homage on the topic: TAKE FLIGHT

Miriam Selmi Reed is represented by Illustration Source, New York City. Portfolio and contact: Illustration Source NYC

Illustration technique: watercolor, acrylic and pencil combined with digital mixed media using Adobe Photoshop and Illustrator.Copyright by Illustration Source, New York City.

Illustrations-Technik: Aquarell, Acryl mit Farbstift, gemischt mit Adobe Photoshop und Illustrator. Copyright by Illustration Source, New York City.

Create patterns / erstellen von Mustern in Illustrator

Tutorial in English and German / Anleitung in Englisch und Deutsch

Deutsche Version siehe unten!
divider

English version:

Open a new document in Adobe Illustrator CS6 or CC:

1. Go to MENU > OBJECT > PATTERN > MAKE.
Create your pattern inside the blue box. Illustrator is going to create your pattern as a repeat automatically.

pattern

2. Once you are done, simply select the DONE button, this way Illustrator adds the pattern (repeat) into your Swatch Library. Now you can fill your fashion silhouette or object with your pattern.

Print

3. To make a change to your newly created pattern: Go to OBJECT > PATTERN > EDIT PATTERN. Make your changes and click on DONE if you like to save over the old pattern or click on SAVE A COPY in case you like to add a new swatch and keep the previous one.

For more tips watch the step-by-step Tutorial:

divider

Our new i-adobe book is available online – in English – including tutorials on 72 pages – Preview & download here!

divider

Deutsche Version:

Öffnen Sie ein neues Dokument in Adobe Illustrator CS6 oder CC:

1. Gehen Sie zu MENÜ > OBJEKT > MUSTER > ERSTELLEN. Illustrator erstellt automatisch ihr Muster als Rapport innerhalb des blauen Rahmens.

muster

2. Sobald Sie mit Ihrem Muster fertig sind, klicken Sie oben auf FERTIG. Damit wird Ihr Muster (Rapport) in Ihr Farbfeld-Bedienfeld eingefügt. Jetzt können Sie Ihr Muster in Ihr Objekt oder Illustration als Flächefarbe einfüllen.

3. Falls Sie Ihr Muster ändern möchten: Gehen Sie zu OBJEKT > MUSTER > MUSTER BEARBEITEN. Klicken Sie auf FERTIG wenn Sie das alte Muster überspeichern wollen oder klicken Sie auf KOPIE SPEICHERN wenn Sie es als neues Muster speichern wollen.

Schritt-für-Schritt Anleitung auf Englisch mit deutschen Untertitel:

divider

Unser neues i-adobe book ist erhältlich online – in Deutsch – inklusive Tutorials auf 72 Seiten – Vorschau & Download hier!

divider

Your own Portfolio / Dein eigenes Portfolio!

Build a website in minutes with Adobe Portfolio!

Deutsche Version siehe unten!

portfolio

It’s never been easier to create your free website and promote your own portfolio. Adobe Creative Cloud makes it possible!
ENGLISH:  How to showcase your work with Adobe Portfolio!

divider

Deutsche Version:
Noch nie war es so einfach eine eigene gratis Webseite erstellen; mit der Adobe Creative Cloud ist es super einfach!
DEUTSCH: Einführung in Adobe Portfolio in 4 Minuten!

Photoshop: Retouch Layer / Retuschen-Ebene

English:
How I retouch my illustrations in a “non-destructive” way: When using the Stamp- and Healing Brush Tools in Photoshop CC or CS6, I place an empty layer on top – while selecting the option ALL LAYERS in the Control Bar – then I click the ALT key to sample and start stamping. When I make a mistake, I select the empty retouch-layer and use the Eraser Tool to delete it. With this “non-destructive” method my artwork won’t be harmed.


stamp

Deutsch:
Wie ich meine Illustrationen “nicht-destruktiv” retuschiere: Ich benutze das Stempel-Werkzeug oder den Reparaturpinsel. Ich erstelle eine leere Ebene die ich ganz oben einfüge. Dann drücke ich die ALT Taste um einen sauberen Bereich aufzunehmen – mit der Option ALLE EBENEN (=All Layers) aufnehmen oben in der Steuerung – und stemple vor mich hin. Sollte ich einen Fehler machen, benutze ich das Radiergummi-Werkzeug und lösche ihn. Damit arbeite ich “nicht-destruktiv” und meine Illustration ist dadurch geschützt.


Photoshop Stamp-Tool / Stempel-Werkzeug

Photoshop Stamp-Tool / Stempel-Werkzeug


Miriam Selmi Reed is represented and licensed by Illustration Source - Courtesy of Illustration Source

Miriam Selmi Reed is represented and licensed by Illustration Source – Courtesy of Illustration Source


View the artists’s homage on the topic: PARENTHOOD TODAY

Miriam Selmi Reed is represented by Illustration Source, New York City. Portfolio and contact: Illustration Source NYC

Illustration technique: watercolor, acrylic and pencil combined with digital mixed media using Adobe Photoshop and Illustrator.Copyright by Illustration Source, New York City.

Illustrations-Technik: Aquarell, Acryl mit Farbstift, gemischt mit Adobe Photoshop und Illustrator. Copyright by Illustration Source, New York City.

How to import Excel charts into Illustrator & Indesign

Tutorial in English and German / Anleitung in Deutsch und Englisch

Deutsche Version siehe unten!
divider
English version:

Would you like to receive our tips for free in your e-mail box? Simply select FOLLOW to sign up with your e-mail address.

TIP OF THE MONTH: How to import Excel charts into Adobe Illustrator or Indesign

1. Open Excel, select the chart while holding down the SHIFT key and go to EDIT > COPY PICTURE.

Excel_E

2. Select “As shown on screen”
3. Open Illustrator or InDesign and PASTE it! (MENU > EDIT > PASTE)

Of course, the result will be pixelated with this method. If you like to keep the vectors, I prefer to take the Excel file into Adobe Illustrator. There I can edit the graphic as I please and place it as an AI file into Indesign if needed.

divider

Our new i-adobe book is available online – in English – including tutorials on 72 pages – Preview & download here!

divider

Deutsche Version:

Möchten Sie unsere gratis Tipps in Ihrem e-mail erhalten? Schreiben Sie sich unter FOLLOW mit Ihrer e-mail Adresse ein.

TIPP DES MONATS: Wie man ein Diagramm von Excel in Adobe Illustrator oder InDesign importiert

1. Öffne Excel, wähle das Diagramm aus, drücke gleichzeitig die UMSCHALT (Shift) TASTE und gehe zu BEARBEITEN > ALS BILD KOPIEREN.

Excel_D

2. Wähle dann “Wie angezeigt”
3. Öffne Illustrator oder InDesign und füge das Diagramm ein! (MENU > BEARBEITEN > EINFÜGEN)

Es ist klar, dass mit dieser Methode das Diagramm verpixelt sein wird. Wenn ich die Vektoren behalten möchte, hole ich das Diagramm ins Adobe Illustrator und kann die Grafik verändern. Später platziere ich die Grafik dann als AI ins Indesign Layout falls mein Projekt das benötigt.

divider

Unser neues i-adobe book ist erhältlich online – in Deutsch – inklusive Tutorials auf 72 Seiten – Vorschau & Download hier!

divider

NEW: 123 i-Adobe eBook / PDF

ENGLISH:

While there are many online tutorials and step-by-step courses already available, we have chosen to simply provide solutions for some of the most commonly asked questions we’ve encountered:

Preview & download at: 123 i-adobe Book in ENGLISH

i-Adobe interactive book / Cover illustration: Michael Alan Reed

i-Adobe interactive book / Cover illustration: Michael Alan Reed

DEUTSCH:

Es gibt bereits viele Tutorials und Kurse online, daher haben wir uns entschlossen einfache Lösungen für typische Adobe Anwendungsprobleme zu publizieren:

Vorschau & Download: 123 i-adobe Buch in DEUTSCH

Vectorise your photo / Foto in Vektoren umwandeln

Tutorial in English and German / Anleitung in Deutsch und Englisch

Deutsche Version siehe unten!

English version:

Would you like to receive our tips for free in your e-mail box? Simply select FOLLOW to sign up with your e-mail address.

divider

TIP OF THE WEEK: How to colorize a vectorized photo!
How to use the image trace option in Illustrator CS6 or CC, to vectorize and colorize a Photo – Bilingual instructions in English and German subtitles.

Step 1: Place your photo into Illustrator.
Step 2: Vectorise your photo > Window > Image Trace.
Step 3: Don’t forget to click on the button “EXPAND”.
Step 4: Edit your colors > Edit > Edit Colors.

Tutorial:

divider

Deutsche Version

Möchten Sie unsere gratis Tipps im e-mail erhalten? Schreiben Sie sich unter FOLLOW mit Ihrer e-mail Adresse ein.

TIPP DER WOCHE: Wie ein vektorisiertes Bild einfärbt

Tutorial: Wie man mit dem Bildnachzeichner in Illustrator CS6 oder CC arbeitet, damit ein Foto vektorisiert und einfärbt. Zweisprachige Anleitung in Englisch mit deutschen Untertiteln.

1: Platzieren Sie Ihr Bild in Illustrator.
2: Vektorisieren Sie Ihr Photo > Fenster > Bildnachzeichner.
3: Vergessen Sie nicht auf “UMWANDELN” zu klicken.
4: Färben Sie Ihr Vektorbild ein unter > Bearbeiten > Farben bearbeiten.

Tutorial auf Englisch mit deutschen Untertiteln:

divider
Illustration technique: watercolor, acrylic and pencil combined with digital mixed media using Adobe Photoshop and Illustrator.Copyright by Illustration Source, New York City.

Illustrations-Technik: Aquarell, Acryl mit Farbstift, gemischt mit Adobe Photoshop und Illustrator. Copyright by Illustration Source, New York City.

Courtesy of Illustration Source

Courtesy of Illustration Source

View the artists’s homage on the topic: GOVERNMENT

Miriam Selmi Reed is represented by Illustration Source, New York City. Portfolio and contact: Illustration Source NYC

Your source for commissioned illustration: ORIGINAL ART STUDIOS in New York City.

OAS

Portfolio Original Art Studios, New York City: MIRIAM SELMI REED

Color profiles / Farbprofile zuweisen oder umwandeln?

Tutorial in English and German / Anleitung in Deutsch und Englisch

Deutsche Version siehe unten!
divider
English version:

Would you like to receive our tips for free in your e-mail box? Simply select FOLLOW to sign up with your e-mail address.

TIP OF THE WEEK: What is the difference between assign a color profile or to convert a color profile?

Here it is in Photoshop: Menu > Edit > Convert to Profile (right above: Assign Profile!)
PSD_covertProfile

In InDesign: Menu > Edit > Convert to Profile (right above: Assign Profile!)
Indd_Covert-to-profile

And here in Illustrator: Menu > Edit > Assign Profile (Convert to does NOT exist!)
AI_assignProfile

Tip: To assign a color profile only changes the appearance on the monitor. You can try that out, in that you are opening “Assign Profile”, and activate “Preview” while choosing different CMYK-profiles – the view on the monitor changes! If you open the Info-window as well, you can see, that the CMYK values are NOT changing.
If you CONVERT a CMYK color profil; your CMYK values will change!

More info: COLOR PROFILES – MORE INFO

divider

Deutsche Version:

Möchten Sie unsere gratis Tipps in Ihrem e-mail erhalten? Schreiben Sie sich unter FOLLOW mit Ihrer e-mail Adresse ein.

TIPP DER WOCHE: Was ist der Unterschied zwischen Farbprofil zuweisen oder umwandeln?

Hier ist es in Photoshop: Bearbeiten > in Profil umwandeln (gleich oberhalb: Profil zuweisen!)
PSD-Profilumwandeln

In InDesign: Menu > Barbeiten > in Profil umwandeln (gleich oberhalb: Profil zuweisen!)
indd

Und hier in Illustrator: Menu > Bearbeiten > Profil zuweisen (Umwandeln existiert nicht!)
AI-Profilzuweisen

Tipp: Das Zuweisen des Profils ändert nur die Darstellung am Bildschirm. Das kann man sehr gut ausprobieren, in dem man den Dialog “Profil zuweisen” öffnet, die checkbox “Vorschau” aktiviert und nacheinander verschiedene CMYK-Profile anwählt – die Bildschirmdarstellung verändert sich! Wenn man aber das Info-Bedienfeld offen hat, sieht man, dass sich die CYMK-Werte in der Datei NICHT verändern.
Wenn man aber ein CMYK Profil in ein anderes “umwandelt” werden die CYMK-Werte geändert!

Mehr info: FARBPROFILE – MEHR INFO

How to quickly change brush sizes in Photoshop

With courtesy of Illustrationsource in New York City - www.illustrationsource.com

With courtesy of Illustrationsource in New York City – http://www.illustrationsource.com

Miriam Selmi Reed is represented by Illustration Source, New York City. Portfolio and contact: Illustration Source NYC

divider

TIP OF THE WEEK:
“How I quickly change my brush sizes in Photoshop”
With a painting tool selected, Control + Option (Mac) – drag left/right in order to decrease/ increase brush size. Control + Option (Mac) – drag up/down to decrease/ increase brush hardness. Since I’m using a German keyboard; I have to press the ctrl & alt keys on my Mac…

On Windows: Alt + Right Mouse – drag left/right to decrease/increase brush size and up/down to decrease/ increase brush hardness.

brush

TIPP DER WOCHE:
“So verändere ich meine Pinselgrössen in Photoshop super schnell”
Wählen Sie Ihr Pinselwerkzeug, drücken Sie auf die ctrl & alt Tasten (Mac) – klicken & ziehen Sie nach links/rechts um die Pinselgrösse zu verkleinern/vergrössern. Ctrl + alt (Mac) – klicken & ziehen Sie nach oben/unten um die Härte zu reduzieren/verstärken.

Bei Windows: Alt Taste + rechter Mausklick – klicken & ziehen Sie nach links/rechts um den Pinsel zu verkleinern/vergrössern und nach oben/unten um die Härte zu reduzieren/verstärken.

divider

Miriam Selmi Reed is represented and licensed by Illustration Source - Courtesy of Illustration Source

Miriam Selmi Reed is represented and licensed by Illustration Source – Courtesy of Illustration Source

View the artists’s homage on the topic: TAX TIME

Miriam Selmi Reed is represented by Illustration Source, New York City. Portfolio and contact: Illustration Source NYC

Illustration technique: watercolor, acrylic and pencil combined with digital mixed media using Adobe Photoshop and Illustrator.Copyright by Illustration Source, New York City.

Illustrations-Technik: Aquarell, Acryl mit Farbstift, gemischt mit Adobe Photoshop und Illustrator. Copyright by Illustration Source, New York City.

divider

Your source for commissioned illustration: ORIGINAL ART STUDIOS in New York City.

OAS

Portfolio Original Art Studios, New York City: MIRIAM SELMI REED

Animate your illustrations

Tutorial in English and German / Anleitung in Deutsch und Englisch

Deutsche Version siehe unten!
divider
English version:

TIP OF THE WEEK: How to make simple animations

1. Tip: Draw a storyboard or write your concept in advance – see sample below:

TicTacToe_Storyboard

2. in my case: to feel the characters and their movements I made a simple animated GIF using the timeline in Adobe Photoshop:
-Draw your characters in several positions
-Open them in Adobe Photoshop and go to WINDOW > TIMELINE
Tutorial: How to create frame animations in Photoshop
zeitleiste

-save it as an ANIMATED GIF with a loop – under FILE > EXPORT > Save for Web:

Copyright by Mimi Selmi Reed

Copyright by Mimi Selmi Reed – for TigerBooks Germany

In order to complete the following animated ebook, I’ve used tigercreate, which runs similar like every animation program by using a timeline with frames:

Written, illustrated and animated by Mimi Selmi Reed & sound design by Mike Reed REEDesign.ch – all rights reserved. Z-DOG for Tigerbooks Germany.

divider

Deutsche Version:

TIPP DER WOCHE: Wie man einfache Animationen erstellen kann

1. Tipp: Zeichnen Sie ein Storyboard oder schreiben Sie ein Konzept im voraus – siehe Beispiel:

TicTacToe_Storyboard

2. Um ein Gespür für meine Charakteren und ihre Bewegungen zu erhalten, erstellte ich kurz ein animiertes GIF mit einer Zeitleiste in Adobe Photoshop:
-Zeichnen Sie ihre Charakteren in mehreren Positionen
-Öffnen Sie diese in Adobe Photoshop und gehen Sie zu FENSTER > ZEITLEISTE
Tutorial: Erstellen von Frame-Animationen in Photoshop
zeitleiste

-speichern Sie es als ANIMIERTES GIF mit einem Loop – unter DATEI > EXPORTIEREN > Speichern für Web:

Copyright by Mimi Selmi Reed

Copyright by Mimi Selmi Reed – for TigerBooks Germany

Um dieses animierte ebook fertigzustellen, benutzte ich tigercreate, welches ähnlich funktioniert wie jedes Animations Programm. Nämlich mit einer Zeitleiste:

Written, illustrated and animated by Mimi Selmi Reed & sound design by Mike Reed REEDesign.ch – all rights reserved. Z-DOG for Tigerbooks Germany.

Adobe CC: new Drawing Tools part 2 / neue Zeichnungs-Werkzeuge Teil 2

Tutorial in English and German / Anleitung in Deutsch und Englisch

Deutsche Version siehe unten!
divider

English version:

Would you like to receive our tips for free in your e-mail box? Simply select FOLLOW to sign up with your e-mail address.

divider

TIP OF THE WEEK: How to draw with the new PENCIL TOOL in Adobe CC

It’s never been so easy to draw in Illustrator. Simply double-click the Pencil-Tool icon in your tool bar to adjust the Pencil Tool Options.

Next step: trace your drawing by using the new Pencil Tool. You’ll see how easy it flows with the right setting! You’re now even able to draw closed shapes.

pfadFINAL

divider

Tutorial, part 1: New Drawing Tools in Illustrator CC / Part 1

divider

Deutsche Version

Möchten Sie unsere gratis Tipps im e-mail erhalten? Schreiben Sie sich unter FOLLOW mit Ihrer e-mail Adresse ein.

TIPP DER WOCHE: Wie man mit dem neuen Buntstift-Werkzeug in Adobe CC zeichnet

Noch nie war es so leicht in Adobe Illustrator zu zeichnen. CC macht’s möglich! Doppelklicken Sie auf das Buntstift-Werkzeug um die Optionen zu öffnen und anzupassen.

Nächster Schritt: zeichnen Sie mit dem neuen Buntstift-Werkzeug von Adobe CC den Formen nach. Jetzt ist es sogar möglich geschlossene Formen mit dem Buntstift zu erstellen!

pfadFINAL

divider

Tutorial, Teil 1: Neue Zeichnungswerkzeuge in Illustrator CC / Teil 1

divider

Here is the final illustration / Hier ist die fertige Illustration:

Courtesy of Illustration Source

Courtesy of Illustration Source

Miriam Selmi Reed is represented by Illustration Source, New York City. Portfolio and contact: Illustration Source NYC

Illustration technique: Traditional colored pencil drawing combined with digital mixed media using Smart Objects in Adobe Photoshop and Illustrator. Copyright by Illustration Source, New York City. All rights reserved.

Illustrations-Technik: Farbstiftzeichnung gemischt mit Adobe Illustrator und Photoshop sowie Smart-Objekten. Copyright by Illustration Source, New York City. All rights reserved.

Illustrator: new Drawing Tools 1 / neue Zeichnungs-Werkzeuge 1

Tutorial in English and German / Anleitung in Deutsch und Englisch

Deutsche Version siehe unten!
divider

English version:

Would you like to receive our tips for free in your e-mail box? Simply select FOLLOW to sign up with your e-mail address.

divider

TIP OF THE WEEK: The new Curvature Tool in Adobe Illustrator Creative Cloud

It’s never been so easy to draw in Illustrator!

Select the new Curvature Tool in Illustrator CC. Start with two basic points, and then watch a preview of the how the curve will look like as you are about to drop another point at the end of the path!

kruemmung

Don’t want a curve? Instead of just dropping a point, press Option/Alt when you drop a point, to create a straight line from the previous point. If you’ve already created a smooth curve, double-click a point to change it. It’s simply amazing!

Illustrator Tip: New Drawing Tools in Adobe Illustrator CC – Part 2

divider

Deutsche Version

Möchten Sie unsere gratis Tipps im e-mail erhalten? Schreiben Sie sich unter FOLLOW mit Ihrer e-mail Adresse ein.

TIPP DER WOCHE: Das neue Kurvenzeichner-Werkzeug in Adobe Illustrator CC

Noch nie war es so leicht in Adobe Illustrator zu zeichnen.

TIPP: Wählen Sie das neue Kurvenzeichner-Werkzeug in Illustrator CC. Beginnen Sie mit einem Ankerpunkt, dann sehen Sie die Kurve entstehen, währenddessen Sie den nächsten Ankerpunkt setzen.

kruemmung

Möchten Sie keine Kurve? Anstelle von einem normalen Klicken, drücken Sie die Option/Alt Taste wenn Sie einen Ankerpunkt setzen, damit setzen Sie eine geraden Linie vom vorherigen Punkt.
Falls Sie bereits eine runde Kurve erstellt haben, Doppel-klicken Sie auf einen Ankerpunkt um die Linie zu ändern. Es ist genial und lohnt sich auf die Creative Cloud zu wechseln, sollten Sie Probleme mit dem Zeichenstiftwerkzeug in der Version CS6 haben.

Illustrator Tipp: Neue Zeichnungs-Werkzeuge in Adobe Illustrator CC – Teil 2

divider

Here is the final illustration / Hier ist die fertige Illustration:

Courtesy of Illustration Source

Miriam Selmi Reed is represented by Illustration Source, New York City. Portfolio and contact: Illustration Source NYC

Illustration technique: Traditional colored pencil drawing combined with digital mixed media using Smart Objects in Adobe Photoshop and Illustrator. Copyright by Illustration Source, New York City. All rights reserved.

Illustrations-Technik: Farbstiftzeichnung gemischt mit Adobe Illustrator und Photoshop sowie Smart-Objekten. Copyright by Illustration Source, New York City. All rights reserved.

Invitation / Einladung Art Show in Zurich, Switzerland

Vernissage_Facebook

Art Exhibition in Zurich, Switzerland – from 19.2. – 11.3.2016
Vernissage / Opening reception: Friday 19.2.16 starts at 6pm (18 Uhr) – GALERIE 16b, Ausstellungsstrasse 16, 8005 Zürich – (hinter dem HB Zürich) Finissage with concert: Friday 11.3.16 starts at 6pm (18 Uhr) – Gallery opening hours: WE to SA from 5 to 8pm. (Öffnungszeiten: MI bis SA von 17 bis 20 Uhr)

BLOG / Info: Fine Art / Illustrations by Miriam Selmi Reed

Programs used out of the Adobe Creative Cloud: Adobe Photoshop, After Effects, Audition, Illustrator and Apple Logic Pro

Fine Art & Footage: Miriam Selmi Reed
Music composed, played and arranged by Michael Alan Reed
Copyright 2015 – www.REEDesign.ch – all rights reserved

neuer Adobe Illustrator Kurs / new Adobe Illustrator class

Meine neue Klasse hat noch ein paar freie Plätze 🙂
(Durchführung garantiert – Beginn: 23. Februar)

Neuer Adobe Illustrator Basis Kurs – mehr info!

Screen Shot 2016-02-15 at 21.17.05

EB Zürich
Bildungszentrum für Erwachsene BiZE
Riesbachstrasse 11
8090 Zürich
Telefon 0842 843 844
lernen@eb-zuerich.ch

PANTONE > CMYK

Tutorial in English and German / Anleitung in Deutsch und Englisch

Deutsche Version siehe unten!
divider
English version:

Would you like to receive our tips for free in your e-mail box? Simply select FOLLOW to sign up with your e-mail address.

TIP OF THE WEEK: How to change your Pantone color into CMYK using Adobe Photoshop, InDesign or Illustrator

Does this sound familiar to you? “When I convert PANTONE colors to CMYK in Adobe software, the results do not match the values in my PANTONE COLOR BRIDGE guide. Why is this?”

Tip 1: find your Pantone color or convert to CMYK/RGB: PANTONE COLOR FINDER

Still our Pantone BRIDGE guide showed different values, DID NOT MATCH the Adobe software nor the PANTONE conversions, so we had to find another solution:

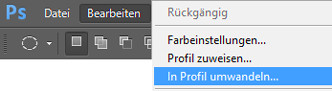
Tip 2: Another possible solution how to covert PANTONE into CMYK in Adobe Photoshop:
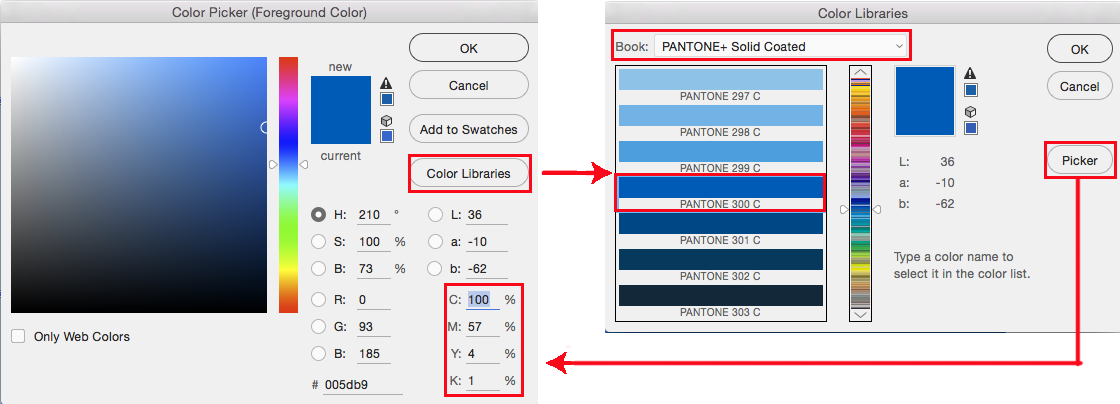
1. Open the Color Picker.
2. Click on the button Color Libraries. In our case we’ve selected Pantone+ 300C.
3. Now click again on the button Picker. The breakdown in Photoshop is 100% Cyan, 57% Magenta, 4% Yellow, 1% K. You can switch back and forth between the Color Picker (CMYK/RGB/HEX) and the Color Libraries (Pantone).
(Our Adobe Bridge Guide shows: 99% Cyan, 51% Magenta, 0% Yellow, 0% Black.)

ColorpickerE

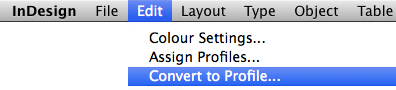
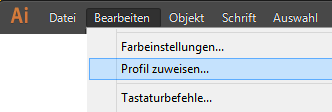
Tip 3: how to covert PANTONE into CMYK in Adobe Illustrator or InDesign:
1. Open the Swatches. (Window > Swatches)
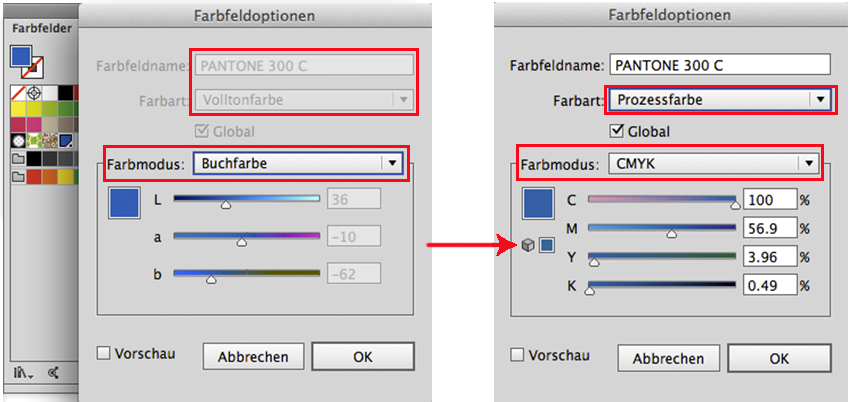
2. Double-click the Pantone color in the Swatches > so the Swatch Options will open.
3. Select Process Color and CMYK as shown below.

Of course it would be ideal if the PANTONE BRIDGE guide would have the same values as in the Adobe programs, but unfortunately this is not the case (yet).

ColorpickerIllustratorE

divider

Trailers and tutorials take lots of time. Of course it is free, but maybe you’d like to buy us “a cup of coffee?” Any support is greatly appreciated: PayPal Donate Button

divider

Deutsche Version:

Möchten Sie unsere gratis Tipps in Ihrem e-mail erhalten? Schreiben Sie sich unter FOLLOW mit Ihrer e-mail Adresse ein.

TIPP DER WOCHE: Wie man mit Adobe Photoshop, InDesign or Illustrator eine Pantone Farbe in CMYK wechseln kann

Kennen Sie dieses Problem? “Wenn ich PANTONE Farben in CMYK in meinen Adobe Programme konvertiere, sind die CMYK Prozente nicht gleich wie in meinem PANTONE COLOR BRIDGE Farbfächer. Warum ist das so?”

Tipp 1: Pantone Farbe finden oder in CMYK/RGB konvertieren : PANTONE FARBEN

Unser Pantone BRIDGE Fächer zeigt immer andere CMYK Werte an und NICHT die gleichen Werte wie bei unseren Adobe Programmen. Darum mussten wir weitere Lösungen finden:

Tipp 2: Eine weitere Möglichkeit wie man PANTONE Farben in CMYK umwandelt in Adobe Photoshop:
1. Öffnen Sie den Farbwähler.
2. Klicken Sie auf den Button Farbbibliotheken. In unserem Fall haben wir Pantone+ 300C gewählt.
3. Klicken Sie wieder auf den Button Farbwähler. Die Werte in Photoshop sind 100% Cyan, 57% Magenta, 4% Yellow, 1% K. Sie können immer wieder zwischen dem Farbwähler (CMYK/RGB/HEX) und dem Farbbibliotheken (PANTONE) hin und her wechseln.
(Unser Adobe Bridge Guide zeigt: 99% Cyan, 51% Magenta, 0% Yellow, 0% Black.)

photoshop

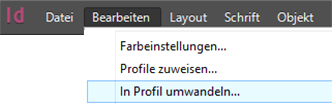
Tipp 3: wie man PANTONE in CMYK wechselt mit Adobe Illustrator oder InDesign:
1. Öffnen Sie das Bedienfeld Farbfelder. (Fenster > Farbfelder)
2. Doppelklicken Sie die Pantone Farbe in Ihren Farbfeldern > damit sich die Farbfeldoptionen öffnen.
3. Wählen Sie Prozessfarbe und CMYK. Siehe unten.

Illustrator

Natürlich wäre es ideal wenn der PANTONE BRIDGE Fächer dieselben CMYK Prozente angeben würde wie in den Adobe Programmen, dies ist aber leider (bis jetzt) nicht Realität.

divider

Adobe-Tipps zusammenzustellen braucht viel Zeit. Natürlich ist es gratis, aber vielleicht spendieren Sie uns einen “Kaffee?” Jede Unterstützung freut uns. Danke! PayPal Donate Button

Photoshop resolution / Auflösung

Tutorial in English and German / Anleitung in Deutsch und Englisch

Deutsche Version siehe unten!
divider

English version:

TIP OF THE WEEK: How to reduce or enlarge a Photoshop file

Below I show the steps of my job; to prepare my illustration at a 300 dpi resolution, 7 inches wide for Adobe InDesign. Go to MENU > IMAGE > IMAGE SIZE:

reduceImage

In my example I use 7 inches Width, because I will place this image in my InDesign document with this size. In your case, you simply use your desired Width (or Height) and place it into your InDesign document at a 100%. With this method you will retain the 300 dpi resolution for the professional printing press.

divider

Deutsche Version:

TIPP DER WOCHE: Wie man ein Bild in Photoshop vergrössert oder verkleinert.

Unten zeige ich die Arbeitsschritte; wie ich meine Illustration auf 300 dpi ändere und als 15 cm breites Bild für Adobe InDesign vorbereite. Gehen Sie zu MENÜ > BILD > BILDGRÖSSE:

reduceImageD

In meinem Beispiel benutze ich 15 cm Breite, weil ich dieses Bild mit diesen Massen in meinem InDesign Dokument benötige. Benutzen Sie in Ihrem Fall Ihre gewünschten Masse und platzieren Sie es zu 100% Grösse in Ihr InDesign Dokument. Mit dieser Methode werden Sie die 300 dpi für die professionelle Offset-Druckmaschine beibehalten.

Todays topic: COMMUNITY

Deutsche Version siehe unten!
divider

English version:

Illustrator Tipp > WIDTH TOOL: When I’m using any lines as shown on my Illustration below, I usually use the Width Tool. The Width Tool in Adobe Illustrator is ideal to give your lines character: select the line and drag with the mouse to define the width of your choice.

widthtool

divider

Deutsche Version:

Illustrator Tip > BREITEN-WERKZEUG: Wenn ich bei meinen Illustrationen (siehe unten) verschiedene Linienstärken benutze, dann benutze ich das Breiten-Werkzeug. Das Breitenwerkzeug in Adobe Illustrator ist ideal um einer simplen Linie einen Pinsel-Charakter zu geben: die Linie anklicken und mit der Maus ZIEHEN bis die Linie breiter wird.

breitenwerkzeugtool

divider

Miriam Selmi Reed represented and licensed by Illustration Source - Courtesy of Illustration Source

Miriam Selmi Reed represented and licensed by Illustration Source – Courtesy of Illustration Source

View the artists’s homage on the topic: COMMUNITY

Miriam Selmi Reed is represented by Illustration Source, New York City. Portfolio and contact: Illustration Source NYC

Illustration technique: watercolor, acrylic and pencil combined with digital mixed media using Adobe Photoshop and Illustrator.Copyright by Illustration Source, New York City.

Illustrations-Technik: Aquarell, Acryl mit Farbstift, gemischt mit Adobe Photoshop und Illustrator. Copyright by Illustration Source, New York City.

divider

Your source for commissioned illustration: ORIGINAL ART STUDIOS in New York City.

OAS

Portfolio Original Art Studios, New York City: MIRIAM SELMI REED