Motion & Animation 3

English:
PART 3, ANIMATION WITH ADOBE ANIMATE CC
Here I’m sharing some great tutorials directly from ADOBE which helped me a great deal to understand ADOBE ANIMATE CC:

Tutorial 1: Animation with ADOBE ANIMATE CC
Tutorial 2: Animate a figure with ADOBE ANIMATE CC

Sharing infos: iADOBE FORUM Our tips for easy download: i-adobe eBook in English

Our animation was first done with ANIMATE – then we used AFTER EFFECTS to finish it.

Deutsch:
TEIL 3, ANIMATION MIT ADOBE ANIMATE CC
Hier zeige ich ein paar Tutorials (Lernvideos) direkt von ADOBE welche mir sehr geholfen haben ADOBE ANIMATE CC zu verstehen:

Tutorial 1: Animation mit ADOBE ANIMATE CC
Tutorial 2: Animiere eine Figur mit ANIMATE CC

Tausche dich aus im iADOBE FORUMAlle unsere Tipps als: i-adobe eBook in Deutsch

Motion & Animation 2

English:
PART 2, my APP Tip for STOP MOTION
My favourite free APP for my Smart phone, easy to use on the road: Stop Motion Studio. Stop Motion Studio has received great ratings in the APP Store. A Step up would be: Stop Motion Studio Pro. Check it out, it is self-explanatory.

Sharing infos: iADOBE FORUM Our tips for easy download: i-adobe eBook in English

Artwork by Jasmine Attinger: JAS.LAND

Deutsch:
TEIL 2, mein APP Tipp für STOP MOTION:
Mein Lieblings-gratis App für mein Smart Phone heisst: Stop Motion Studio. Stop Motion Studio hat eine super Bewertung im APP Store erhalten. Das Stop Motion Studio Pro APP hätte noch mehr Möglichkeiten. Probiere es aus, es ist einfach zum lernen.

Tausche dich aus im iADOBE FORUMAlle unsere Tipps als: i-adobe eBook in Deutsch

Stop Motion reel by Cynthia Gall, Los Angeles
(Cynthia uses Dragonframe and then compiled her reel in After Effects)

Colors / Farben in Adobe InDesign

Tutorial in English and German / Anleitung in Deutsch und Englisch

Deutsche Version siehe unten!
Tip of the week: How to use the Color Theme Tool to select the main colors of your image.

– Open Indesign CC and place your image.
– Select the Color Theme Tool and click on the image.
– The main 5 colors will be added to your Swatches.
(Go to WINDOW > COLOR > SWATCHES)

Here is a tutorial directly from Adobe: Indesign Color Themes

farben1e

Here are your possibilities:
– Select the arrow to choose different color combinations.
(Colorful, Bright, Dark, Muted)
– You can add this as a Theme to your Swatches.
– You can use these colors for a matching Gradient!

farben2e

divider

Our new i-adobe Ebook is available here – in English – including films on 72 pages:
EASY DOWNLOAD

Unser neues i-adobe book ist hier erhältlich – in Deutsch – inklusive Filme auf 72 Seiten: SICHERER DOWNLOAD

divider

Deutsche Version

Tipp der Woche: Wie man mit dem Farbeinstellungs-Werkzeug Farben aus einem Foto herausfiltern kann.

– Öffne Indesign CC und platziere ein Bild.
– Wähle das Farbeinstellungs-Werkzeug und klicke auf das Bild.
– Die 5 Hauptfarben werden in die Farbfelder “aufgenommen”.
(Siehe FENSTER > FARBE > FARBFELDER)

Hier ist ein Tutorial dazu direkt von Adobe: Farbpaletten in Indesign

farben1

Hier sind die Möglichkeiten:
– Unter dem Pfeil kann man verschiedene Farbkombinationen anwählen.
(Bunt, Hell, Dunkel oder Gedeckt)
– Man kann diese in die Farbfelder als Farbgruppe aufnehmen.
– Praktisch: man kann diese Farben z.B. für einen passenden Verlauf benutzen!

farben2

Control your lines

As instructors of Adobe programs and creative professionals, we’ve assembled this blog as easy reference for our students and clients.” Miriam Selmi Reed & Michael Alan Reed

English version:
Once you’ve prepared your illustration, comes the WIDTH TOOL into play:
1. Open your Illustration in Adobe Illustrator
2. Select your outlines with the Width Tool.
3. Drag on the points to adjust your line width.

TUTORIAL for Illustrator beginners: use the Pen Tool

Sharing infos & tips: iADOBE FORUM Our tips: i-adobe eBook in English

Illustrations by Miriam Selmi Reed – Courtesy of Illustration Source

Deutsche Version:
Wenn deine Illustration gezeichnet ist, kommt das BREITEN-WERKZEUG ins Spiel:
1. Öffne deine Illustration in Adobe Illustrator
2. Wähle deine Linien mit dem Breiten-Werkzeug.
3. Ziehe an den Punkten um die gewünschte Linienbreite zu erhalten.

FILME & Anleitung für Illustrator Anfänger: das Zeichenstift-Werkzeug

Tausche dich aus im iADOBE FORUM! Unsere Tipps: i-adobe eBook in Deutsch

divider

Courtesy of Illustration Source

View the artists’s homage on the topic: TIME!

Illustration technique: watercolor, acrylic and pencil combined with digital mixed media using Adobe Photoshop and Illustrator.Copyright by Illustration Source, New York City.

Illustrations-Technik: Aquarell, Acryl mit Farbstift, gemischt mit Adobe Photoshop und Illustrator. Copyright by Illustration Source, New York City.

Miriam Selmi Reed is represented by Illustration Source, New York City. Portfolio and contact: Illustration Source NYC

Cool Fonts

English version:
Below please find my favourite font Links I love to use. Some of them are even for free.
Most important: always package your Indesign and Illustrator file to make sure your fonts get saved together with all your links in one folder.
More info on this topic: package Indesign files

Deutsche Version:
Unten findest Du meine Favoriten-Schriften-Webseiten die ich mag. Einige bieten gute gratis Schriften an. Sehr wichtig: wenn man eine Datei verschickt, diese verpacken, damit die Indesign oder Illustrator Datei – zusammen mit den Schriften und Bilder – in einem Ordner gespeichert werden.
Mehr über dieses Thema: Indesign Datei verpacken

Google Fonts: Google Fonts / Schriften

Fonts / Schriften via: dafont.com

Download free fonts from the Adobe Cloud: TYPEKIT Adobe Fonts

Guide in English / Anleitung in Deutsch: TYPEKIT Adobe Fonts

Brushes / Pinsel in Adobe Illustrator

As instructors of Adobe programs and creative professionals, we’ve assembled this blog as easy reference for our students and clients.” Miriam Selmi Reed & Michael Alan Reed

Deutsche Version siehe unten!

English version:
In my illustration below, I’ve used my own brushes which I created myself in Adobe Illustrator CC: Step-by-step-Information.
Here is a Tutorial directly from Adobe covering this topic: HOW TO DRAW WITH ILLUSTRATOR
Any questions? Contact us at iADOBE FORUM! ALL tips for easy download: i-adobe eBook in English


NEW! Webinar online in English:
Learn how to draw digitally with tips & tricks in combination with Photoshop.
Interested? Send me an e-mail – greetings, Mimi Reed

NEU! Webinar online in Deutsch:
Digital zeichnen lernen mit Tipps & Tricks, in Kombination mit Photoshop.
Interessiert? Schreib mir ein e-mail – Grüsse, Mimi Reed

Deutsche Version:
Bei meiner Illustration unten benutzte ich meine eigenen Pinsel welche ich selber in Adobe Illustrator CC erstellte: Schritt-für-Schritt Anleitung.
Hier ist ein Tutorial direkt von Adobe über das Thema: WIE MAN MIT ILLUSTRATOR ZEICHNET
Hast du noch Fragen? Kontaktiere uns unter iADOBE FORUM! Alle Tipps zum herunterladen: i-adobe eBook in Deutsch

divider

Courtesy of Illustration Source

divider

Your source for commissioned illustration: ILLUSTRATION SOURCE in New York City.

Illustration Source, New York City: online Portfolio Miriam Selmi Reed

Original Art Studios, New York City: MIRIAM SELMI REED at OAS

Master pages / Musterseiten in Adobe InDesign

Tutorial in English and German / Anleitung in Deutsch und Englisch
Deutsche Version siehe unten!

divider

English version:

Before I’d like to show you my trick with the dual pagination on one page, I strongly suggest to watch these 3 tutorials from Adobe first: Multi-pages & Masterpages in Indesign

My personal TIP: How to have both paginations on the same page in Adobe InDesign!

There are several ways to do it, but this is my favorite:

1. Open InDesign with 2 facing master pages
2. Double click on the master page where would like to place both paginations like this:

page

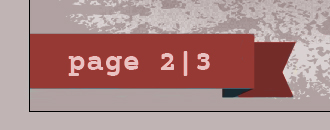
In our tutorial I put the paginations on the left master page, that’s why I go ahead with the following steps:

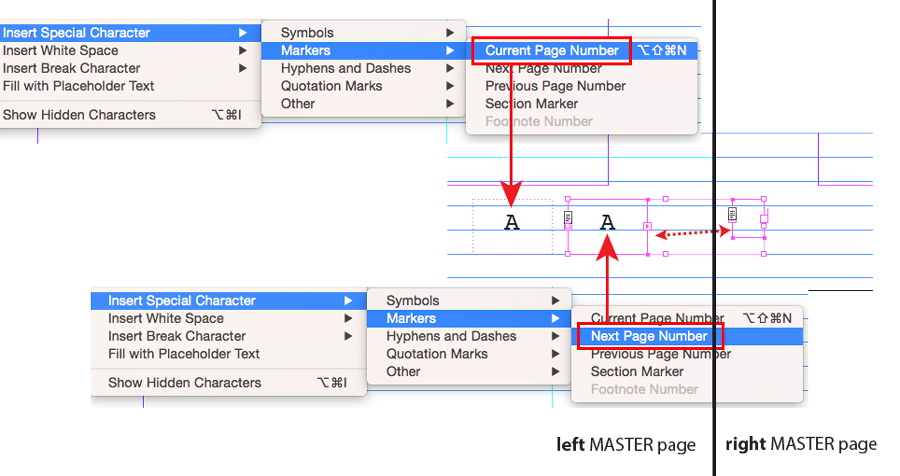
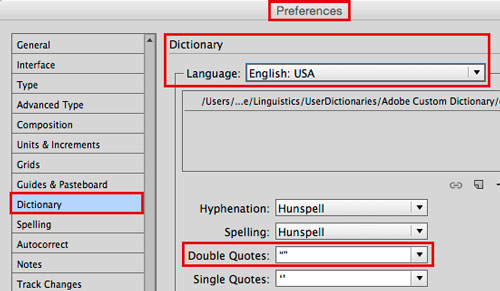
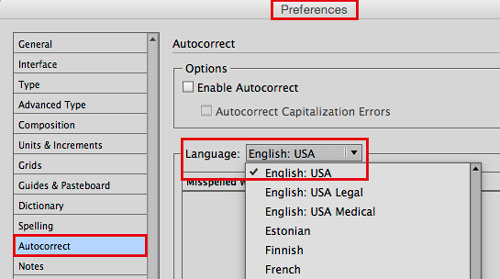
3. For the left pagination go to Font > Insert Special Character > Markers > Current Page Number.

4. For the pagination referring to the right page (the other master page) choose Next Page Number.

5. Here is the key: Make an empty text box on the other master page on the right. Now connect the empty box with the pagination box where you’ve chosen Next Page Number. Look at the image below. Check out your layout pages if it works!

paginationOnBothsides

Our tips for easy download: i-adobe eBook in English

divider

Deutsche Version:

Bevor ich euch den Trick mit der zweifachen Seitenzahl auf einer Seite zeige, empfehle ich es sehr zuerst diesen Film von Adobe anzuschauen: Verwalten von Seiten und Musterseiten in Indesign

Mein persönlicher TIPP: Wie man beide Seitenzahlen auf derselben Seite in Adobe InDesign platziert!

Es gibt verschiedene Wege wie man das machen kann, aber das ist mein Favorit:

1. Öffne InDesign mit zwei Musterseiten (Doppelseiten)
2. Doppelklicke auf die Musterseite wo beide Seitenzahlen sein sollen, wie dieses Beispiel:

seiten

In meiner Anleitung habe ich die Seitenzahlen auf der linken Musterseite platziert. Daher mache ich nun folgendes:

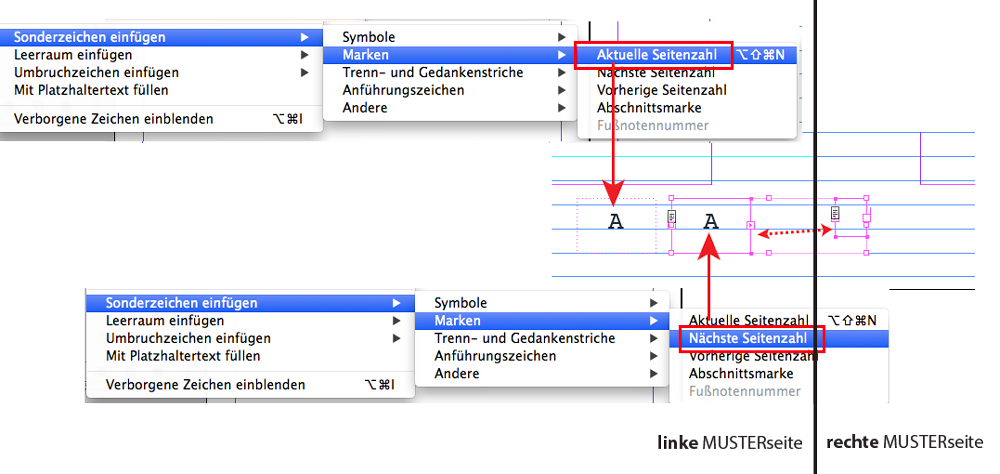
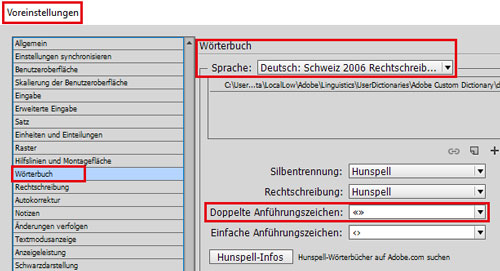
3. Für die linke Seitenzahl gehe ich zu Schrift > Sonderzeichen einfügen > Marken > Aktuelle Seitenzahl.

4. Für die rechte Seitenzahl (die ja eingentlich auf die rechte Musterseite gehört) wähle ich > Nächste Seitenzahl.

5. Hier ist der Trick: ich erstelle eine leere Textbox auf der anderen (rechten) Musterseite. Jetzt verbinde ich die leere Textbox mit der Paginierung wo ich Nächste Seitenzahl gewählt habe. Siehe Bild unten mit Anleitung. Dann kommt das Testen ob es funktioniert, indem man auf die Layoutseiten klickt.

SeitenzahlenAufbeidenSeiten

Alle unsere Tipps als: i-adobe eBook in Deutsch

Work smart with Adobe Photoshop & Illustrator

TIP OF THE WEEK: 
“How I use Smart Objects and Smart Filters in Adobe Photoshop”

Deutsche Version siehe unten!

In 3 simple steps!
1. Open your Adobe Illustrator document with a simple Icon, Illustration or Logo.
2. Copy your Object and place it as Smart Object into your Photoshop file.
3. Click OK to confirm the placement. In the Layers you’ll find the Smart Object as a small icon. By clicking on the small icon, the original file opens again in Illustrator which means: both files are linked with each other.

Or I simply select in Photoshop under Filter > the command CONVERT FOR SMART FILTERS before adding any Filter effects. With this method I can modify the filters as desired and work non-destructive.

A Tutorial including film from Adobe: SMART OBJECTS

Sharing infos: iADOBE FORUM Our tips for easy download: i-adobe eBook in English

Deutsche Version:
TIPP DER WOCHE: 
“Wie ich mit Smart Objekten und -Filtern in Adobe Photoshop arbeite” 

In 3 einfachen Schritten!
1. Öffne dein Adobe Illustrator Dokument mit einem einfachen Icon, Illustration oder Logo.
2. Kopiere dein Object and platziere es als Smart Objekt in deine Photoshop Datei.
3. Klicke auf OK um es zu bestätigen. In deinen Ebenen findest du nun dein Logo als Smart-Objekt. Wenn du auf dieses Smart-Objekt-Icon klickst, öffnet sich dein Original wieder in Illustrator, d.h. die beiden Dateien sind miteinander verknüpft.

Oder: Ich gehe direkt in Photoshop unter Filter und wähle den Befehl > KONVERTIEREN ZU SMART FILTER – bevor ich Filtereffekte anwende. Damit kann ich jegliche Filter jederzeit verändern und arbeite nicht-destruktiv.

Ein Film mit deutschen Untertiteln direkt von Adobe: SMART OBJEKTE

Tausche dich aus im iADOBE FORUMAlle unsere Tipps als: i-adobe eBook in Deutsch

Miriam Selmi Reed is represented and licensed by Illustration Source – Courtesy of Illustration Source

View the artists’s homage on the topic: STOCK MARKET

Miriam Selmi Reed
 is represented by Illustration Source, New York City. Portfolio and contact:  Illustration Source NYC
Illustration technique: watercolor, acrylic and pencil combined with digital mixed media using Adobe Photoshop and Illustrator.Copyright by Illustration Source, New York City.


Illustrations-Technik: Aquarell, Acryl mit Farbstift, gemischt mit Adobe Photoshop und Illustrator. Copyright by Illustration Source, New York City.

Vectorise your photo / Foto in Vektoren umwandeln

Tutorial in English and German / Anleitung in Deutsch und Englisch
Deutsche Version siehe unten!

English version:

TIP OF THE WEEK: How to vectorize & colorize a photo!
In the Illustration below, Mike used manual illustration techniques combined with Adobe Photoshop & Illustrator.

Tutorial: How to use the image trace option in Illustrator CS6 or CC, to vectorize and colorize a Photo. Watch the tutorial in English and German subtitles below.
1: Place your photo into Illustrator.

2: Vectorise your photo under > Window > Image Trace.

3: Don’t forget to click on the button “EXPAND”.

4: Edit your colors under > Edit > Edit Colors.

Tutorial:

Deutsche Version:

TIPP DER WOCHE: Wie man ein Foto vektorisiert & einfärbt!
In der Illustration unten benutzt Mike manuelle Illustrations Techniken, kombiniert mit Adobe Photoshop & Illustrator.

Tutorial: Wie man mit dem Bildnachzeichner in Illustrator CS6 oder CC arbeitet, ein Foto vektorisiert und einfärbt: Siehe Lernvideo in Englisch mit deutschen Untertiteln oben.
1: Platziere ein Foto in Adobe Illustrator.

2: Vektorisiere dein Photo unter > Fenster > Bildnachzeichner.

3: Klicke auf “UMWANDELN” um die Vektorpunkte zu generieren.
4: Du kannst dein Vektorbild umfärben unter > Bearbeiten > Farben bearbeiten.

Copyright by Michael Alan Reed

Michael Alan Reed is the Art Director / Illustrator at: www.REEDesign.ch

Retouch!

As instructors of Adobe programs and creative professionals, we’ve assembled this blog as easy reference for our students and clients.” Miriam Selmi Reed & Michael Alan Reed

Deutsche Version – siehe unten!

1. Open your image in Adobe Photoshop.
2. Open your layers under Window > Layers.
3. Add a new empty layer on top.
4. Select either the Stamp-Tool or the Healing-Brush-Tool.
5. Make sure you select the command ALL LAYERS on top!
6. When clicking the ALT Key, the Healing-Brush-Tool (or Stamp-Tool) samples the part you are selecting. Have a look below.
7. Then you click on the part you wish to retouch. No worries: you are stamping on an empty layer, use the eraser tool if you need to make corrections.

Sharing infos & tips: iADOBE FORUM Our tips: i-adobe eBook in English

Illustration by Miriam Selmi Reed – Courtesy of Illustration Source

Deutsche Version:

1. Öffne dein Bild in Adobe Photoshop.
2. Öffne deine Ebenen unter Menu > Ebenen.
3. Erstelle eine neue leere Ebene ganz oben.
4. Wähle entweder das Stempel-Werkzeug oder den Bereichsreparatur-Pinsel.
5. Ganz wichtig: oben in der Steuerung ALLE EBENEN auswählen!
6. Wenn du den ALT Key drückst, wird der Bereichsreparatur-Pinsel (oder Stempel) den Teil aufnehmen den du haben willst. Siehe oben.
7. Danach klickst du auf den Teil den du retuschieren willst. Keine Sorge: du stempelst auf einer leeren Ebene, falls nötig, benutzt du den Radiergummi für Korrekturen.

Tipp! Adobe Photoshop für Tutorial-Freunde: Die komplette Übersetzung von Englisch zu Deutsch: Übersetzung Englisch > Deutsch in Photoshop CC

Tausche dich aus im iADOBE FORUM! Unsere Tipps: i-adobe eBook in Deutsch

divider

Courtesy of Illustration Source

View the artists’s homage on the topic: TIME!

Illustration technique: watercolor, acrylic and pencil combined with digital mixed media using Adobe Photoshop and Illustrator.Copyright by Illustration Source, New York City.

Illustrations-Technik: Aquarell, Acryl mit Farbstift, gemischt mit Adobe Photoshop und Illustrator. Copyright by Illustration Source, New York City.

Adobe After Effects

The World of Effects & Animation

Deutsche Version – siehe unten!

Most Animations are produced as cartoons in movies, TV, video games or commercials. Programs like Adobe Premiere Pro (for editing) and After Effects (for special effects & animation) are part of the Creative Cloud

Below is an animated After Effects project we’ve recently produced for Swissveg.ch

divider

This link shows professionals in Hollywood as they work on films like OBLIVION and IRON MAN by using the program AFTER EFFECTS

Dieser Link hier zeigt wie Profis bei den Spielfilmen OBLIVION und IRON MAN in Hollywood mit AFTER EFFECTS die gewünschten Effekte eingebaut wurden.
divider

Die Welt der Effekte & Animationen

Der grösste Teil der Animationen werden für den Trickfilmbereich produziert; für Kino oder Fernsehen, für Video-Games oder für die Werbung. Programme wie Adobe Premiere Pro (für Filmschnitt) und After Effects (für Effekte und Animationen) gehören zur Creative Cloud

Hier ist unser neues After Effects Projekt für Swissveg.ch

After Effects ist sehr spannend und in Kombination mit dem Filmschnitt-Programm Premiere Pro kann man relativ schnell professionell eigene Filme fertigstellen.

NEWS: Erste AFTER EFFECTS Klasse in der Migros Klubschule Alltstetten und in Zürich!
Anmeldung und Infos: AFTER EFFECTS KURSE

Smart

As instructors of Adobe programs and creative professionals, we’ve assembled this blog as easy reference for our students and clients.” Miriam Selmi Reed & Michael Alan Reed

English version:
Below is my personal way of cutting out an image with hard edges:
1. Open your image in Adobe Photoshop.
2. Duplicate your layer and select it.
3. Click TWICE on to the layer-mask icon so you will get a VECTOR MASK.
4. Select your Pen-Tool and follow the shape you would like to cut out.
5. Once you are done; click on the layer below and make it invisible.
6. To make alterations on your vector path, simply open the Properties or use the Direct-Selection-Tool to alter the vector points.

Another possible way to cut out an image using the Quick-Selection-Tool

Sharing infos: iADOBE FORUM Our tips for easy download: i-adobe eBook in English

Illustration by Miriam Selmi Reed – Courtesy of Illustration Source NYC

Deutsche Version:
Oben zeige ich mein persönlicher Tipp wie ich Bilder mit harten Kanten freistelle:
1. Öffne dein Bild in Adobe Photoshop.
2. Dupliziere deine Ebene und wähle diese an.
3. Klicke ZWEIMAL auf das Ebenenmasken-Icon damit eine VEKTOR-MASKE entsteht.
4. Wähle dein Zeichenstift-Werkzeug und folge dem Objekt, welches du freistellen möchtest.
5. Wenn du fertig bist, mach die untere Ebene unsichtbar.
6. Um weitere Korrekturen vorzunehmen, öffne die Eigenschaften oder klicke mit dem Direkt-Auswahl-Werkzeug auf die Vektoren und verschiebe deren Position.

Ein anderer schneller Weg ein Bild freizustellen mit dem Schnell-Auswahl-Werkzeug

Tipp! Adobe Photoshop – Die komplette Übersetzung Englisch > Deutsch in Photoshop CC

Tausche dich aus im iADOBE FORUMAlle unsere Tipps als: i-adobe eBook in Deutsch

divider

Courtesy of Illustration Source

View the artists’s homage on the topic: Finance and Debt

Miriam Selmi Reed is represented by Illustration Source, New York City. Portfolio and contact: Illustration Source NYC

Illustration technique: watercolor, acrylic and pencil combined with digital mixed media using Adobe Photoshop and Illustrator.Copyright by Illustration Source, New York City.

Illustrations-Technik: Aquarell, Acryl mit Farbstift, gemischt mit Adobe Photoshop und Illustrator. Copyright by Illustration Source, New York City.

divider

Your source for commissioned illustration: ORIGINAL ART STUDIOS in New York City.

OAS

Portfolio Original Art Studios, New York City: MIRIAM SELMI REED

Pespective in Adobe Illustrator

As instructors of Adobe programs and creative professionals, we’ve assembled this blog as easy reference for our students and clients.” Miriam Selmi Reed & Michael Alan Reed

English version:

1. Open your Illustration in Adobe Illustrator
2. Select your Perspective Grid Tool. The 2 Point-Perspective pops-up.
3. Write some text, choose a color and select the BLUE Widget on the left.
4. Select your text with the Perspective Selection Tool and move it on to the grid. Now you can adjust the size.
5. Switch to the ORANGE Widget for the raster to the right and do the same there. Explore!

Our infos & tips: i-adobe eBook in English

by Miriam Selmi Reed – REEDesign.ch

1. Öffne deine Illustration in Adobe Illustrator
2. Wähle das Perspektiven Raster-Werkzeug. Das 2 Punkt-Perspektiven-Raster erscheint.
3. Schreibe deinen Text, suche eine Farbe aus und klick auf das BLAUE Widget links oben.
4. Wähle den Text mit dem Perspektiven-Auswahl-Werkzeug und ziehe ihn auf den Raster.
5. Wechsle zum Orangen Widget, welches für das rechte Raster zuständig ist und mach dasselbe dort. Viel Spass beim ausprobieren.

Unsere Tipps: i-adobe eBook in Deutsch

divider

Courtesy of Illustration Source

View the artists’s homage on the topic: PERSPECTIVE

Illustration technique: watercolor, acrylic and pencil combined with digital mixed media using Adobe Photoshop and Illustrator.Copyright by Illustration Source, New York City.

Illustrations-Technik: Aquarell, Acryl mit Farbstift, gemischt mit Adobe Photoshop und Illustrator. Copyright by Illustration Source, New York City.

Brushes in Adobe Photoshop

As instructors of Adobe programs and creative professionals, we’ve assembled this blog as easy reference for our students and clients.” Miriam Selmi Reed & Michael Alan Reed

English version:
In my illustration below, I’ve used paint brushes and layer masks in Adobe Photoshop.
1. Open your picture in Adobe Photoshop CC
2. Open your brushes under > Window > Brush
3. Create a new layer on top where you can paint and make a layer mask for corrections:
Step-by-step-guide: How to make a layer mask. To make changes in your layer mask is simple: use your brush and paint directly into your layer mask using black or white!

Check out the Adobe Create Magazine: Tutorials. Any questions? Contact us at iADOBE FORUM Our tips for easy download: i-adobe eBook in English

Deutsche Version:
In meiner Illustration benutzte ich die Pinsel und Ebenenmasken in Adobe Photoshop.
1. Öffne dein Bild in Adobe Photoshop CC
2. Öffne deine Pinsel unter > Fenster > Pinsel
3. Erstelle eine neue Ebene ganz oben zum pinseln und eine Ebenenmaske für allfällige Korrekturen: Schritt-für-Schritt Anleitung: Wie man eine Ebenenmaske erstellt. Man korrigiert eine Ebenenmaske ganz einfach indem man direkt mit einem weissen oder schwarzen Pinsel innerhalb der Maske malt!

Dann schau mal ins Adobe Create Magazine rein: Tutorials. Hast du Fragen? Kontaktiere uns unter iADOBE FORUM! Unsere Tipps zum herunterladen: i-adobe eBook in Deutsch

divider

View the artists’s homage on the topic PEACE ON EARTH at Portfolio Illustration Source

Courtesy of Illustration Source

Licensed illustrations by ILLUSTRATION SOURCE NYC: MIRIAM SELMI REED

Perspective!

“As instructors of Adobe programs and creative professionals, we’ve assembled this blog as easy reference for our students and clients.” Miriam Selmi Reed & Michael Alan Reed

divider

Deutsche Version siehe unten!
Photoshop Tip: I normally use the perspective option in Photoshop, to tilt the floor; as shown in my Illustration below. I open my Photoshop file and go to EDIT > TRANSFORM and choose PERSPECTIVE. With this method, I can alter the PERSPECTIVE as I wish; by simply pulling the anchor points to change it. Hit ENTER once you’re done.
Illustrator Tip: I’ve traced the outlines with Adobe Illustrator using Adobe CC: New Tracing Tools in Adobe Illustrator
ALL tips of this Blog combined in one 72 pages PDF for easy download: i-adobe book in English – Preview & download here

Illustration by Miriam Selmi Reed / Courtesy of Illustration Source

Deutsche Version:
Photoshop Tip: Ich benutze die Perspektiven-Option in Photoshop, um den Boden perspektivisch nach hinten zu kippen; wie man oben bei meiner Illustration sieht. Ich öffne meine Photoshop-Datei und gehe zu BEARBEITEN > TRANSFORMIEREN und wähle Perspektivisch. Mit dieser Methode kann ich die PERSPEKTIVE ändern indem ich an den Hebeln ziehe. Wichtig: mit der ENTER Taste bestätigen.
Illustrator Tipp: Ich habe die neuen Zeichnungswerkzeuge von Adobe CC benutzt um die Illustration unten zu zeichnen: Neue Zeichnungswerkzeuge in Adobe Illustrator
Alle Tipps von diesem Blog kombiniert in einem 72-Seiten PDF zum herunterladen: i-adobe book in Deutsch – Vorschau & Download hier

divider

Courtesy of Illustration Source

Courtesy of Illustration Source

View the artists’s homage on the topic: MONEY

Miriam Selmi Reed is represented by Illustration Source, New York City. Portfolio and contact: Illustration Source NYC

Illustration technique: watercolor, acrylic and pencil combined with digital mixed media using Adobe Photoshop and Illustrator.Copyright by Illustration Source, New York City.

Illustrations-Technik: Aquarell, Acryl mit Farbstift, gemischt mit Adobe Photoshop und Illustrator. Copyright by Illustration Source, New York City.

divider

Your source for commissioned illustration: ORIGINAL ART STUDIOS in New York City.

OAS

Portfolio Original Art Studios, New York City: MIRIAM SELMI REED

RGB or CMYK ?

divider

Deutsche Version siehe unten!
My personal tip: I love to work with RGB in Photoshop, as shown on my Illustration below. I prefer RGB since it has millions of colors to choose from. Either sRGB or Adobe RGB depending on the project. (see animation below)

When converting to CMYK you can go to IMAGE > MODE. The professional method to convert a RGB file into CMYK would be: Photoshop > Menu > Edit > Convert to Profile and select the CMYK color profile of your choice. (To find out which CMYK color profile is correct for your project, depends on the printing press and the chosen paper.) Nevertheless, it’s important to know that CMYK files have only a range of approx. 4000 – 6000 colors used for the printing process, so it is better for me to keep the PSD file with layers in RGB and convert a flatten Tiff-Copy to CMYK.
More on the RGB-topic: RGB versus S-RGB
ALL tips of this Blog combined in one 72 pages PDF for easy download: i-adobe book in English – Preview & download here

Shows sample of sRGB and Adobe RGB / zeigt Beispiel von sRGB und Adobe RGB

Photoshop > Menu > Edit > Assign Profiles: Shows difference of sRGB to Adobe RGB / Photoshop > Menu > Bearbeiten > Profile zuweisen: zeigt Unterschied von sRGB zu Adobe RGB

Deutsche Version
Mein persönlicher Tipp: Ich arbeite am liebsten mit RGB in Photoshop, wie man unten bei meiner Illustration sehen kann. Ich bevorzuge RGB da es Millionen von Farbmöglichkeiten hat, je nach Projekt wähle ich sRGB oder Adobe RGB. (Siehe Animation oben)

Wenn man sein Bild in CMYK konvertieren will, kann man unter BILD > MODUS das CMYK Fogra 39 Farbprofil wählen. Die professionelle Methode wäre jedoch: Photoshop > Menu > Bearbeiten > in Profil umwandeln und wähle dort das korrekte CMYK Farbprofil. (welches Farbprofil korrekt ist, hängt von der Druckmachine und Papierwahl ab; download Farbprofile www.eci.org). Es ist wichtig nicht zu vergessen, dass CMYK Dokumente nur ca. 4000 – 6000 Farbmöglichkeiten haben, da dieser Modus für die Offsetdruckmaschine auf Papier gedacht ist, d.h. ich persönlich behalte meine PSD Datei in RBG (mit Ebenen) und speichere eine Tiff-Kopie (ohne Ebenen) welches ich in das gewünschte CMYK Farbprofil umwandle.
Mehr über das Thema RGB oder s-RGB: RGB versus S-RGB
Alle Tipps von diesem Blog kombiniert in einem 72-Seiten PDF zum herunterladen: i-adobe book in Deutsch – Vorschau & Download hier

divider

Courtesy of Illustration Source

Courtesy of Illustration Source

View the artists’s homage on the topic: MONEY

Miriam Selmi Reed is represented by Illustration Source, New York City. Portfolio and contact: Illustration Source NYC

Illustration technique: watercolor, acrylic and pencil combined with digital mixed media using Adobe Photoshop and Illustrator.Copyright by Illustration Source, New York City.

Illustrations-Technik: Aquarell, Acryl mit Farbstift, gemischt mit Adobe Photoshop und Illustrator. Copyright by Illustration Source, New York City.

divider

Your source for commissioned illustration: ORIGINAL ART STUDIOS in New York City.

OAS

Portfolio Original Art Studios, New York City: MIRIAM SELMI REED

SCAN !

divider

Deutsche Version siehe unten!
Scan Tip: I love to scan my drawings and open them in Adobe Photoshop, as shown on my Illustration below. I use a simple scanner and use a high dpi setting. In Adobe Photoshop I use LAYERS > as well as TRANSPARANCIES so I can paint on a layer on top of my scan, working non-destructive. I also use mostly LAYER MASKS when I have to erase parts of my work. I simply avoid destructive methods like the “eraser tool”!
Step-by-step guide for layer masks: LAYER MASKS in Adobe Photoshop.
ALL tips of this Blog combined in one 72 pages PDF for easy download: i-adobe book in English – Preview & download here

Deutsche Version
Scan Tipp: Ich scanne meine Zeichnungen gerne ein und öffne sie in Adobe Photoshop, wie ich unten bei meiner Illustration zeige. Ich benutze einen normalen Scanner mit einer hohen DPI Einstellung. In Adobe Photoshop benutze ich EBENEN > und TRANSPARENZEN damit ich auf der Ebene oberhalb meines Scans nicht-destruktiv arbeiten kann. Ich benutze zudem immer EBENENMASKEN wenn ich Teile meines Bilder löschen möchte. Ich vermeide prinzipiell das “Radiergummi-Werkzeug” welches Pixel unwiderruflich löscht!
Hier sind die Arbeitsschritte dazu: EBENEN-MASKEN in Adobe Photoshop.
Alle Tipps von diesem Blog kombiniert in einem 72-Seiten PDF zum herunterladen: i-adobe book in Deutsch – Vorschau & Download hier

divider

Courtesy of Illustration Source

Courtesy of Illustration Source

View the artists’s homage on the topic: WALL STREET

Miriam Selmi Reed is represented by Illustration Source, New York City. Portfolio and contact: Illustration Source NYC

Illustration technique: watercolor, acrylic and pencil combined with digital mixed media using Adobe Photoshop and Illustrator.Copyright by Illustration Source, New York City.

Illustrations-Technik: Aquarell, Acryl mit Farbstift, gemischt mit Adobe Photoshop und Illustrator. Copyright by Illustration Source, New York City.

divider

Your source for commissioned illustration: ORIGINAL ART STUDIOS in New York City.

OAS

Portfolio Original Art Studios, New York City: MIRIAM SELMI REED

Languages in Adobe InDesign / Sprachen in Adobe InDesign

Deutsche Version siehe unten!
TIP OF THE MONTH:
“How to change the languages in Adobe InDesign”:

To avoid problems with languages in InDesign, it is crucial to make sure that the language you have chosen is THE SAME in the Preferences AND in the font settings!

1. Open InDesign and go to MENU > EDIT > PREFERENCES and make the following selections:
(Mac: INDESIGN > PREFERENCES) – The settings below are for ENGLISH USA:

pref1

pref2

It is VERY important to choose the same language in the Characters:
charac

Same goes IF you are using a Paragraph or Character Style:
para

Now when you import or place your Word document; Indesign will recognise your settings!

Additional Tip: How to import a large word doc into InDesign

ALL tips combined in one PDF: i-adobe book in English – Preview & download here

divider

Deutsche Version
TIPP DES MONATS:
“Wie man die Spracheinstellungen in Adobe InDesign korrekt einstellt”:

Um Konflikte mit verschiedenen Sprachen zu vermeiden ist es WICHTIG, dass man dieselbe Spracheinstellung in den Voreinstellungen UND in den Zeichenformatierung oder Zeichen-Absatzformate wählt:

1. Öffne InDesign und gehe zu MENU > BEARBEITEN > VOREINSTELLUNGEN:
(Mac: INDESIGN > VOREINSTELLUNGEN) – Diese Einstellungen sind für die Schweiz:

vorein1

vorein2

Es ist SEHR WICHTIG die gleiche Sprache in der Zeichenformatierung zu wählen:
vorein3

Dasselbe gilt natürlich wenn man Zeichen- oder Absatzformat verwendet:
vorein4

Beim importieren oder platzieren eines Word Dokuments werden somit diese Einstellungen korrekt umgesetzt – zudem funktioniert die Autokorrektur damit besser.

Weiterer Tipp: Wie man ein grosses Word Doc ins InDesign platziert

Alle Tipps kombiniert in einem PDF: i-adobe book in Deutsch – Vorschau & Download hier

Work smart!

divider

Deutsche Version siehe unten!
Photoshop Tip: I love to mix Photoshop and Illustrator, as shown on my Illustration below. I copy my Illustrator drawing and place it as a SMART OBJECT into my Photoshop file. With this method, I can work non-destructive and make as many changes as I wish. It shows an interesting mixture between pixels and sharp vector outlines!
More on this topic: How to use SMART OBJECTS

VectorE

Deutsche Version
Photoshop Tipp: Ich mische gerne Photoshop and Illustrator, wie man unten bei meiner Illustration sieht. Ich kopiere meine Illustrator Zeichnung und platziere es als SMART OBJEKT in meine Photoshop Datei. Mit dieser Methode, kann ich nicht-destruktive arbeiten und so viele Änderungen machen wie ich will. Zudem zeigt es eine interessante Mischung zwischen Pixel und harten Vektor Linien.
Mehr über dieses Thema: Wie man SMART OBJEKTE benutzt

divider

Courtesy of Illustration Source

Courtesy of Illustration Source

View the artists’s homage on the topic: THE GRADUATE

Miriam Selmi Reed is represented by Illustration Source, New York City. Portfolio and contact: Illustration Source NYC

Illustration technique: watercolor, acrylic and pencil combined with digital mixed media using Adobe Photoshop and Illustrator.Copyright by Illustration Source, New York City.

Illustrations-Technik: Aquarell, Acryl mit Farbstift, gemischt mit Adobe Photoshop und Illustrator. Copyright by Illustration Source, New York City.

divider

Your source for commissioned illustration: ORIGINAL ART STUDIOS in New York City.

OAS

Portfolio Original Art Studios, New York City: MIRIAM SELMI REED

Color profiles / Farbprofile zuweisen oder umwandeln?

Tutorial in English and German / Anleitung in Deutsch und Englisch

Deutsche Version siehe unten!
divider
English version:

Would you like to receive our tips for free in your e-mail box? Simply select FOLLOW to sign up with your e-mail address.

TIP OF THE WEEK: What is the difference between assign a color profile or to convert a color profile?

Here it is in Photoshop: Menu > Edit > Convert to Profile (right above: Assign Profile!)
PSD_covertProfile

In InDesign: Menu > Edit > Convert to Profile (right above: Assign Profile!)
Indd_Covert-to-profile

And here in Illustrator: Menu > Edit > Assign Profile (Convert to does NOT exist!)
AI_assignProfile

Tip: To assign a color profile only changes the appearance on the monitor. You can try that out, in that you are opening “Assign Profile”, and activate “Preview” while choosing different CMYK-profiles – the view on the monitor changes! If you open the Info-window as well, you can see, that the CMYK values are NOT changing.
If you CONVERT a CMYK color profil; your CMYK values will change!

More info: COLOR PROFILES – MORE INFO

divider

Deutsche Version:

Möchten Sie unsere gratis Tipps in Ihrem e-mail erhalten? Schreiben Sie sich unter FOLLOW mit Ihrer e-mail Adresse ein.

TIPP DER WOCHE: Was ist der Unterschied zwischen Farbprofil zuweisen oder umwandeln?

Hier ist es in Photoshop: Bearbeiten > in Profil umwandeln (gleich oberhalb: Profil zuweisen!)
PSD-Profilumwandeln

In InDesign: Menu > Barbeiten > in Profil umwandeln (gleich oberhalb: Profil zuweisen!)
indd

Und hier in Illustrator: Menu > Bearbeiten > Profil zuweisen (Umwandeln existiert nicht!)
AI-Profilzuweisen

Tipp: Das Zuweisen des Profils ändert nur die Darstellung am Bildschirm. Das kann man sehr gut ausprobieren, in dem man den Dialog “Profil zuweisen” öffnet, die checkbox “Vorschau” aktiviert und nacheinander verschiedene CMYK-Profile anwählt – die Bildschirmdarstellung verändert sich! Wenn man aber das Info-Bedienfeld offen hat, sieht man, dass sich die CYMK-Werte in der Datei NICHT verändern.
Wenn man aber ein CMYK Profil in ein anderes “umwandelt” werden die CYMK-Werte geändert!

Mehr info: FARBPROFILE – MEHR INFO