Featured Concept : Use Your Head at Illustration Source

Contact Illustration Source and start licensing the best conceptual illustration available.
Illustration Source – 15 East 32nd Street 7th Floor – New York, NY 10016
Featured Concept : Use Your Head at Illustration Source
Contact Illustration Source and start licensing the best conceptual illustration available.
Illustration Source – 15 East 32nd Street 7th Floor – New York, NY 10016
Film Company: Zeitsprung Commercial
Advertising agency: Kaelinkom & Partner, Rolf Kälin
Client: Siemens Hausgeräte Schweiz
Storyboard by: Miriam Selmi Reed – REEDesign.ch
Music & Trailer edit by: Michael Alan Reed – REEDesign.ch
Programs used: Adobe After Effects & Apple Logic Pro
Tutorial in English / Deutsch:
Deutsche Version siehe unten!
![]()
English version:
Would you like to receive our tips for free in your e-mail box? Simply select FOLLOW to sign up with your e-mail address.
![]()
TIP OF THE WEEK: Vectorize your pixel image or embed your Photo in Illustrator to avoid missing links!
Option 1: Vectorize your pixel image in Illustrator CS6.
In three simple steps:
1. Place a Photoshop document (jpg, tiff, psd) into Illustrator CS6.
2. Go to Menu > Window > Image Trace, choose your Preset, select under Advanced your Options and click on Trace.
3. When you are done, don’t forget to click on Expand.

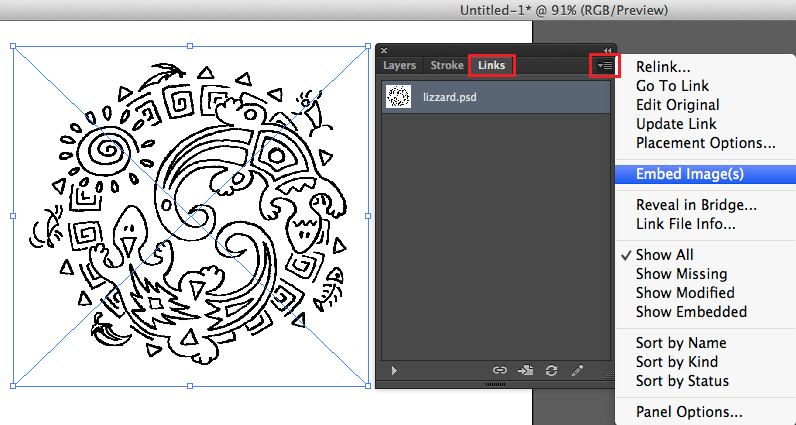
Option 2: Embed your image!
In one easy step:
1. Select your image. Go to Window > Links > choose the side option > Embed Image(s).
This way your photo is part of your Illustrator document and won’t show as a missing link.
Tutorial in English with german subtitles for advanced users: How to vectorize and colorise a photo
![]()
Deutsche Version:
Möchten Sie unsere gratis Tipps im e-mail erhalten? Schreiben Sie sich unter FOLLOW mit Ihrer e-mail Adresse ein.
![]()
TIPP DER WOCHE: Vektorisieren Sie Ihr Pixel Bild oder betten Sie Ihr Foto in Illustrator ein um Probleme mit Verknüpfungen zu vermeiden!
Option 1: Vektorisieren Sie Ihr Pixel Bild in Illustrator CS6.
In drei einfachen Schritten:
1. Platzieren Sie Ihre Photoshop Datei (jpg, tiff, psd) in Ihr Illustrator CS6 Dokument.
2. Gehen Sie zu Menü > Fenster > Bildnachzeichner, wählen Sie Ihre Vorgabe, wählen zudem unter Erweitert Ihre Optionen und klicken auf Nachzeichnen.
3. Wenn Sie fertig sind, ist es wichtig auf Umwandeln zu klicken. Damit wird Ihr Foto vektorisiert.

Option 2: Betten Sie Ihr Foto ein!
Mit einem einfachen Schritt:
1. Wählen Sie Ihr Bild an und gehen zu Fenster > Verknüpfungen > wählen Sie im Bedienfeld Eingebettete Bilder. Damit wird Ihr Pixel-Bild Teil Ihrer Illustrator Datei und ist nicht mehr mit dem platzierten Original-Bild verknüpft.

Tutorial in Englisch mit deutschen Untertitel für Fortgeschrittene: Wie man ein Foto vektorisiert und einfärbt
Tutorial in English and German / Anleitung in Englisch und Deutsch
Deutsche Version siehe unten!
![]()
English version:
Would you like to receive our tips for free in your e-mail box? Simply select FOLLOW to sign up with your e-mail address.
In case you are into mixing Adobe programs, such as Photoshop and Illustrator, using SMART OBJECTS might be an option for you!
TIP OF THE WEEK: Placing Illustrator Images as Smart Objects into Photoshop CC or CS6.
In two simple steps!
1. Open your Illustrator document with a simple Icon, Illustration or Logo.
2. Copy your Object and place it as Smart Object into Photoshop.

3. Click OK to confirm the placement. In the Layers you’ll find the Smart Oject as a small icon. By clicking on the small icon, the original file opens again in Illustrator.
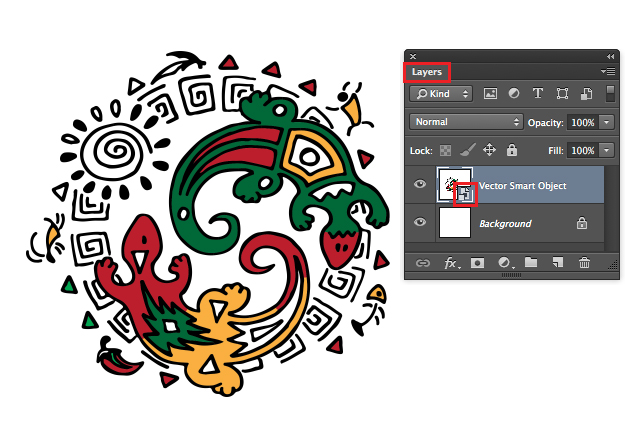
If you make a change there and hit Save, the changes will be automatically transferred into your Photoshop Document because both programs are now connected.
Simple and Easy!
![]()
Our new i-adobe book is available online – in English – including tutorials on 72 pages! Have a look: Preview & secure online Shop!
![]()
Deutsche Version:
Möchten Sie unsere gratis Tipps im e-mail erhalten? Schreiben Sie sich unter FOLLOW mit Ihrer e-mail Adresse ein.
Falls Sie gerne Adobe Programme – wie Photoshop und Illustrator – mischen möchten, wäre das benutzen von SMART OBJEKTEN eine Option.
TIPP DER WOCHE: Platzieren von Illustrator Bilder als Smart Objekte in ein Photoshop CC oder CS6 Dokument.
In nur zwei einfachen Schritten!
1. Öffnen Sie Ihr Illustrator Dokument mit einem Icon, Illustration oder Logo.
2. Kopieren Sie Ihr Objekt und fügen es als Smart Objekt in Ihre Photoshop Datei ein.

3. Klicken Sie auf OK um die Platzierung zu bestätigen. In Ihren Ebenen finden Sie nun Ihr Smart Objekt als kleines Icon. Wenn Sie auf dieses Icon klicken, öffnet sich das Original Dokument wieder in Illustrator.

Sollten Sie in dieser neu geöffneten Illustrator Datei wieder eine Änderung machen und auf Speichern klicken, werden die Änderungen automatisch in Ihre Photoshop Datei übernommen. Das heisst: Beide Programme sind jetzt mit diesem Smart-Objekt verbunden!
![]()
Unser neues i-adobe book ist erhältlich online – in Deutsch – inklusive Tutorials auf 72 Seiten! BESTELLUNG mit Käuferschutz: Vorschau und sicherer Onlineshop!
![]()
Miriam Selmi Reed represented and licensed by Illustration Source
Portfolio and contact: Illustration Source NYC
Illustration technique: Traditional drawing combined with digital mixed media using Smart Objects in Photoshop and Illustrator. Copyright by Illustration Source, New York City.
Illustrations-Technik: Farbstift-Zeichnung gemischt mit Illustrator und Photoshop sowie Smart-Objekten. Copyright by Illustration Source, New York City.
Deutsche Version:
Möchten Sie unsere gratis Tipps im e-mail erhalten? Schreiben Sie sich unter FOLLOW mit Ihrer e-mail Adresse ein.
![]()
TIPP DER WOCHE: Neu in CS6/Version 8.0.2 und CC: Verpacken in Illustrator
Bisher konnte man nur in Adobe InDesign “verpacken” um die Schriften (Fonts) und Bilder (Links) zusammen mit der Datei in einem Ordner zu speichern. Daher musste man in Illustrator die Bilder (links) unter Verknüpfungen “einbetten” und die Schriften (Fonts) in Pfade umwandeln. Seit der Version CS6, Version 8.0.2 ist dies nun auch bei Adobe Illustrator möglich.
Das verpacken in Illustrator CS6 erfolgt in einem einfachen Arbeitsschritt:

Darauf öffnet sich dieses Fenster; ähnlich wie bei InDesign werden nun die Fonts und Links bequem in einen Ordner verpackt:

English version:
Would you like to receive our tips for free in your e-mail box? Simply select FOLLOW to sign up with your e-mail address.
![]()
TIP OF THE WEEK: The NEW “package” option in Adobe Illustrator CC
Previously it was only possible to “package” the fonts and links in Adobe InDesign. In earlier Illustrator versions it was necessary to embed the links and outline the fonts to be able to send the document. Since version CS6 8.0.2. it is also possible in Adobe Illustrator.
To “package” your Illustrator CS6 document is now simple and easy:

Similar to InDesign, you will then see the window which allows you to package the fonts and links into a folder of your choice:

CREDITS:
Client: i-peak infosystems gmbh
Creative Director / CEO: Raoul Julen
Animation & Editing: REEDesign.ch / Michael A. Reed / Miriam S. Reed
Soundtrack: “Fleure Bleue” / proudmusiclibrary.com
Programs: Adobe After Effects CS6, Apple Logic Pro
Deutsche Version:
Möchten Sie unsere gratis Tipps im e-mail erhalten? Schreiben Sie sich unter FOLLOW mit Ihrer e-mail Adresse ein.
![]()
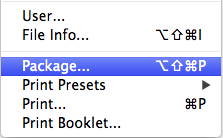
TIPP DER WOCHE: Wie man ein CS6 InDesign Dokument in CS4 oder CS5 öffnen kann
Fast jede/r InDesign Benutzer/in kennt die folgende Fehlermeldungen: fehlende Document fonts, Links oder plug-ins und können daher das Dokument nicht öffnen. Mit diesen 3 einfachen Schritten können Sie dies in Zukunft vermeiden:
1. Gehen Sie unter MENÜ > DATEI > VERPACKEN – Damit erstellt Adobe InDesign ein Ordner mit allen Document fonts (Schriften) und links (Bilder) welche Sie in Ihrem InDesign Dokument benutzten.

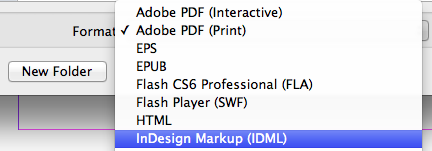
2. Gehen Sie unter MENÜ > DATEI > SPEICHERN und wählen Sie unter Format: CS4 oder höher (IDML) …
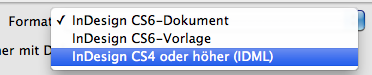
… die gleiche Option finden Sie unter DATEI > EXPORTIEREN. Wählen Sie unter Format: InDesign Markup (IDML).

3. Legen Sie das IDML in Ihren verpackten Ordner. Jede Druckerei oder Person, die Ihr InDesign Dokument öffnen muss, wird sich bei Ihnen bedanken. Sogar wenn diese CS4 benutzen, wird mit einem einfachen Klick auf das IDML Icon das InDesign Dokument automatisch geöffnet. Zudem, alle Document fonts (Schriften) und links (Bilder) sind somit praktisch im selben Ordner verpackt.
![]()
Unser neues i-adobe book ist erhältlich online – in Deutsch – inklusive Tutorials auf 72 Seiten – Vorschau und Download hier!
![]()
English version:
Would you like to receive our tips for free in your e-mail box? Simply select FOLLOW to sign up with your e-mail address.
TIP OF THE WEEK: How to save a CS6 InDesign file down to version CS4 or CS5
![]()
Almost every InDesign user experiences missing plug-ins, fonts or links while trying to open a document. With these 3 easy steps you’re maybe able to avoid it in the future:
1. Go under MENU > FILE > PACKAGE – This way Adobe InDesign makes a package of all the fonts and links (images) you’ve used in your InDesign file.
2. Go under MENU > FILE > SAVE and choose under Format: CS4 or later (IDML) …

… the same option you may find under FILE > EXPORT and choose under Format: InDesign Markup (IDML) which is the same.
3. Put the IDML into the same packaged folder. Every printer and person who needs to open your InDesign file will find it useful. Even if they are using CS4 or CS5, they can click on the IDML and your CS6 InDesign document opens this way. Also, all the fonts and links (images) are collected in the same folder.
![]()
Our new i-adobe book is available online – in English – including tutorials on 72 pages! Preview & download here!
![]()
Film Company: Rosas & Co Films AG
Advertising agency: By Heart AG
Client: Emmi Caffe Latte
Storyboard: Miriam Selmi Reed – REEDesign
Music & Trailer edit: Michael Alan Reed – REEDesign
Programs used: Adobe After Effects & Apple Logic Pro
Deutsche Version:
Möchten Sie unsere gratis Tipps im e-mail erhalten? Schreiben Sie sich unter FOLLOW mit Ihrer e-mail Adresse ein.
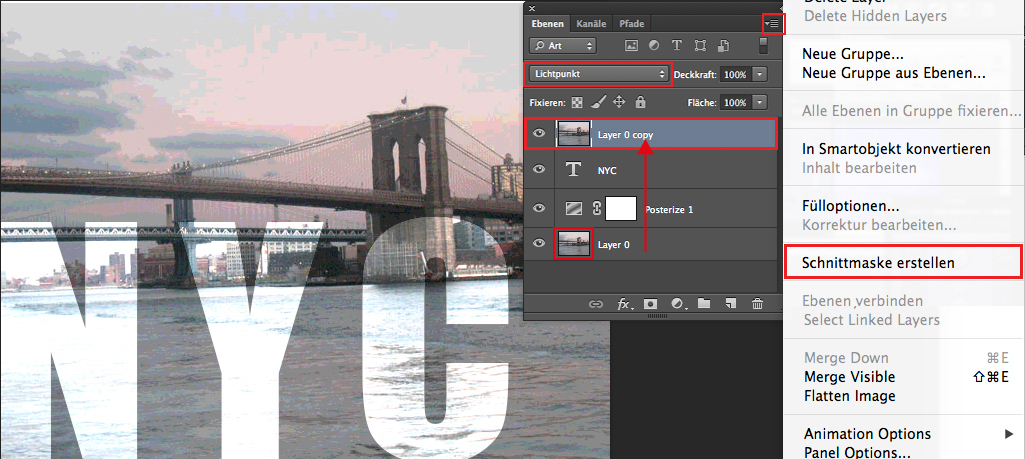
TIPP DER WOCHE: Schnittmasken in Adobe Photoshop CS6
![]()
Schritt 1: Öffnen Sie Ihr Bild in Photoshop CS6 und wählen “Tontrennung” in den Einstellungsebenen.

Schritt 2: Schreiben Sie Ihren Text möglichst gross und fett.

Schritt 3: Duplizieren Sie Ihr Bild, schieben diese Ebene ganz nach oben und
wählen “Schnittmaske erstellen”.
Um unseren Effekt zu erzielen, wählten wir zusätzlich die Option “Lichtpunkt”.
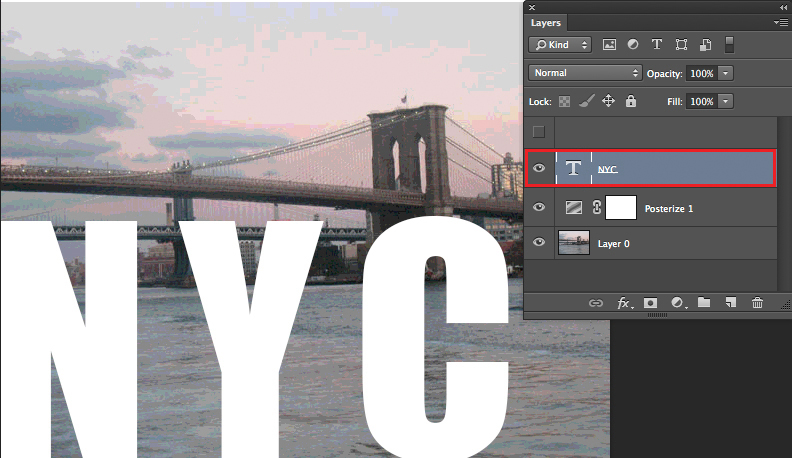
Und hier ist das fertige Resultat:

English version:
Would you like to receive our tips for free in your e-mail box? Simply select FOLLOW to sign up with your e-mail address.
TIP OF THE WEEK: Clipping mask in Adobe Photoshop CS6
![]()
Step 1: Open your image in Photoshop CS 6 and add on “Posterize” in your adjustment layer.

Step 2: add on some bold, large Text.
Step 3: Duplicate your image, move that layer on top and select “Create Clipping Mask”.
To adjust the effect, we selected “Pin Light” from the layer blending mode.

and here is the result:

English version:
Would you like to receive our tips for free in your e-mail box? Simply select FOLLOW to sign up with your e-mail address.
TIP OF THE WEEK: How to change the image size of a photo in Adobe Photoshop
![]()
Teaching Photoshop for so many years, we’ve come across the same issues over and over again. One of the major problems especially for beginners is; how to re-size an image to 300 Pixels/Inch for print. Actually it is VERY simple: All a user has to understand is that Photoshop is based on pixels.
Simply pay attention to the “Pixel Dimensions” while changing the size of the image. The Pixel Dimensions should always remain the same! Reason: if Photoshop deletes Pixels or adds on Pixels, our image quality changes for the worse, gets blurry etc.
Step 1: Open the image in Photoshop CS6. Go to MENU > IMAGE > IMAGE SIZE.
Pay attention to the Pixel Dimensions which should remain the same. The Width and Height are linked together.
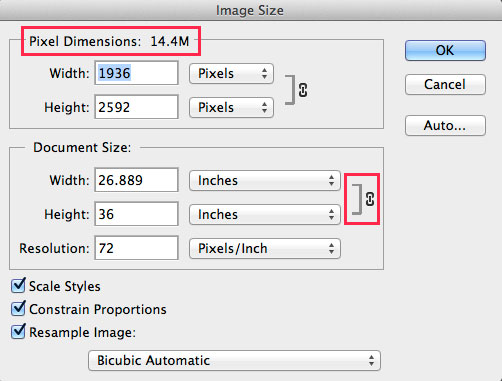
Step 2: Click off the Box “Resample Image” now the Width, Height and Resolution are linked together. Pay attention to the Pixel Dimensions on top. They are the same as before.

Step 3: Type in the Resolution field 300 Pixels/Inch for print. Notice that the Pixel Dimensions stay the same.
This means that we have changed the size of the image BUT, the Pixel Dimensions remain the same, so we have optimal quality for print.

Keep in mind that DPI is not PPI is not LPI and although there are many opinions as to the best re-sizing methods, one should at least utilize and compare the results of the 6 different re-sampling methods available at the bottom of the Photoshop image size dialog box, as the Automatic default setting “Bicubic Automatic” may not always be optimal.
Deutsche Version:
Möchten Sie unsere gratis Tipps im e-mail erhalten? Schreiben Sie sich unter FOLLOW mit Ihrer e-mail Adresse ein.
TIPP DER WOCHE: Bilder korrekt in der Grösse in Photoshop anpassen
![]()
Seit vielen Jahren unterrichten wir Photoshop, daher bemerken wir immer wieder dieselben Probleme. Eines davon ist wie man Pixelbilder korrekt in der Grösse auf 300 Pixels/Zoll für den Druck anpasst.
Eigentlich ist es simpel: Der Benutzer muss einfach verstehen, dass die Pixelmasse IMMER gleich bleiben sollten.
D.h. man kann die Bildgrösse in der Breite und Höhe verändern, die Pixelmasse sollten aber gleich bleiben. Grund: Wenn Photoshop Pixels löscht oder dazufügt, verschlechtert sich die Bildqualität und das Bild wird unscharf.
Schritt 1: Öffnen Sie das Bild in Photoshop CS6. Gehen Sie zu MENÜ > BILD > BILDGRÖSSE.
Beachten Sie die Pixelmasse die nun immer gleich bleiben sollten. Die Breite und Höhe sind miteinander verknüpft.

Schritt 2: Wählen Sie die Check Box “Interpolationsverfahren” ab. Damit werden die Breite, Höhe und Auflösung (Pixel) miteinander verknüpft. Beachten Sie oben die Pixelmasse: sie verändern sich nicht.
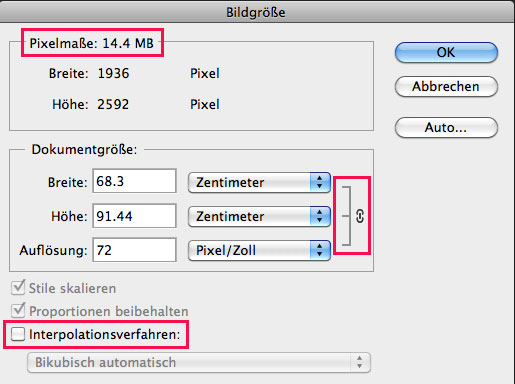
Schritt 3: Tippen Sie im Feld “Auflösung” 300 Pixel/Zoll für den Druck. Beachten Sie die Pixelmasse oben: sie bleiben immer noch gleich.
Das heisst: Wir änderten zwar die Grösse des Bildes, ABER die Pixelmasse bleiben gleich und wir haben eine optimale Qualität für den Offsetdruck.

DPI ist nicht das dasselbe wie PPI und ist nicht dasselbe wie LPI, dieses Thema wird in einem zukünftigen Post gezeigt. Es gibt viele Möglichkeiten wie man Bilder in Photoshop vergrössert oder verkleinert, man sollte dazu auch noch die 6 verschiedenen Optionen unter dem “Interpolationsverfahren” in Betracht ziehen, da “Bikubisch automatisch” nicht immer die optimale Lösung ist.
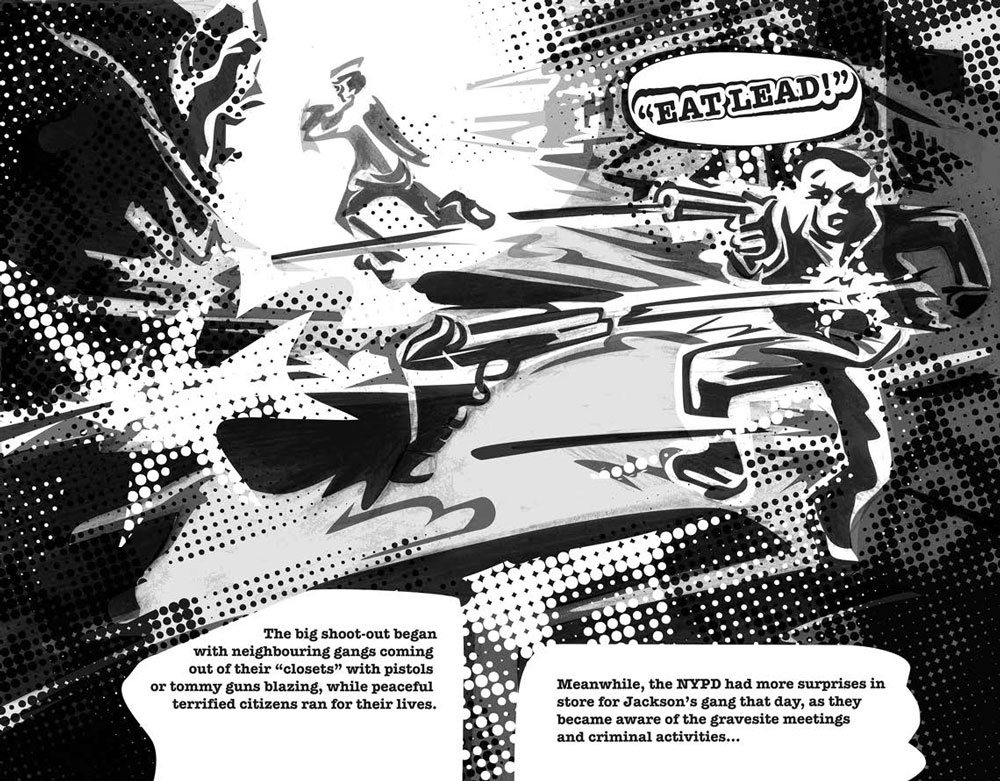
Featured Artist Miriam Selmi Reed
Copyright by SIS New York City
Miriam worked in Zurich from 1990-1996 as a designer/illustrator in both full-time and freelance positions for advertising agencies such as Wirz BBDO and McCann Erickson. After that, she came to the United State to work for Disney on the new Disneyland Tokyo theme park designs. Miriam then went on to work with Cinesite/Kodak, the Hollywood special effects company, as staff illustrator/concept artist. Her feature film projects included Titanic, Hard Rain, The Truman Show, Face Off and Practical Magic.
Illustration Source provides you with speed and convenience. Our website design and simple pricing allow you more time to work on your project and less time searching for images and decoding costs.
The artists represented by Illustration Source are some of the best illustrators working today.
Contact us today and start licensing the best conceptual illustration available.
http://www.illustrationsource.com
Info in English and German – Info in Deutsch und Englisch
English version:
Would you like to receive our tips for free in your e-mail box? Simply select FOLLOW to sign up with your e-mail address.
![]()
TIP OF THE WEEK: how to use BLACK!
Ever wondered why Black sometimes prints more like a dark grey?
This is our suggestion how to set set the right Black for the CMYK printing process:
To print large areas of Black we suggest using: 30 % Cyan, 20 % Magenta, 20 % Yellow and 100 % Black to print a neutral and deep Black. Some printers go as high as: 70c, 60m, 50y – ask your printer for details.
For fonts in general, especially if the type is thin and small: 100 % Black is fine. Is the Black font big in size, like a large, bold headline; you might add Cyan, Magenta and Yellow as mentioned above.
As for Registration Black: Please DO NOT use this for anything else than Registration marks. Why? Because it is: 100 % Cyan, 100 % Magenta, 100 % Yellow and 100 % Black (=Key), is used for registration marks only and goes way over the 300 % color limit.
In general: pay attention that you won’t go over the 300 % color limit, which is easy to check in InDesign under: WINDOW > OUTPUT > SEPARATIONS PREVIEW > the Ink Limit should not exceed 300 %)
Tip: as you may have noticed the “default” black of Photoshop is 75c 68m 67y 90k, which takes you to the 300% maximum total ink limit and also allows for a little ink dot gain or “spreading” at the press by lowering the black(Keyline) 10%
cheers – REEDesign
![]()
Deutsche Version:
Möchten Sie unsere gratis Tipps im e-mail erhalten? Schreiben Sie sich unter FOLLOW mit Ihrer e-mail Adresse ein.
![]()
TIPP DER WOCHE: Wie man Schwarz korrekt einsetzt.
Haben sie sich jemals gewundert, warum schwarze Flächen als Dunkelgrau gedruckt werden? Hier ist unser Ratschlag, wie sie ihr Schwarz korrekt für den CMYK Druckprozess vorbereiten:
Um ein tiefes Schwarz bei grossen Flächen zu erhalten empfehlen wir: 30 % Cyan, 20 % Magenta, 20 % Yellow and 100 % Black. Einige Druckereien gehen sogar so hoch: 70c, 60m, 50y – fragen Sie Ihre Druckerei.
Für Schriften, vor allem klein in der Grösse und dünn: 100 % Black ist genügend. Ist die Schrift jedoch gross und Fett, könnte man Cyan, Magenta und Yellow dazugeben.
Das Passermarken-Schwarz ist mit 100 % Cyan, 100 % Magenta, 100 % Yellow und 100 % Black (=Key) über dem erlaubten 300% Farbauftrag und ist somit nur für Schnitt- und Passermarken gedacht.
Tipp: den 300 % Farbauftrag nicht überschreiten: InDesign prüft das unter: FENSTER > AUSGABE > Separationsvorschau > Farbauftrag.
cheers – REEDesign
Tutorial in English and German:
Would you like to receive our tips for free in your e-mail box? Simply select FOLLOW to sign up with your e-mail address.
TIP OF THE WEEK: how to illustrate a book with Adobe Illustrator.
![]()
Möchten Sie unsere gratis Tipps im e-mail erhalten? Schreiben Sie sich unter FOLLOW mit Ihrer e-mail Adresse ein.
TIPP DER WOCHE: Wie man mit Adobe Illustrator ein Buch illustriert.
Illustrations: mixed media technique, manual drawing mixed with Adobe programs by Miriam Selmi Reed in collaboration with Michael Alan Reed

English: Place your sketches in Adobe Illustrator. Trace the lines using the pen tool – need help? watch this tutorial: HOW TO DRAW IN ADOBE ILLUSTRATOR – Fill in the shapes. Use patterns to add some effects and most importantly: have fun!
![]()
Deutsch: Platzieren Sie Ihre Zeichnungen in Adobe Illustrator. Pausen Sie Ihre Zeichnung nach mit dem Zeichenstiftwerkzeug – brauchen Sie Hilfe? Schauen Sie sich dieses Lernvideo an: WIE MAN MIT ILLUSTRATOR ZEICHNET. – Füllen Sie die Flächen ein mit Farben. Benutzen Sie die Musterbibliotheken von Adobe Illustrator. Das wichtigeste: have fun!
secure ONLINE SHOP:
Would you like to receive our tips for free in your e-mail box? Simply select FOLLOW to sign up with your e-mail address.
![]()
Möchten Sie unsere gratis Tipps im e-mail erhalten? Schreiben Sie sich unter FOLLOW mit Ihrer e-mail Adresse ein.
![]()
Illustrations: manual technique combined with Adobe Photoshop & Illustrator.
Copyright by Miriam Selmi Reed, registered with the Library of Congress USA, Date of Recordation: 2009-12-02, Entire Copyright Document: V3583 D244-246 P1-83, Registration Number: PA0000962179., Title: original Title:” Ziggy takes Coco for a walk.”
Animation for I-Pad: Adobe InDesign / Animation for Trailer: Adobe After Effects
Music, composing and mix by Michael Alan Reed,
Copyright by Michael Alan Reed: using Apple Logic
![]()
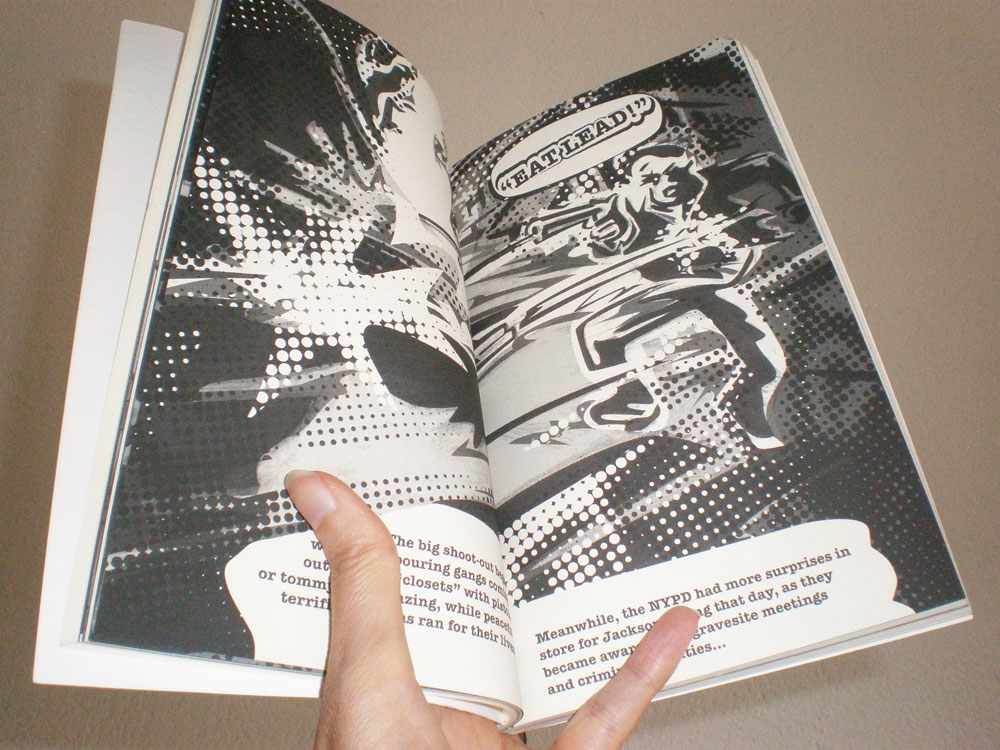
Latest news about Z-DOG: Z-DOG COMIC
Trailers, answering questions and tutorials take lots of time. Of course it is free, but maybe you’d like to buy them a cup of coffee? 
Adobe-Tipps zusammenzustellen braucht viel Zeit. Natürlich ist es gratis, aber vielleicht spendieren Sie uns einen “Kaffee?” Jede Unterstützung freut uns. Danke!
