InDesign: Make your own Short-cuts / Eigene Kurzbefehle erstellen

Tutorial in English and German / Anleitung in Deutsch und Englisch

Deutsche Version siehe unten!
divider
English version:

Would you like to receive our tips for free in your e-mail box? Simply select FOLLOW to sign up with your e-mail address.

TIP OF THE WEEK: How to make your own short cuts in Adobe InDesign

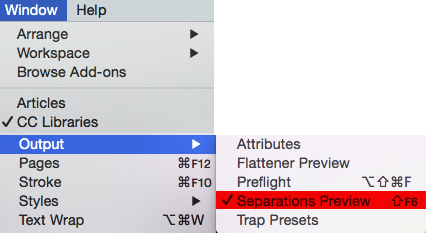
MENU > EDIT > open the KEYBOARD-SHORTCUTS

First you have to create a NEW SET and choose a name
newset

Under PRODUCT AREA choose the shortcut you’d like to change:

1. In our case I’ve chosen under VIEW-MENU > GRIDS & GUIDES: Show Baseline Grid.

assign

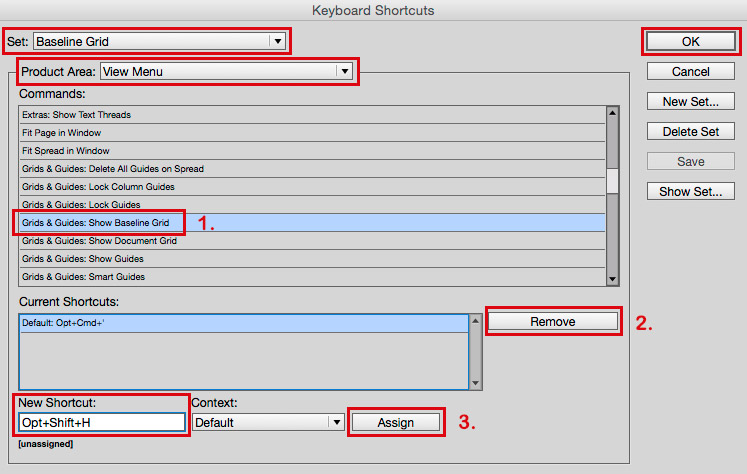
2. Under CURRENT SHORTCUTS remove the old shortcut.

3. Create a NEW SHORTCUT and hit ASSIGN.
In our case I’ve selected on my Mac for Show/Hide Baseline Grid: ALT (Option) + SHIFT + H
It is important to create a shortcut which is not in use!

4. Confirm with OK

Try your own shortcut in InDesign – have fun 🙂

divider

Trailers and tutorials take lots of time. Of course it is free, but maybe you’d like to buy us “a cup of coffee?” Any support is greatly appreciated: PayPal Donate Button

divider

Deutsche Version:

Möchten Sie unsere gratis Tipps in Ihrem e-mail erhalten? Schreiben Sie sich unter FOLLOW mit Ihrer e-mail Adresse ein.

Tipp der Woche: wie man selber eigene Kurzbefehle in InDesign erstellen kann!

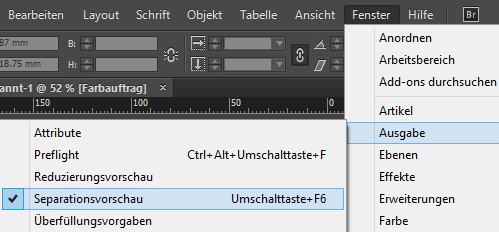
MENU > BEARBEITEN > TASTATURBEFEHLE

Das Bedienfeld öffnet sich!

Zuerst muss man einen NEUEN SATZ erstellen und nach Wunsch benennen.

Tastatur1

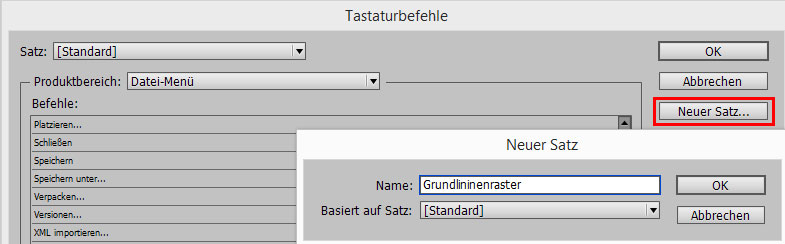
Unter PRODUKTEBEREICH den Tastaturbefehl suchen den man ändern will.

1. In unserem Fall unter ANSICHT-MENÜ > GRUNDLINIENRASTER EINBLENDEN.

Tastatur2

2. Unter AKTUELLE TASTATURBEFEHLE zuerst den alten Tastaturbefehl ENTFERNEN.

3. Unter NEUER TASTATURBEFEHL einen neuen (unbenutzten*) Tastaturbefehl ZUWEISEN.
In unserem Fall wählte ich auf meinem PC für den Grundlinienraster einblenden: z.B. UMSCHALT (SHIFT) + CTRL (PC) / Cmnd (Mac) + H

4. mit OK bestätigen

Wichtig ist, dass man logischerweise einen neuen KURZBEFEHL auswählt, der noch unbenutzt* ist!

Den neuen eigenen Kurzbefehl in InDesign ausprobieren – viel Spass!

divider

Adobe-Tipps zusammenzustellen braucht viel Zeit. Natürlich ist es gratis, aber vielleicht spendieren Sie uns einen “Kaffee?” Jede Unterstützung freut uns. Danke! PayPal Donate Button

Animate with Photoshop in 2016

The following illustration was created by Mimi Selmi Reed (webdesign: Adobe Muse) with pencils and water color – traced and executed in Illustrator & Photoshop – animated in Adobe Photoshop CC.
(Tutorial see below / Anleitung siehe unten)

Copyright by Miriam Selmi Reed - member SCBWI - all rights reserved.

Copyright by Miriam Selmi Reed – member SCBWI – all rights reserved.

Every Follower, Like and comment is welcome! More comics & cartoons at: Z-DOG COMIC

divider

ENGLISH:
Animations with Photoshop / Animationen mit Photoshop:
Photoshop timeline for animations is under Window > Timeline. Have fun!
How to create frame animations in Photoshop

DEUTSCH:
Die Photoshop-Zeitleiste für Animationen kann man unter Fenster > Zeitleiste finden. Viel Spass!
Erstellen von Frame-Animationen in Photoshop

animation

Topic of the week: Consumerism

divider

Illustrator Tipp > TRANSPARENCY: I love to use Transparencies in Adobe Illustrator, as shown on my Illustration below. I first go under MENU > WINDOW < TRANSPARENCY; and select a Transparency for my selected object. With this method, I can apply different transparencies and work non-destructive.

transparency

divider

Illustrator Tip > TRANSPARENZ: Ich benutze gerne die Transparenzen in Illustrator – wie bei meiner Illustration unten. Dazu gehe ich unter MENU > FENSTER > TRANSPARENZ; und wähle eine Transparenz nach Wahl. Mit dieser Methode arbeite ich nicht-Destruktiv, und kann somit jederzeit eine Transparenz löschen oder nach Wunsch verändern.

transparenz

divider

Miriam Selmi Reed represented and licensed by Illustration Source - Courtesy of Illustration Source

Miriam Selmi Reed represented and licensed by Illustration Source – Courtesy of Illustration Source

View the artists’s homage on the topic: CONSUMERISM

Miriam Selmi Reed is represented by Illustration Source, New York City. Portfolio and contact: Illustration Source NYC

Illustration technique: watercolor, acrylic and pencil combined with digital mixed media using Adobe Photoshop and Illustrator.Copyright by Illustration Source, New York City.

Illustrations-Technik: Aquarell, Acryl mit Farbstift, gemischt mit Adobe Photoshop und Illustrator. Copyright by Illustration Source, New York City.

divider

Your source for commissioned illustration: ORIGINAL ART STUDIOS in New York City.

OAS

Portfolio Original Art Studios, New York City: MIRIAM SELMI REED

InDesign Trick!

Tutorial in English and German / Anleitung in Deutsch und Englisch

Deutsche Version siehe unten!
divider
English version:

Would you like to receive our tips for free in your e-mail box? Simply select FOLLOW to sign up with your e-mail address.

TIP OF THE WEEK: How to check on the separations for the printing press

All InDesign users who are sending their files to the printer, know the disappointment, when certain parts are being printed too dark which makes the details disappear.
The reason is simple: paper is like a sponge, which means more than 300% color is not possible for the paper to absorb.

Separations1

InDesign offers the Solution under MENU > WINDOW > OUTPUT > SEPARATIONS PREVIEW 300%. The parts which are higher as the allowed 300%, are shown in Indesign with this method! (see image below = the red marked parts are above 300%)

separations

we recommend opening the file again in Adobe Photoshop and lighten the red marked parts – save it – place the file again in Indesign or refresh the link!

face

divider

ALL tips of this Blog combined in one 72 pages PDF for easy download: i-adobe book in English – Preview & download here

divider

Deutsche Version:

Möchten Sie unsere gratis Tipps in Ihrem e-mail erhalten? Schreiben Sie sich unter FOLLOW mit Ihrer e-mail Adresse ein.

TIPP DER WOCHE: Wie man in InDesign den Farbauftrag für den Offsetdruck kontrollieren kann

Alle InDesign Benutzer die Ihre Dateien in den Druck schicken, kennen die Überraschung, wenn gewisse dunkle Bildstellen im Druck “absaufen”, d.h. zu dunkel gedruckt werden und die Details nicht mehr zu erkennen sind.
Der Grund ist einfach: Papier ist wie ein Schwamm, d.h. mehr als 300% Farbauftrag kann ein Papier nicht aufsaugen.

Farbauftrag1

Die Lösung bietet InDesign unter MENU > FENSTER > AUSGABE > SEPARATIONSVORSCHAU 300%. Die Teile im Bild welche die erlaubten 300% übersteigen, werden damit in InDesign angezeigt! (siehe Foto unten = die Rot markierten Teile sind über 300%)

separationen

Wir empfehlen das Bild in Photoshop wieder zu öffnen und darauf achten, dass die rot markierten Stellen aufgehellt werden – danach wieder neu in InDesign platzieren oder erneut verknüpfen!

face

divider

Alle Tipps von diesem Blog kombiniert in einem 72-Seiten PDF zum herunterladen: i-adobe book in Deutsch – Vorschau & Download hier

divider

Today’s Topic: TRANSPARENCY

divider

Photoshop Tipp > BLENDING MODE: I love to use Blending Modes in my layers, as shown on my Illustration below. I first go under MENU > LAYERS > and select a different Blending Mode for the layer. With this method, I can apply different transparencies to my layers and work non-destructive.

Blendingmode

divider

Photoshop Tip > MISCHMODUS: Ich benutze gerne den Mischmodus in Photoshop – wie bei meiner Illustration unten. Dazu gehe ich unter MENU > EBENEN > und stelle einen anderen Mischmodus für die Ebene ein. Mit dieser Methode arbeite ich nicht-Destruktiv, und kann somit jederzeit eine Transparenz löschen oder nach Wunsch verändern.

Mischmodus

divider

Miriam Selmi Reed represented and licensed by Illustration Source - Courtesy of Illustration Source

Miriam Selmi Reed represented and licensed by Illustration Source – Courtesy of Illustration Source

View the artists’s homage on the topic: TRANSPARENCY

Miriam Selmi Reed is represented by Illustration Source, New York City. Portfolio and contact: Illustration Source NYC

Illustration technique: watercolor, acrylic and pencil combined with digital mixed media using Adobe Photoshop and Illustrator.Copyright by Illustration Source, New York City.

Illustrations-Technik: Aquarell, Acryl mit Farbstift, gemischt mit Adobe Photoshop und Illustrator. Copyright by Illustration Source, New York City.

divider

Your source for commissioned illustration: ORIGINAL ART STUDIOS in New York City.

OAS

Portfolio Original Art Studios, New York City: MIRIAM SELMI REED

Adobe Pantone Spot Colors versus Pantone Spot Colors

Tutorial in English and German / Anleitung in Deutsch und Englisch

Deutsche Version siehe unten!
divider

English version:

Would you like to receive our tips for free in your e-mail box? Simply select FOLLOW to sign up with your e-mail address.

TIP OF THE WEEK: How to change a Pantone Color in to CMYK for the printing press

Were you ever confused when trying to change a Pantone Spot color into CMYK? You might have a Pantone Bridge book and look up the color conversion just to find out that this number does not match the Adobe numbers. Open the Swatch Options and change the Color Type as well as the Color Mode to Process and CMYK as shown below.

See our example using Adobe InDesign:

IndesignE

In short: my Pantone Bridge book shows the breakdown of 1777C as: C:0 / M:68 / Y: 28 / K: 0 > versus my Adobe InDesign, Illustrator and Photoshop which show: C:0 / M: 73 / Y: 31 / K:0 – as shown above!

This does not seem like much but, can be confusing! I simply use the Adobe conversion and put my Pantone book back into the book shelve until they solve this issue. Unfortunately, I didn’t find a better solution yet…

divider

Deutsche Version:

Möchten Sie unsere gratis Tipps in Ihrem e-mail erhalten? Schreiben Sie sich unter FOLLOW mit Ihrer e-mail Adresse ein.

TIP OF THE WEEK: Wie man eine Pantone Vollton Farbe in eine Prozessfarbe CMYK für den Offsetdruck umwandeln kann

Waren Sie jemals verärgert als Sie Ihre Pantone Farbe in eine CMYK Farbe umwandeln wollten? Vermutlich hatten Sie Ihren Pantone Color Bridge Fächer offen, suchten den CMYK Breakdown und waren erstaunt, dass Ihr Pantone Bridge Fächer komplett andere Nummern aufzeigt als Ihre Adobe Programme? Öffnen Sie Ihre Farbfelder und Ihre Optionen damit Sie den Farbtyp und Farbmodus auf Prozess und CMYK ändern können. Siehe Bild unten!

Hier ist ein Beispiel mit Adobe InDesign:

IndesignD

In kürze: mein Pantone Bridge Fächer zeigt den Breakdown von meiner Pantone Farbe 1777C als: C:0 / M:68 / Y: 28 / K: 0 > hingegen mein Adobe InDesign, Illustrator und Photoshop zeigen: C:0 / M: 73 / Y: 31 / K:0 – wie sie beim Bild oben sehen können.

Dies scheint kein grosser Unterschied zu sein, kann aber verwirren! Wir benutzen ganz einfach den Adobe Breakdown und stellen unser Pantone Bridge Fächer zurück ins Büchergestell. Bis jetzt fand ich leider noch keine bessere Lösung…

divider

Any support is greatly appreciated – Jede Unterstützung freut uns: PayPal Donate Button

divider

Todays topic: PATHWAYS

divider

Photoshop Tipp > SMART FILTERS: When I’m using Filters as shown on my Illustration below, I first go under MENU > FILTER > Convert for Smart Filter. With this method, I can apply every filter and work non-destructive. I open my layers and click on my Filter icon which opens the previous chosen filter settings so I can make my adjustments.

smart-filters

Photoshop Tip > SMART FILTER: Wenn ich in Photoshop Filter benutze – siehe unten – dann gehe ich unter MENU > FILTER > Konvertieren für Smart Filter. Mit dieser Methode arbeite ich nicht-Destruktiv, und kann somit jeden Filter löschen oder nach Wunsch verändern. Dazu öffne ich mein Ebenen-Bedienfeld und klicke auf meinen Filter, damit sich der vorher gewählte Filter wieder öffnet und ich Änderungen vornehmen kann.

divider

Miriam Selmi Reed represented and licensed by Illustration Source - Courtesy of Illustration Source

Miriam Selmi Reed represented and licensed by Illustration Source – Courtesy of Illustration Source

View the artists’s homage on the topic: PATHWAYS

Miriam Selmi Reed is represented by Illustration Source, New York City. Portfolio and contact: Illustration Source NYC

Illustration technique: watercolor, acrylic and pencil combined with digital mixed media using Adobe Photoshop and Illustrator.Copyright by Illustration Source, New York City.

Illustrations-Technik: Aquarell, Acryl mit Farbstift, gemischt mit Adobe Photoshop und Illustrator. Copyright by Illustration Source, New York City.

divider

Your source for commissioned illustration: ORIGINAL ART STUDIOS in New York City.

OAS

Portfolio Original Art Studios, New York City: MIRIAM SELMI REED

Cool InDesign Trick

Tutorial in English and German / Anleitung in Deutsch und Englisch

Deutsche Version siehe unten!
divider

English version:

Would you like to receive our tips for free in your e-mail box? Simply select FOLLOW to sign up with your e-mail address.

TIP OF THE WEEK: Cool InDesign Trick – how to fill in placeholder text and count the characters automatically

-Open InDesign and draw a square with the text tool
-Fill it with placeholder text under MENU > TYPE > FILL WITH PLACEHOLDER TEXT
-Go to WINDOW > INFO and read the info on the amount of characters and words

wordcount

Of course, this also works with real text. You don’t need to count text yourself; let InDesign do this for you!

divider

Deutsche Version:

Möchten Sie unsere gratis Tipps im e-mail erhalten? Schreiben Sie sich unter FOLLOW mit Ihrer e-mail Adresse ein.

TIPP DER WOCHE: Wie man automatisch Platzhaltertext auffüllt und InDesign die Zeichen zählen lässt!

-Öffnen Sie InDesign ziehen Sie einen Rahmen mit dem Textwerkzeug auf.
-Unter MENÜ > SCHRIFT > MIT PLATZHALTER TEXT FÜLLEN; damit füllt Indesign automatisch den Rahmen mit Text.
-Gehen Sie zu FENSTER > INFORMATIONEN und lesen Sie die Info über die Anzahl Ihrer Zeichen und Wörter.

info

Natürlich geht dies auch mit richtigem Text. Sie müssen die Silben nicht selber zählen; InDesign erledigt das für Sie!

divider

Any support is greatly appreciated – Jede Unterstützung freut uns: PayPal Donate Button

divider

Tip of the week: Retouch Layer / Tipp der Woche: Retuschenebene

divider

TIP OF THE WEEK: how I retouch my illustrations using the Stamp Tool and Healing Brush Tool in Photoshop CC or CS6. I place on an empty layer on top – while I select the option ALL LAYERS in the Control Bar – then I click the ALT key to sample and start stamping. 😉

Miriam Selmi Reed is represented and licensed by Illustration Source – Courtesy of Illustration Source

Miriam Selmi Reed is represented and licensed by Illustration Source – Courtesy of Illustration Source

TIPP DER WOCHE: Wie ich meine Illustrationen retuschiere mit dem Stempel Werkzeug oder dem Reparaturpinsel ist einfach. Ich benutze eine leere Ebene die ich ganz oben einfüge. Dann drücke ich die ALT Taste um einen sauberen Bereich aufzunehmen – mit der Option ALLE EBENEN aufnehmen in der Steuerung – und stemple vor mich hin. 😉
divider

Miriam Selmi Reed is represented and licensed by Illustration Source - Courtesy of Illustration Source

Miriam Selmi Reed is represented and licensed by Illustration Source – Courtesy of Illustration Source

View the artists’s homage on the topic: MENTAL HEALTH

Miriam Selmi Reed is represented by Illustration Source, New York City. Portfolio and contact: Illustration Source NYC

Illustration technique: watercolor, acrylic and pencil combined with digital mixed media using Adobe Photoshop and Illustrator.Copyright by Illustration Source, New York City.

Illustrations-Technik: Aquarell, Acryl mit Farbstift, gemischt mit Adobe Photoshop und Illustrator. Copyright by Illustration Source, New York City.

divider

Your source for commissioned illustration: ORIGINAL ART STUDIOS in New York City.

OAS

Portfolio Original Art Studios, New York City: MIRIAM SELMI REED

Bookfair 2015 in Frankfurt / Buchmesse 2015 in Frankfurt

Happy to announce that my new illustrated book Z-DOG is represented by my literary agent at the bookfair in Frankfurt from 14 to 18th of October 2015.

INFO: Bookfair Frankfurt / Buchmesse Frankfurt
BLOG: Z-DOG

Copyright by Miriam Selmi Reed - all rights reserved

Copyright by Miriam Selmi Reed – all rights reserved

Clean up Swatches automatically / Farbfelder automatisch aufräumen lassen!

Tutorial in English and German / Anleitung in Deutsch und Englisch

Deutsche Version siehe unten!
divider

English version:

Would you like to receive our tips for free in your e-mail box? Simply select FOLLOW to sign up with your e-mail address.

TIP OF THE WEEK: How to clean up color Swatches in InDesign and Illustrator

Ever had a huge amount of colors in your Swatch-box in an InDesign or Illustrator document and had no idea which colors to delete?

In order to provide the printer or another designer a clean working file, it is advisable to remove unnecessary color swatches.

The answer is simple: Go to MENU > WINDOW > and open the Swatches.
1. Select all Unused. 2. Click on the trash can.
All colors which you didn’t use in your document are now deleted in your swatch box automatically!

UnusedSwatches

divider

TIP 2: How to use Global Colors in Adobe Illustrator – here is a cool trick: GLOBAL COLORS

divider

Deutsche Version:

Möchten Sie unsere gratis Tipps in Ihrem e-mail erhalten? Schreiben Sie sich unter FOLLOW mit Ihrer e-mail Adresse ein.

TIPP DER WOCHE: Wie man in Adobe InDesign und Illustrator Farbfelder aufräumt

Hatten Sie jemals Ihre Farbfelder in InDesign oder Illustrator so vollgeladen mit Farben, dass Sie nicht mehr wussten, welche Farben in Ihrer Datei verwendet wurden?

Die Lösung ist einfach: gehen Sie zu MENU > FENSTER > und öffnen Sie das Bedienfeld Farbfelder.
1. Alle nicht verwendeten auswählen. 2. Klicken Sie auf den Papierkorb.
Alle Farben die in Ihrem Dokument nicht benutzt werden, wurden somit aus Ihrem Farbfeld-Bedienfeld automatisch gelöscht!

Um der Druckerei oder einem anderen Designer eine saubere Datei zu schicken, ist es ratsam, unnötige Farbfelder zu löschen.

NichtgebrauchteFarbfelder

divider

TIPP 2: Wie man globale Farben in Illustrator benutzt. Ein cooler Trick: GLOBALE FARBEN

divider

Any support is greatly appreciated – Jede Unterstützung freut uns: PayPal Donate Button

divider

Comic Illustration

TIP OF THE WEEK: how to illustrate a book with Adobe Illustrator / TIPP DER WOCHE: wie man mit Adobe Illustrator illustriert.

STEP 1: scan your drawing / 1 Schritt: scannen Sie Ihre Zeichnung

Drawing by Miriam Selmi Reed

Drawing by Miriam Selmi Reed

STEP 2: Trace with Adobe Illustrator / Nachzeichnen mit Adobe Illustrator

Illustration by Miriam Selmi Reed - Copyright by Round Robin Editrice, Rome, Italy

Illustration by Miriam Selmi Reed – Copyright by Round Robin Editrice, Rome, Italy

STEP 3: Print the illustration or book / Die Illustration oder das Buch wird gedruckt

Illustration by Miriam Selmi Reed - Copyright by Round Robin Editrice, Rome, Italy

Illustration by Miriam Selmi Reed – Copyright by Round Robin Editrice, Rome, Italy

Secure ONLINE SHOP / Sicherer ONLINE SHOP:
Screen Shot 2013-07-13 at 3.45.22 PM

divider

Tutorial in English and German – Anleitung dazu in Deutsch und Englisch

1. Scan your image and place it in Adobe Illustrator – FILE > PLACE.
Scannen Sie ihre Bildvorlage und platzieren Sie es in Adobe Illustrator – DATEI > PLATZIEREN.

2. Go to WINDOW > LAYERS and add a layer on top to trace your image using the Pen Tool.
Unter FENSTER > EBENEN erstellen Sie eine neue Ebene und zeichnen mit dem Zeichenstiftwerkzeug den Linien nach.

CARTOON PATH PART 1 – COMIC FIGUR TEIL 1

3. Go to WINDOW > SWATCHES and select your lines to fill them with color.
Unter FENSTER > FARBFELDER und wählen sie ihre Konturen und füllen diese mit Farbe.

CARTOON PATH PART 2 – COMIC FIGUR TEIL 2

Tutorial for beginners: How to draw in Adobe Illustrator
Übung für Anfänger: Wie man mit Illustrator zeichnet

divider

Any support is greatly appreciated – Jede Unterstützung freut uns: PayPal Donate Button

Freedom of Speech

divider

Tip 1: Promote your own artwork for free
I love the new promotion tools the Creative Cloud offers; check it out!

Illustrator Tip 2: how to use Global Colors in Adobe Illustrator
I always use Global Colors in all my Illustrator files. Click on the link to get more info.

divider

Tipp 1: Promoten Sie gratis Ihre Design-Arbeiten
Ich finde die neuen gratis Promotionsmöglichkeiten der Creative Cloud super; check it out!

Illustrator Tipp 2: Wie man Globale Farben in Adobe Illustrator benutzt
Ich benutze generell immer globale Farben in Adobe Illustrator. Klicken Sie auf den Link für mehr Infos.

divider

Courtesy of Illustration Source - Copyright by Illustration Source

Courtesy of Illustration Source – Copyright by Illustration Source

View the artists’s homage on the topic: FREEDOM OF SPEECH

Miriam Selmi Reed is represented by Illustration Source, New York City. Portfolio and contact: Illustration Source NYC

Illustration technique: watercolor, acrylic and pencil combined with digital mixed media using Adobe Photoshop and Illustrator.Copyright by Illustration Source, New York City.

Illustrations-Technik: Aquarell, Acryl mit Farbstift, gemischt mit Adobe Photoshop und Illustrator. Copyright by Illustration Source, New York City.

divider

Your source for commissioned illustration: ORIGINAL ART STUDIOS in New York City.

OAS

Portfolio Original Art Studios, New York City: MIRIAM SELMI REED

How to import a large word doc into InDesign / Wie man ein grosses Word Doc ins InDesign platziert

Tutorial in English and German / Anleitung in Deutsch und Englisch

Deutsche Version siehe unten!
divider

English version:

Would you like to receive our tips for free in your e-mail box? Simply select FOLLOW to sign up with your e-mail address.

divider

TIP OF THE WEEK: How to import a large word doc into InDesign

The question of my student was: “how can I import a multi-page Word doc into InDesign, so it fills the pages in InDesign automatically?”

1. Open Adobe InDesign
2. Place your multi-page doc. file under FILE > PLACE and then shift+click on the first InDesign page.
All of the pages will be filled in automatically by InDesign!

At certain times, InDesign has problems with the .docx suffix. Should that be the case, simply save it out again as a .doc file and try it again.

TIP 2: HOW TO REMOVE THE FORMATS OF A WORD DOCUMENT IN INDESIGN

divider

Deutsche Version:

Möchten Sie unsere gratis Tipps im e-mail erhalten? Schreiben Sie sich unter FOLLOW mit Ihrer e-mail Adresse ein.

TIPP DER WOCHE: Wie man ein grosses Word Doc ins InDesign platziert

Die Frage war: “wie kann ich eine Word Datei mit vielen Seiten ins InDesign platzieren, so dass der ganze Text automatisch im InDesign auch auf mehreren Seiten eingefüllt wird?”

1. Öffnen sie Adobe InDesign
2. Platzieren sie ihre Word Datei mit vielen Seiten unter DATEI > PLATZIEREN und wählen sie die Shift/Umschalt Taste + klicken sie auf die erste InDesign Seite.
Alle Seiten sollten nun im InDesign automatisch aufgefüllt werden!

Manchmal hat InDesign Probleme mit .docx Endungen. Sollte das der Fall sein, speichern sie die Datei nochmals mit der .doc Endung.

TIPP 2: WIE MAN WORD FORMATIERUNGEN IM INDESIGN ENTFERNT

Registration Black / Passermarken Schwarz

English version:

Deutsche Version siehe unten!
divider

Would you like to receive our tips for free in your e-mail box? Simply select FOLLOW to sign up with your e-mail address.

divider

TIP OF THE WEEK: Registration Black
Open Adobe InDesign and then the Window > Swatches to see the Color options you have.

Notice the swatch box Registration Black!
RegistrationE
This is a combination of 100% Cyan, 100% Magenta, 100% Yellow and 100% Black.
Registration Black is primarily used only for producing the Registration line marks used to register or “line-up” the 4-color printing plates.

cmyk

Do not use Registration Black for normal design work, as that exceeds the normal 300% Ink Limit! Paper is like a sponge and usually can’t absorb more than 300% without blurring or distorting the image. (Window > Output > Separations Preview)

Adobe InDesign has the option to create a print ready PDF which allows Adobe Acrobat to create the Registration Marks automatically
Here is the article on : HOW TO MAKE A PRINT READY PDF IN INDESIGN

TIP 1: 100% Black alone is best for fonts and most design elements. For large black elements it is recommended to add some Cyan, Magenta and Yellow for a deep black.
Here is the article on how to create a deep black: BLACK IS NOT BLACK !

TIP 2: the article on WHICH PDF to choose: WHICH PDF IS CORRECT

TIP 3: An exception for using Registration Black as a design tool like overlays when creating effects is shown in this article on how to create a Button: CREATE YOUR OWN BUTTON!

divider

Deutsche Version:

Möchten Sie unsere gratis Tipps im e-mail erhalten? Schreiben Sie sich unter FOLLOW mit Ihrer e-mail Adresse ein.

TIPP DER WOCHE: Passermarken-Schwarz!
1. Öffnen Sie Adobe InDesign.
2. Gehen Sie zu Fenster > Farbfelder und schauen sich die Optionen im Bereich Schwarz an.

Analysieren Sie das Passermarken-Schwarz!
RegistrationD
Hier haben Sie 100% Cyan, 100% Magenta, 100% Yellow und 100% Black.
Für was braucht man denn Passermarken-Schwarz? Es ist einfach: nur um dem Drucker eine druckfertige Datei (z.B. PDF) mit Passermarken zu schicken.

Das Passermarken-Schwarz MUSS auf allen 4 Farbfilmen vorhanden sein, sonst kann der Drucker die Filme nicht korrekt aufeinander passen.

cmyk

Benutzen Sie das Passermarken-Schwarz besser nicht als Design-Element denn es übersteigt den erlaubten 300% Farbauftrag. Grund: Papier ist wie ein Schwamm und kann nicht mehr als ca. 300% Farbauftrag absorbieren. (Fenster > Ausgabe > Separationsvorschau)

Adobe InDesign hat die Option um ein druckfertiges PDF zu erstellen, d.h.: Adobe Acrobat erstellt die Passermarken automatisch
Hier ist der Artikel : WIE MAN MIT INDESIGN EIN DRUCKFERTIGES PDF ERSTELLT

TIPP 1: 100 % Black (Schwarz) ist normalerweise genügend. Für grosse schwarze Flächen empfiehlt es sich jedoch Cyan, Magenta und Yellow dazuzufügen um ein tiefes Schwarz zu erhalten.
Hier ist der Artikel wie man ein tiefes Schwarz im Druck erreicht: BLACK IS NOT BLACK !

TIPP 2: Welches PDF soll ich wählen: WELCHES PDF SOLL ICH NEHMEN?

TIPP 3: Wir benützen das Passermarken-Schwarz nur in Ausnahmefällen, wie z.B. beim Erstellen eines Buttons. : STOPPER GESTALTEN!

Earth Day

divider

Photoshop Tutorial: How to remove backgrounds with layer masks

Photoshop Tipp: Wie man Bilder mit Ebenenmasken freistellt

divider

Miriam Selmi Reed represented and licensed by Illustration Source

Miriam Selmi Reed represented and licensed by Illustration Source

View the artists’s homage on the topic: Earth Day

Miriam Selmi Reed is represented by Illustration Source, New York City. Portfolio and contact: Illustration Source NYC

Illustration technique: watercolor, acrylic and pencil combined with digital mixed media using Adobe Photoshop and Illustrator.Copyright by Illustration Source, New York City.

Illustrations-Technik: Aquarell, Acryl mit Farbstift, gemischt mit Adobe Photoshop und Illustrator. Copyright by Illustration Source, New York City.

divider

Your source for commissioned illustration: ORIGINAL ART STUDIOS in New York City.

OAS

Portfolio Original Art Studios, New York City: MIRIAM SELMI REED

Indesign & Illustrator: Layers/Ebenen-Trick

Tutorial in English and German / Anleitung in Deutsch und Englisch

Deutsche Version siehe unten!
divider

English version:

Would you like to receive our tips for free in your e-mail box? Simply select FOLLOW to sign up with your e-mail address.

TIP OF THE WEEK: InDesign & illustrator: How to move an object from one layer to another

Here is a cool Tutorial to check out first before we begin: How to work with layers in Adobe Indesign

A lot of my students have been asking about layer-basics:
1. Place one object on to the bottom layer
2. Create an additional layer

layers

3. Select the object with the Selection-Tool on the bottom layer and move the small square from the bottom to the top layer. The layer structure remains the same; it is just the object which moves from one layer to the other!

divider

Deutsche Version:

Möchten Sie unsere gratis Tipps in Ihrem e-mail erhalten? Schreiben Sie sich unter FOLLOW mit Ihrer e-mail Adresse ein.

TIPP DER WOCHE: InDesign & Illustrator: Wie man ein Objekt von einer Ebene in die andere verschieben kann

Hier ist ein cooles Tutorial über Ebenen in Indesign bevor wir beginnen: Wie man mit Ebenen im Indesign arbeitet

Viele meiner Studenten wünschen Basiskenntnisse über Ebenen:
1. Platzieren Sie ein Objekt auf der unteren Ebene
2. Erstellen Sie eine neue zweite Ebene

Ebenen

3. Wählen Sie mit dem Auswahl-Werkzeug das Objekt auf der unteren Ebene an und ziehen das kleine farbige Quadrat auf die obere Ebene. Die Anordnung der Ebenen bleibt gleich; nur das Objekt bewegt sich von einer Ebene zur anderen!

divider

Any support is greatly appreciated – Jede Unterstützung freut uns: PayPal Donate Button

Social Media 3

divider

Illustrator Tutorial: How to vectorize a photo and colorise it
I like to use my own photographs and combine them into my illustrations. Here is a cool trick on how to vectorize your own photos in Illustrator.

divider

Illustrator Tipp: Wie man ein Foto vektorisiert und einfärbt
Ich benutze gerne meine digitalen Fotos in meinen Illustrationen. Hier ist ein cooler Trick wie Sie Ihre eigenen Photos in Illustrator vektorisieren.

divider

Courtesy of Illustration Source

Courtesy of Illustration Source

View the artists’s homage on the topic: SOCIAL MEDIA

Miriam Selmi Reed is represented by Illustration Source, New York City. Portfolio and contact: Illustration Source NYC

Illustration technique: watercolor, acrylic and pencil combined with digital mixed media using Adobe Photoshop and Illustrator.Copyright by Illustration Source, New York City.

Illustrations-Technik: Aquarell, Acryl mit Farbstift, gemischt mit Adobe Photoshop und Illustrator. Copyright by Illustration Source, New York City.

divider

Your source for commissioned illustration: ORIGINAL ART STUDIOS in New York City.

OAS

Portfolio Original Art Studios, New York City: MIRIAM SELMI REED

Cool InDesign Trick 2

As instructors of Adobe programs and creative professionals, we’ve assembled this blog as an easy reference for our students and clients.” Miriam Selmi Reed & Michael Alan Reed

Deutsche Version siehe unten!
divider

English version:

TIP OF THE WEEK: Cool InDesign Trick part 2

1. Draw 9 squares in InDesign using the Rectangle Frame Tool. Tip: InDesign Trick Part 1

2. If possible open the MINI BRIDGE – then select all 9 squares at the same time using the Selection-Tool and open the PATHFINDER under WINDOW > OBJECT & LAYOUT.

trickD1

3. In the PATHFINDER window select the button “Add: Combines selected objects into one shape”. Now your 9 squares are ready to be filled in with one image…

trickE2

4. Either drag your image of your choice from the MINI BRIDGE into the image box or simply go to MENU > FILE > PLACE

trickE3

Sharing infos & tips: iADOBE FORUM Our tips: i-adobe eBook in English

divider

Deutsche Version!

TIPP DER WOCHE: Cool InDesign Trick Teil 2

1. Zeichne 9 Quadrate in InDesign mit dem Rechteckrahmen-Werkzeug. Tipp: InDesign Trick Teil 1

2. Wähle nun mit dem Auswahl-Werkzeug alle 9 Quadrate gleichzeitig an und öffne den PATFINDER unter FENSTER > OBJEKT & LAYOUT.

trickD1

3. Im PATHFINDER Fenster wähle den Button “Addieren: Die ausgewählten Objekte werden zu einer gemeinsamen Form kombiniert”.

trickD2

4. Jetzt kann man ein Bild entweder von der MINI BRIDGE direkt hineinziehen oder unter MENÜ > DATEI > PLATZIEREN

trickE3

divider

Tausche dich aus im iADOBE FORUM! Unsere Tipps: i-adobe eBook in Deutsch

Cool InDesign Trick 1

As instructors of Adobe programs and creative professionals, we’ve assembled this blog as an easy reference for our students and clients.” Miriam Selmi Reed & Michael Alan Reed

Deutsche Version siehe unten!
divider

English version:

TIP OF THE WEEK: Cool InDesign Trick part 1

Draw 9 squares in InDesign using the Rectangle Frame Tool using a cool trick!

It is simple: while – dragging with the Rectangle Frame Tool – making the square; click the right and up arrow keys on your keyboard 3 times. When you hold down the shift key at the same time, you’ll make 9 squares!

arrow

To change the distance in between the squares: simply keep the selection active and press down the CTRL key (PC) or the cmd key (Mac) – located on the right side of your keyboard while clicking on the same arrow tools. Important: keep pressing the mouse down during the whole process.

trick2-2

Divide one image into these 9 squares: Cool Indesign Trick part 2

Sharing infos & tips: iADOBE FORUM Our tips: i-adobe eBook in English

divider

Deutsche Version!

TIPP DER WOCHE: Cool InDesign Trick Teil 1

Zeichne 9 gleiche Quadrate in InDesign mit dem Rechteckrahmen-Werkzeug mit diesem Trick!

Es ist einfach: Wenn man mit dem Rechteckrahmen-Werkzeug – ein Quadrat aufzieht; klickt man gleichzeitig 3 mal auf die rechte Pfeiltaste auf dem Keyboard und 3 mal auf die Pfeiltasten die nach oben zeigen. Wenn man nun gleichzeitig die shift (Umschalt)-Taste runterdrückt, kann man damit 9 gleich grosse Quadrate erstellen.

arrow

Die Distanz zwischen den Quadraten ändern: Die Auswahl immer noch aktiv halten und dann die CTRL Taste (PC) oder die cmd Taste (Mac) – auf der rechten Seite des Keyboards – und auf die Pfeiltasten klicken. Wichtig: Die Maus immer gedrückt halten!

trick2-2

divider

Wie man ein Foto in diese 9 Rahmen einfügt: Cool Indesign Trick Teil 2

Tausche dich aus im iADOBE FORUM! Unsere Tipps: i-adobe eBook in Deutsch