How to colorize a vectorized photo / Wie man ein Foto vektorisiert und einfärbt

Tutorial in English and German / Anleitung in Deutsch und Englisch

Deutsche Version siehe unten!

English version:

Would you like to receive our tips for free in your e-mail box? Simply select FOLLOW to sign up with your e-mail address.

divider

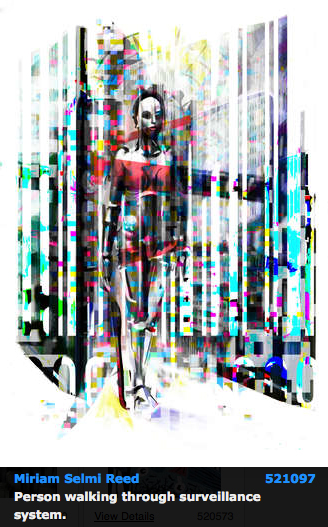
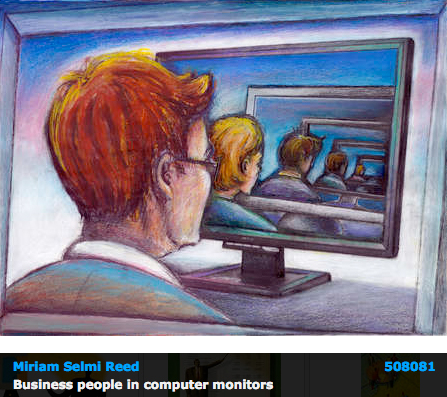
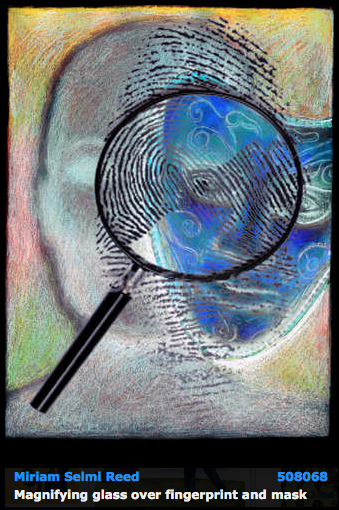
TIP OF THE WEEK: How to colorize a vectorized photo!
How to use the image trace option in Illustrator CS6 or CC, to vectorize and colorize a Photo – Bilingual instructions in English and German subtitles.

Step 1: Place your photo into Illustrator.
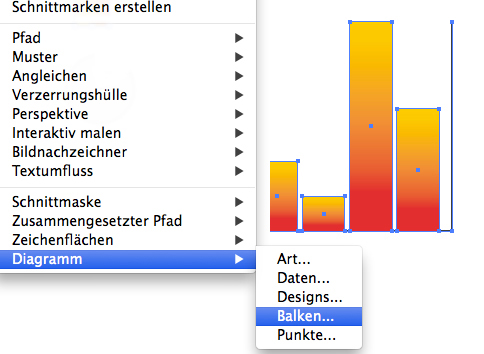
Step 2: Vectorise your photo > Window > Image Trace.
Step 3: Don’t forget to click on the button “EXPAND”.
Step 4: Edit your colors > Edit > Edit Colors.

Tutorial:

Tutorial for beginners:
How to vectorize a photo or embed the image

Tutorial for advanced users:
How to vectorize your handwriting

divider

Deutsche Version

Möchten Sie unsere gratis Tipps im e-mail erhalten? Schreiben Sie sich unter FOLLOW mit Ihrer e-mail Adresse ein.

TIPP DER WOCHE: Wie ein vektorisiertes Bild einfärbt

Tutorial: Wie man mit dem Bildnachzeichner in Illustrator CS6 oder CC arbeitet, damit ein Foto vektorisiert und einfärbt. Zweisprachige Anleitung in Englisch mit deutschen Untertiteln.

1: Platzieren Sie Ihr Bild in Illustrator.
2: Vektorisieren Sie Ihr Photo > Fenster > Bildnachzeichner.
3: Vergessen Sie nicht auf “UMWANDELN” zu klicken.
4: Färben Sie Ihr Vektorbild ein unter > Bearbeiten > Farben bearbeiten.

Tutorial auf Englisch mit deutschen Untertiteln:

Tutorial für Anfänger:
Wie man ein Bild vektorisiert oder einbettet

Tutorial für Fortgeschrittene:
Wie man eine Handschrift vektorisiert

Indesign CC 2014: How to save down to a lower version / wie man in eine tiefere Version abspeichert

Tutorial in English and German / Anleitung in Deutsch und Englisch

Deutsche Version siehe unten!

English version:

Would you like to receive our tips for free in your e-mail box? Simply select FOLLOW to sign up with your e-mail address.

divider

TIP OF THE WEEK: How to save down to a lower version with InDesign CC 2014

Have you ever tried to open an InDesign file and the message pops-up “cannot open file since it was created with a newer version”?

InddWarning

Here is the solution for Indesign Creative Cloud 2014:

New in Indesign CC 2014; you can package your document together with an IDML (InDesign Markup)! With the packaging command, under MENU > FILE > PACKAGE, InDesign collects the links and fonts used in the document and creates a folder to be handed over to the next person.
And here comes the kicker: It automatically creates an IDML file, which is the KEY to open the file in lower versions. All you have to do is: Click on the IDML Icon and the document even opens in older versions such as CS4!

File_package_Indd

divider

Our new i-adobe book is available online – in English – including tutorials on 72 pages! Have a look: Preview & secure online Shop!

divider

TIP: HOW TO EXPORT AN IDML (INDESIGN MARKUP) WITH INDESIGN CS6

divider

Deutsche Version:

Möchten Sie unsere gratis Tipps im e-mail erhalten? Schreiben Sie sich unter FOLLOW mit Ihrer e-mail Adresse ein.

TIPP DER WOCHE: Wie InDesign CC 2014 auf eine niedrigere Version abspeichern kann

Haben Sie jemals versucht eine InDesign Datei zu öffnen und haben eine Fehlermeldung erhalten: “die Datei kann nicht geöffnet werden, da sie in einer neueren Version erstellt wurde”?

InDesign-Warnung

Hier ist die Lösung für InDesign Creative Cloud 2014:

Neu in Indesign CC 2014; Sie können Ihr Dokument zusammen mit einem IDML (InDesign Markup) verpacken! Mit dem verpacken Befehl, unter MENÜ > DATEI > VERPACKEN, wird InDesign alle Bilder und Schriften verpacken die Sie in Ihrem Dokument benutzt haben und erstellt einen Ordner. Somit können die Daten komplett in einem Packet weitergegeben werden.
Und dies ist das Beste: es erstellt automatisch ein IDML welches der Schlüssel ist Ihre Datei in niedrigeren Versionen zu öffnen. Alles was Sie tun müssen: Klicken Sie auf das IDML Icon und Ihr InDesign Dokument lässt sich sogar mit CS4 öffnen!

IDML_deutsch

divider

Unser neues i-adobe book ist erhältlich online – in Deutsch – inklusive Tutorials auf 72 Seiten! BESTELLUNG mit Käuferschutz: Vorschau und sicherer Onlineshop!

divider

TIPP: WIE MAN EIN IDML (INDESIGN MARKUP) IN INDESIGN CS6 EXPORTIEREN KANN

New tracing tools in Illustrator CC / Neue Zeichnungswerkzeuge in Illustrator CC

Info in English and German – Info in Deutsch und Englisch

New tracing tools in Illustrator CC! Are you having issues using the Pen tool to create round corners? Updating to the Adobe Creative Cloud might be your answer!
Neue Zeichnungswerkzeuge in Illustrator CC! Haben sie Schwierigkeiten mit der “Feder”, dem Zeichnungsstiftwerkzeug um Rundungen zu zeichnen? Ein Update zur Adobe Creative Cloud könnte ihre Antwort sein!

divider

1. Live corners: simply draw a star, select the Direct-Selection-Tool, click’n’drag on the “little dot” below your anchor point and then the corner can be rounded. If you are double-clicking the “little dot”, you’re able to change the radius as you wish!
1. Interaktive Ecken: zeichnen sie einen Stern. Klicken sie mit dem Direktauswahl-Werkzeug auf den “kleinen Punkt” direkt unter dem Ankerpunkt und ziehen daran: ihr Eckpunkt wird rund! Wenn Sie kurz Doppelklicken, können sie den Radius nach Wunsch verändern.
RoundedCorners

2. All-new Pencil Tool: In previous Illustrator versions it was only possible to draw open lines with the Pencil tool and they were not very accurate. Now you can adjust the “Smoothness” to be more accurate, continuous and even draw closed shapes.
2. Neues Bunstift-Werkzeug: In früheren Illustrator Versionen war es nur möglich gerade offene Linien mit dem Buntstift zu zeichnen und dies gar nicht präzise! Jetzt können Sie die Qualität selber einstellen, ähnlich zeichnen wie mit dem Zeichenstift-Werkzeug und zu geschlossenen Formen abschliessen.
PencilTool

3. Path Segment Reshape: Remember how hard it was to make rounded shapes? The new Anchor Point Tool might be your answer. Simply drag the straight line with it and reshape as needed!
3. Form für Pfadsegment ändern: Mit dem neuen Ankerpunkt-Werkzeug ist es ein Kinderspiel gerade Linien abzurunden. Klicken sie auf die gerade Linie und runden sie diese nach Wunsch ab!
AnchorPointTool

divider

COOL FREE FONTS – COOLE GRATIS SCHRIFTEN ! FREE FONTS with Adobe CC – GRATIS SCHRIFTEN mit Adobe CC

InDesign: How to remove the formats of a Word Document / Wie man Word Formatierungen entfernt

Tutorial in English and German / Anleitung in Deutsch und Englisch

English version:

Would you like to receive our tips for free in your e-mail box? Simply select FOLLOW to sign up with your e-mail address.

divider

TIP OF THE WEEK: How to remove the formats of a Word Document when placing it into InDesign

There is an easy 2-step method:
1. Simply select the option Show Import Options while placing the .doc into Adobe InDesign. (Menu > File > Place > select Show Import Options)

E1

2. Select the option Formatting > Remove Styles and Formatting from Text and Tables.

E2

When you wish to keep the .doc file formatting embedded, simply choose Preserve Styles and Formatting from Text and Tables. This also applies to Excel files.

TIP 2: HOW TO IMPORT A MULTI-PAGE WORD DOC INTO INDESIGN

divider

Deutsche Version:

Möchten Sie unsere gratis Tipps im e-mail erhalten? Schreiben Sie sich unter FOLLOW mit Ihrer e-mail Adresse ein.

TIPP DER WOCHE: Wie man Word Formatierungen beim platzieren ins InDesign entfernt

Es gibt einen einfachen Weg in 2 Schritten:
1. Wählen Sie die Option Importoptionen anzeigen wenn Sie Ihr .doc in ihr Adobe InDesign Dokument platzieren. (Menu > Datei > Platzieren > wählen Sie Importoptionen anzeigen)

D1

2. Wählen Sie die Option Formatierung > Formate und Formatierung aus Text und Tabellen entfernen.

D2

Sollten Sie die Formate und Formatierungen von Ihrem Word Dokument behalten wollen, wählen Sie ganz einfach Formate und Formatierung aus Text und Tabellen beibehalten. Dasselbe gilt natürlich auch für Excel Dateien.

TIPP 2: Wie man ein Word Dokument mit viel Text ins InDesign platziert, sodass sich die Seiten automatisch auffüllen

Today’s concept: Government

Courtesy of Illustration Source

Courtesy of Illustration Source

View the artists’s homage on the topic: Government

Miriam Selmi Reed is represented by Illustration Source, New York City. Portfolio and contact: Illustration Source NYC

Illustration technique: watercolor, acrylic and pencil combined with digital mixed media using Adobe Photoshop and Illustrator.Copyright by Illustration Source, New York City.

Illustrations-Technik: Aquarell, Acryl mit Farbstift, gemischt mit Adobe Photoshop und Illustrator. Copyright by Illustration Source, New York City.

Pantone + series

Tutorial in English and German / Anleitung in Deutsch und Englisch

Deutsche Version siehe unten!
divider

English version:

Would you like to receive our tips for free in your e-mail box? Simply select FOLLOW to sign up with your e-mail address.

TIP OF THE WEEK: How to replace Pantone Plus with older Pantone color books.

You may have noticed that your old Pantone Guides aren’t matching the new Pantone + series in your Adobe CS6 programs?
The reason is simple: In CS4 and CS5 the Pantone colors were based on CMYK – while CS6 has the new +Plus series, which is based on LAB colors.

PantoneE

For more information on what LAB colors are: WHAT ARE LAB COLORS?

HERE IS A POSSIBLE SOLUTION!
There is a way to load the old Pantone series from CS2 – CS5 versions into your CS6 Version.
This is what Adobe recommends and we’d like to share it with you:
Replace Pantone Plus with older Pantone color books

divider

Deutsche Version:

Möchten Sie unsere gratis Tipps im e-mail erhalten? Schreiben Sie sich unter FOLLOW mit Ihrer e-mail Adresse ein.

TIPP DER WOCHE: Ersetzen von Pantone Plus durch ältere Pantone-Farbtafeln

Vielleicht haben Sie bemerkt, dass Ihre alten Pantone Fächer mit der neuen Pantone + serie in Ihren Adobe CS6 Programme nicht mehr übereinstimmen?

Der Grund ist einfach: In CS4 und CS5 basieren die Pantone Farben auf CMYK – die neue CS6 Version hat jedoch die neue +Plus Serie, welche auf LAB Farben basiert.

PantoneD

Für mehr Information was LAB Farbe sind: WAS SIND LAB FARBEN?

Es gibt jedoch einen Weg Ihre alte Pantone Serie von CS2 – CS5 in Ihre CS6 Programme zu laden!
Dies ist was Adobe empfiehlt:
Ersetzen von Pantone Plus durch ältere Pantone-Farbtafeln

Symbole / Symbols in Illustrator CS6

Tutorial in English and German / Anleitung in Deutsch und Englisch

English version:

Would you like to receive our tips for free in your e-mail box? Simply select FOLLOW to sign up with your e-mail address.

divider

TIP OF THE WEEK: Symbols in Adobe Illustrator

Are you not good in drawing? Use your Symbol library provided by Illustrator CS6!
Go to Menu > Window > Symbols and click on the library which opens the Symbol collection.
In our sample we’ve used the RETRO collection and have chosen the guitar.
Once the selected Symbol shows up in your own Symbol library, you may click on the “un-link” icon, which breaks the link to the secure Adobe collection.

Symbole

Your symbol now shows anchor points which allows you to recolor and make it your own illustration. The Direct Selection Tool (white arrow) is able to choose each part separately which makes it easy to make your alterations.

Symbole2

Learn how to draw in Adobe illustrator: ADOBE ILLUSTRATOR DRAWING TUTORIALS

divider

Deutsche Version:

Möchten Sie unsere gratis Tipps im e-mail erhalten? Schreiben Sie sich unter FOLLOW mit Ihrer e-mail Adresse ein.

TIPP DER WOCHE: Symbole in Adobe Illustrator

Können Sie nicht gut selber zeichnen? Benutzen Sie die Symbol-Bibliothek in Illustrator CS6!
Gehen Sie im Menü unter Fenster > Symbole und öffnen unten links Ihre Symbol-Bibliothek.
In unserem Beispiel öffneten wir die RETRO Sammlung und wählten die Gitarre aus der Adobe Kollektion.
Sobald Ihr gewähltes Symbol in Ihrer Bibliothek auftaucht, können Sie die Verknüpfung zur geschützten Adobe Kollektion unterbrechen.

Symbole

Da nun Ihr Symbol die Ankerpunkte zeigt, können Sie Ihr Symbol jetzt umfärben und zur eigenen Illustration verwandeln. Mit dem Direktauswahl-Werkzeug (weisser Pfeil) können Sie jeden Teil separat anwählen und verändern.

Symbole2

Lernen Sie wie man mit Adobe illustrator zeichnet: ADOBE ILLUSTRATOR ÜBUNGEN

Today’s concept: BOO !

Courtesy of Illustration Source

Courtesy of Illustration Source

View the artists’s homage on the topic: Boooo!…

Miriam Selmi Reed is represented by Illustration Source, New York City. Portfolio and contact: Illustration Source NYC

Illustration technique: Charcoal, acrylic and pencil combined with digital mixed media using Adobe Photoshop and Illustrator.Copyright by Illustration Source, New York City.

Illustrations-Technik: Kreide, Acryl mit Farbstift, gemischt Adobe Photoshop und Illustrator. Copyright by Illustration Source, New York City.

How to control the Baseline Grid / Anpassen des Grundlinienrasters

Tutorial in English and German / Anleitung in Deutsch und Englisch

English version:

Would you like to receive our tips for free in your e-mail box? Simply select FOLLOW to sign up with your e-mail address.

divider

TIP OF THE WEEK: How to control the Baseline Grid in Adobe InDesign

1. Open Adobe InDesign and place a large photo and some text.

Courtesy of Illustration Source, New York City

Courtesy of Illustration Source, New York City

2. Go to VIEW > GRIDS & GUIDES > SHOW BASELINE GRID. The baseline grid is shown behind the picture which is not always useful.

3. Go to the Indesign Preferences which are located on a MAC under INDESIGN > PREFERENCES > GRIDS and on a PC under EDIT > PREFERENCES > GRIDS. That is the important part: be sure that the GRIDS IN BACK box is turned off!

GridsE

As you can see, the grids are now shown OVER the image!

Courtesy of Illustration Source, New York City

Courtesy of Illustration Source, New York City

How to align your text to your Baseline Grid as shown above: BASELINE GRID

divider

Deutsche Version:

Möchten Sie unsere gratis Tipps im e-mail erhalten? Schreiben Sie sich unter FOLLOW mit Ihrer e-mail Adresse ein.

TIPP DER WOCHE: Wie man den Grundlinienraster in Adobe InDesign anpasst

1. Öffnen Sie Adobe InDesign platzieren Sie ein grosses Foto und Text.

Courtesy of Illustration Source, New York City

Courtesy of Illustration Source, New York City

2. Gehen Sie zu ANSICHT > RASTER UND HILFSLINIEN > GRUNDLINIENRASTER EINBLENDEN. Der Grundlinienraster ist im Moment hinter dem Foto, was nicht immer praktisch ist.

3. Gehen Sie zu den Indesign Voreinstellungen welche bei MAC unter INDESIGN > VOREINSTELLUNGEN > RASTER und auf einem PC unter BEARBEITEN > VOREINSTELLUNGEN > RASTER zu finden sind. Wählen nun Sie die RASTER IM HINTERGRUND BOX ab!

RasterD

Mit dem abwählen dieser Box erscheint der Raster nun ÜBER dem Bild!

Courtesy of Illustration Source, New York City

Courtesy of Illustration Source, New York City

Passen Sie Ihren Text am Grundlinienraster an, wie beim oberen Beispiel: GRUNDLINIENRASTER

InDesign: How to control pages / Wie man Seiten bestimmt

Tutorial in English and German / Anleitung in Deutsch und Englisch

English version:

Would you like to receive our tips for free in your e-mail box? Simply select FOLLOW to sign up with your e-mail address.

divider

TIP OF THE WEEK: How to control pages in Adobe InDesign

Simply open a new Document in InDesign with 3 facing pages.
In most cases the first page is needed to stand alone as a cover.
Ever wondered how to delete the first page in InDesign, in case you don’t need it?

Here’s the solution in 2 easy steps:

Step 1: simply deselect the option “Allow Document Pages to Shuffle”
englisch1

Step 2: select the first (single) page and delete it
Englisch2

There you go; the 2 facing pages are standing alone, starting with page 1 on the left…
Englisch3

divider

Deutsche Version:

Möchten Sie unsere gratis Tipps im e-mail erhalten? Schreiben Sie sich unter FOLLOW mit Ihrer e-mail Adresse ein.

TIPP DER WOCHE: Wie man die Seiten in Adobe InDesign bestimmt

Öffnen Sie ein Dokument mit 3 Doppelseiten im InDesign.
In den meisten Fällen benötigen Sie das Cover auf der ersten Einzelseite.
Haben Sie jemals versucht die erste Seite zu löschen, falls diese nicht gebraucht wird?

Hier ist die Lösung in 2 einfachen Schritten:

Schritt 1: Deaktivieren Sie “Neue Dokumentseitenanordung zulassen”.
deutsch1

Schritt 2: wählen Sie die erste Einzel-Seite und löschen Sie diese.
Deutsch2

Und hier ist das Resultat; nun stehen die beiden Doppelseiten allein da.
Deutsch3

Today’s topic: In a meeting…

Courtesy of Illustration Source

Courtesy of Illustration Source

View the artists’s homage on the topic In a meeting…

Miriam Selmi Reed is represented by Illustration Source, New York City. Portfolio and contact: Illustration Source NYC

Illustration technique: Charcoal, acrylic and pencil combined with digital mixed media using Adobe Photoshop. Copyright by Illustration Source, New York City.

Illustrations-Technik: Kreide, Acryl mit Farbstift, gemischt Adobe Photoshop. Copyright by Illustration Source, New York City.

Graphic styles in Illustrator CS6 / Grafikstile in Illustrator CS6

Tutorial in English and German / Anleitung in Deutsch und Englisch

English version:

Would you like to receive our tips for free in your e-mail box? Simply select FOLLOW to sign up with your e-mail address.

divider

TIP OF THE WEEK: Graphic Styles in Illustrator CS6

1. Open a new document in Adobe Illustrator and draw a simple shape with a fill color.

2. Select your shape with the Selection Tool and go to Window > Graphic styles. Select the drop-down-arrow of the Libraries and choose your favorite Graphic Style.

graphicstyle

Each time you select a Graphic Style in one of the protected Adobe Libraries, it will be added on to your personal Graphic Style collection and can be altered as you wish.
Under Window > Appearance you may change the Graphic Style or delete it.

There are lots of Graphic Styles in the Adobe Library you should try out – have fun!

divider

Deutsche Version:

Möchten Sie unsere gratis Tipps im e-mail erhalten? Schreiben Sie sich unter FOLLOW mit Ihrer e-mail Adresse ein.

TIPP DER WOCHE: Grafikstile in Illustrator CS6

1. Öffnen Sie ein neues Dokument in Adobe Illustrator, zeichnen Sie eine einfache Form und färben Sie diese mit einer Flächen-Farbe ein.

2. Wählen Sie die Form mit dem Auswahl-Werkzeug an und gehen Sie zu Fenster > Grafikstile. Wählen Sie einen Grafikstil nach Wunsch unter den Bibliotheken an.

Grafikstil

Jedesmal wenn man einen Grafikstil von den schreibgeschützen Adobe Bibliotheken anwählt, wird dieser zu den eigenen Grafikstilen dazugefügt und kann somit verändert werden.
Unter Fenster > Aussehen kann man jeden Grafikstil verändern oder löschen.

Es gibt viele Grafikstile in den Adobe Bibliotheken die man ausprobieren sollte – viel Spass!

Wrap text around a circle / Rundtext

Tutorial in English and German / Anleitung in Deutsch und Englisch

English version:

Would you like to receive our tips for free in your e-mail box? Simply select FOLLOW to sign up with your e-mail address.

divider

TIP OF THE WEEK: One way to wrap text around a circle in Adobe Illustrator.

1. Draw a circle.

2. Select your Type on a Path Tool, select the path of your circle and type your text.

jpg1D

3. With your Selection Tool select the text. COPY the text (go to EDIT) and Paste in Front (EDIT) which makes an exact copy in the same position.

JPG3D

… select the long single handle and drag it around until the copied text is properly set below!

4. Select the Text below and and go to FONT > TYPE ON A PATH > TYPE ON A PATH OPTIONS and choose the following:

JPG4E

TIP: depending on the arrangement of your text, you might have to click on the box FLIP or choose a different Align to Path option. Click on the PREVIEW button to have a look!

5. To move the text closer to the path, go to WINDOW > TYPE > CHARACTER and set the Baseline Shift accordingly.

JPG5E

This is the result!

divider

Deutsche Version:

Möchten Sie unsere gratis Tipps im e-mail erhalten? Schreiben Sie sich unter FOLLOW mit Ihrer e-mail Adresse ein.

divider

TIPP DER WOCHE: Wie man einen Rundtext in Illustrator erstellen kann

1. Zeichnen Sie einen Kreis.

2. Wählen Sie das Pfadtext-Werkzeug, klicken auf den Pfad des Kreises und schreiben Sie Ihren Text.

jpg1D

3. Wählen mit dem Auswahl-Werkzeug den Rundtext an. Unter Bearbeiten > Kopieren und wieder unter Bearbeiten > Davor Einfügen erstellen Sie eine exakte Kopie auf derselben Position.

JPG3D

… dann ZIEHEN Sie am langen HEBEL herum bis Ihr neuer zweiter Text unten angepasst ist!

4. Wählen Sie nun den unteren Text an und gehen zu MENU > SCHRIFT > PFADTEXT > PFADTEXTOPTIONEN und geben die folgenden Koordinaten ein:

JPG4D

TIPP: Je nach dem wie Ihr Text läuft, müssen Sie die Box SPIEGELN anklicken oder eine andere An Pfad ausrichten Option wählen. Ausprobieren und auf VORSCHAU klicken!

5. Um den Text näher an die Pfadlinie zu stellen gehen Sie zu MENU > FENSTER > SCHRIFT > ZEICHEN und ändern den Grundlinienversatz nach Wunsch.

JPG5D

Hier ist der fertige Rundtext!

MONEY

Courtesy of Illustration Source

Courtesy of Illustration Source

View the artists’s homage on the topic MONEY

Miriam Selmi Reed is represented by Illustration Source, New York City. Portfolio and contact: Illustration Source NYC

Illustration technique: Traditional painting combined with digital mixed media such as Adobe Photoshop. Copyright by Illustration Source, New York City.

Illustrations-Technik: Acrylbild gemischt mit Adobe Photoshop. Copyright by Illustration Source, New York City.

new ADOBE MUSE templates / Vorlagen

Tutorial in English and German / Anleitung in Deutsch und Englisch

English version:

Would you like to receive our tips for free in your e-mail box? Simply select FOLLOW to sign up with your e-mail address.

TIP OF THE WEEK: ADOBE MUSE new templates

It’s never been so easy to create websites. Adobe MUSE, part of Adobe CC makes it possible. You also maybe able to rent Adobe MUSE for a low monthly fee if you don’t have CC.

Here are some great new templates to choose from:
Adobe MUSE: ADOBE MUSE TEMPLATES!

Some cool widgets to choose from: BRAND NEW COOL WIDGET

More on Adobe MUSE and our own websites created in Adobe MUSE:
More info at i-adobe.com: Adobe Muse Websites and more Info

divider

Deutsche Version:

Möchten Sie unsere gratis Tipps im e-mail erhalten? Schreiben Sie sich unter FOLLOW mit Ihrer e-mail Adresse ein.

TIPP DER WOCHE: ADOBE MUSE neue Vorlagen

Es war noch nie so einfach Webseiten zu erstellen. Adobe MUSE, Teil der Adobe CC macht es möglich. Man sollte Adobe MUSE auch monatlich einzeln für wenig Geld mieten können, sollten Sie kein Creative Cloud Abo haben.

Hier sind ein paar coole neue Vorlagen zum anschauen:
Adobe MUSE: ADOBE MUSE TEMPLATES!

Ein paar neue Widgets zum anschauen: BRAND NEW COOL WIDGET

Mehr Info wegen Adobe MUSE und unsere eigenen Webseiten erstellt mit Adobe MUSE:
Mehr Info auf i-adobe.com: Adobe Muse Webseiten und mehr Info

Graphs / Diagramme in Illustrator CS6

Tutorial in English and German / Anleitung in Deutsch und Englisch

English version:

Would you like to receive our tips for free in your e-mail box? Simply select FOLLOW to sign up with your e-mail address.

divider

TIP OF THE WEEK: How to create Graphs and Charts in Adobe Illustrator.

How to create your Graph:
1. Select your Graph Tool and click where you want to create your graph.
2. Define the dimensions of your graph: Enter a width and height for the graph, and click OK.
3. Enter the data for the graph in the Graph Data window and click the Apply button.

Graph1

To change the graph: Select the entire graph with the Selection Tool, and then choose Object > Graph > Data.

How to change the graph type:
1. Select a graph with the Selection Tool.
2. Choose Object > Graph > Type.
3. Graph Type dialog box: click the button that corresponds to the desired graph type, and click OK.

GraphType

How to create a column design:
1. Create a rectangle as the object in the design. Paint the rectangle as desired.
2. Select the rectangle with the Selection Tool.
3. Choose Object > Graph > Design.
4. Click New Design. Rename it if needed.

GraphDesign

Select your Graph and choose Object > Graph > Column and choose your New Design.

Column

Tip: I personally prefer to colorize my columns manually using the Direct Selection Tool.

divider

Deutsche Version:

Möchten Sie unsere gratis Tipps im e-mail erhalten? Schreiben Sie sich unter FOLLOW mit Ihrer e-mail Adresse ein.

divider

TIPP DER WOCHE: Wie man Diagramme in Illustrator erstellt

Wie man ein Diagramm erstellt:
1. Wählen Sie ein Diagramm-Werkzeug aus und klicken auf die Position wo Sie Ihr Diagramm erstellt haben wollen.
2. Legen Sie die Abmessungen des Diagramms fest: in welcher Größe das Diagramm eingefügt werden soll und klicken Sie auf OK.
3. Geben Sie die Daten für das Diagramm im Diagrammdaten-Fenster ein und klicken Sie auf die Schaltfläche Anwenden.

Graph1

Um die Grafik im Nachhinein wieder zu ändern: Wählen Sie das Diagramm mit dem Auswahl-Werkzeug an und gehen zu Objekt > Diagramm > Daten.

Wie man die Diagramm-Art ändert:
1. Wählen Sie Ihr Diagramm mit dem Auswahl-Werkzeug an.
2. Gehen Sie zu Objekt > Diagramm > Art.
3. Diagrammattribute: Klicken Sie bei ART auf das Diagramm Ihrer Wahl und bestätigen Sie mit OK.

Diagrammattribute

Wie man ein Design für ein Balkendiagramm erstellt:
1. Erstellen Sie ein Rechteck als Platzhalter für Ihr Design. Färben Sie dieses nach Ihren Wünschen ein.
2. Wählen Sie Ihr gestaltetes Rechteck mit dem Auswahl-Werkzeug aus.
3. Gehen Sie zu Objekt > Diagramm > Designs.
4. Klicken Sie auf Neues Design. Wählen Sie Umbennen um Ihr Design zu betiteln.

Diagramm-Design

Wählen Sie Ihr Balkendiagramm und gehen zu Objekt > Diagramm > Balken und wählen Ihr neues Design.

<DiagrammBalken

Tipp: I persönlich benutze das Direktauswahl-Werkzeug und färbe meine Diagramme lieber selber ein.

Today’s topic: I’m All Ears

Courtesy of Illustration Source

Courtesy of Illustration Source

View the artists’s homage on the topic I’m All Ears

Miriam Selmi Reed is represented by Illustration Source, New York City. Portfolio and contact: Illustration Source NYC

Illustration technique: Charcoal, acrylic and pencil combined with digital mixed media using Smart Objects / Filter in Adobe Photoshop and Illustrator. Copyright by Illustration Source, New York City.

Illustrations-Technik: Kreide, Acryl mit Farbstift, gemischt mit Adobe Illustrator und Photoshop sowie Smart-Objekte / Filter. Copyright by Illustration Source, New York City.

Embed images in Illustrator – Einbetten von Bildern in Illustrator

Tutorial in English and German / Anleitung in Deutsch und Englisch

English version:

Would you like to receive our tips for free in your e-mail box? Simply select FOLLOW to sign up with your e-mail address.

TIP OF THE WEEK: Embed your images in Adobe Illustrator

The easiest way to avoid missing links in Adobe Illustrator CS4, CS5 and CS6: Simply select the image and click on the button on top EMBED image. With this method you embed your image as part of your Illustrator document and it’s not linked to your image file anymore. Which means: you can now send your Illustrator to someone else without getting a “missing link” error.

VERKE1

VERKE2

The advantage of Adobe Illustrator CC: you can now package your Illustrator document! PACKAGE OPTION IN ILLUSTRATOR CC

divider

Deutsche Version:

Möchten Sie unsere gratis Tipps im e-mail erhalten? Schreiben Sie sich unter FOLLOW mit Ihrer e-mail Adresse ein.

TIPP DER WOCHE: Einbetten von Bildern in Adobe Illustrator

Um fehlende Verknüpfungen in Adobe Illustrator CS4, CS5 and CS6 zu vermeiden, gibt es eine einfache Lösung.
Wählen Sie Ihr Bild an und klicken Sie oben auf den Button EINBETTEN. Mit dieser Methode werden Sie Ihr Bild in Ihr Illustrator Dokument einbetten und es gibt keine Verknüpfungen mehr mit Ihrer Bilddatei. D.h. Sie können jetzt Ihre Illustrator Datei an andere Parteien schicken, ohne dass diese Personen “Fehlermeldungen” von fehlenden Verknüpfungen erhalten.

VERKD1

VERKD2

Hier ist der Vorteil von Illustrator CC: Sie können neu Ihre Illustrator Datei auch verpacken! VERPACKEN IN ILLUSTRATOR CC

Be On The Lookout

Courtesy of Illustration Source

Courtesy of Illustration Source

View the artists’s homage on the topic Be On The Lookout

Miriam Selmi Reed is represented by Illustration Source, New York City. Portfolio and contact: Illustration Source NYC

Illustration technique: Traditional painting combined with digital mixed media using Smart Objects in Adobe Photoshop and Illustrator. Copyright by Illustration Source, New York City.

Illustrations-Technik: Acrylbild gemischt mit Adobe Illustrator und Photoshop sowie Smart-Objekten. Copyright by Illustration Source, New York City.

Which PDF should I take? / Welches PDF soll ich nehmen?

Tutorial in English and German / Anleitung in Deutsch und Englisch

English version: (Deutsche Version siehe unten)

Would you like to receive our tips for free in your e-mail box? Simply select FOLLOW to sign up with your e-mail address.

Tip of the week: Choose the correct PDF!

It’s very simple, InDesign CS5, CS6 and CC you have 5 main PDF Formats to choose from:

Screen Shot 2014-08-17 at 4.55.02 PM

IMPORTANT: Before you export a PDF-file, you should always talk to your printer about the resolution and the color profile!

1. Go under FILE > Adobe PDF Presets > High Quality Print
Which is a PDF for quality printing on desktop printers.

HighQuality

2. Go under FILE > Adobe PDF Presets > PDF/X-3, PDF/X-4
Which are for professional printing presses which have ISO standard for graphic content exchange. IMPORTANT: always ask your printer which PDF/X to choose.
PDF/X 4 includes support for live transparency.
More info on how to export a PDF/X: How to export a PDF/X

3. Go under FILE > Adobe PDF Presets > Press Quality
Creates PDF files for high-quality print production such as for digital printing.

PressQuality

4. Go under FILE > Adobe PDF Presets > Smallest File Size
Choose this PDF for on-screen display, Websites and to attach to an e-mail.

More info directly at ADOBE Help: PDF Options

More info on Presets directly at ADOBE Help: PDF Presets

divider

Deutsche Version:

Möchten Sie unsere gratis Tipps im e-mail erhalten? Schreiben Sie sich unter FOLLOW mit Ihrer e-mail Adresse ein.

Tipp der Woche: Wählen Sie das korrekte PDF!

Es ist simpel einfach. InDesign CS5, CS6 und CC haben Sie 5 PDF Formate zum auswählen:

Bildschirmfoto 2014-08-17 um 17.01.15

Hinweis: Bevor Sie eine Adobe PDF-Datei erstellen, sollten Sie mit der Druckerei die Ausgabeauflösung und sonstige Einstellungen (Farbprofil) klären!

1. Gehen Sie unter DATEI > Adobe PDF Vorgaben > Druckausgabequalität.
Dies erstellt PDF-Dateien für die Druckausgabe in hoher Qualität (z. B. für den Digitaldruck).

Druckasugabequalitaet

2. Gehen Sie unter DATEI > Adobe PDF Vorgaben > Kleinste Dateigrösse. Dieses PDF ist ideal für Webseiten und falls Sie Ihrem Kunden das PDF in einem e-mail schicken möchten.

3. Gehen Sie unter DATEI > Adobe PDF Vorgaben > PDF/X-3, PDF/X-4
Diese sind für professionelle Offset Druckmaschinen die ISO Standard kompatibel sind. WICHTIG: Fragen Sie immer welches PDF/X Ihre Offsetdruckerei möchte!
Mehr Info wie man ein PDF/X exportiert: Wie man ein PDF/X exportiert

4. Gehen Sie unter DATEI > Adobe PDF Vorgaben > Qualitativ hochwertiger Druck.
Dies erstellt PDF-Dateien für hochwertige Drucke auf Desktop-Druckern.

hochwertigerDruck

Mehr Info direkt bei ADOBE Help: PDF Optionen

Mehr Info über die PDF Vorgaben bei ADOBE Help: PDF Vorgaben