Miriam Selmi Reed is represented by Illustration Source, New York City. Portfolio and contact: Illustration Source NYC
Illustration technique: Watercolor and pencil combined with digital media using Smart Objects and Filters in Photoshop and Illustrator. Copyright by Illustration Source, New York City.
Illustrations-Technik: Aquarell mit Farbstift, gemischt mit Illustrator und Photoshop sowie Smart-Objekten und Smart-Filtern. Copyright by Illustration Source, New York City.
Tutorial in English and German / Anleitung in Deutsch und Englisch
English version:
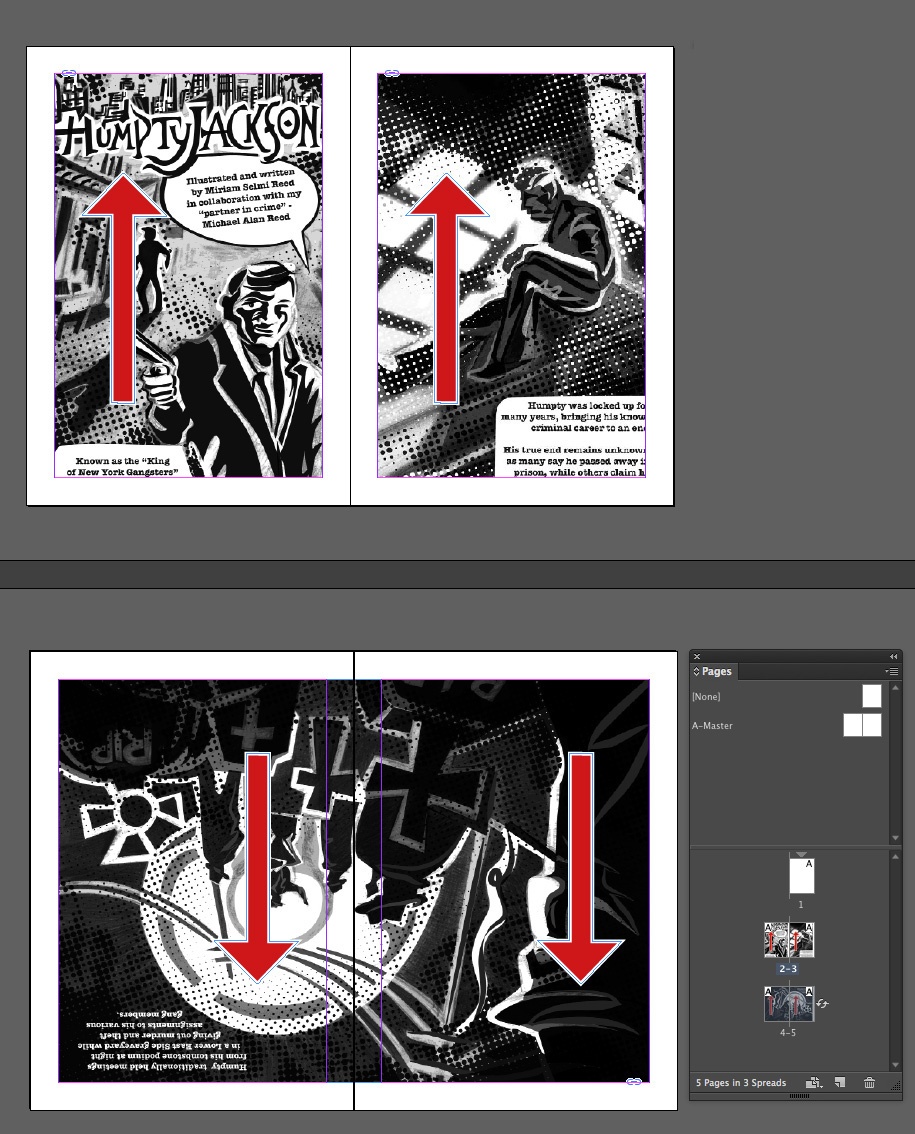
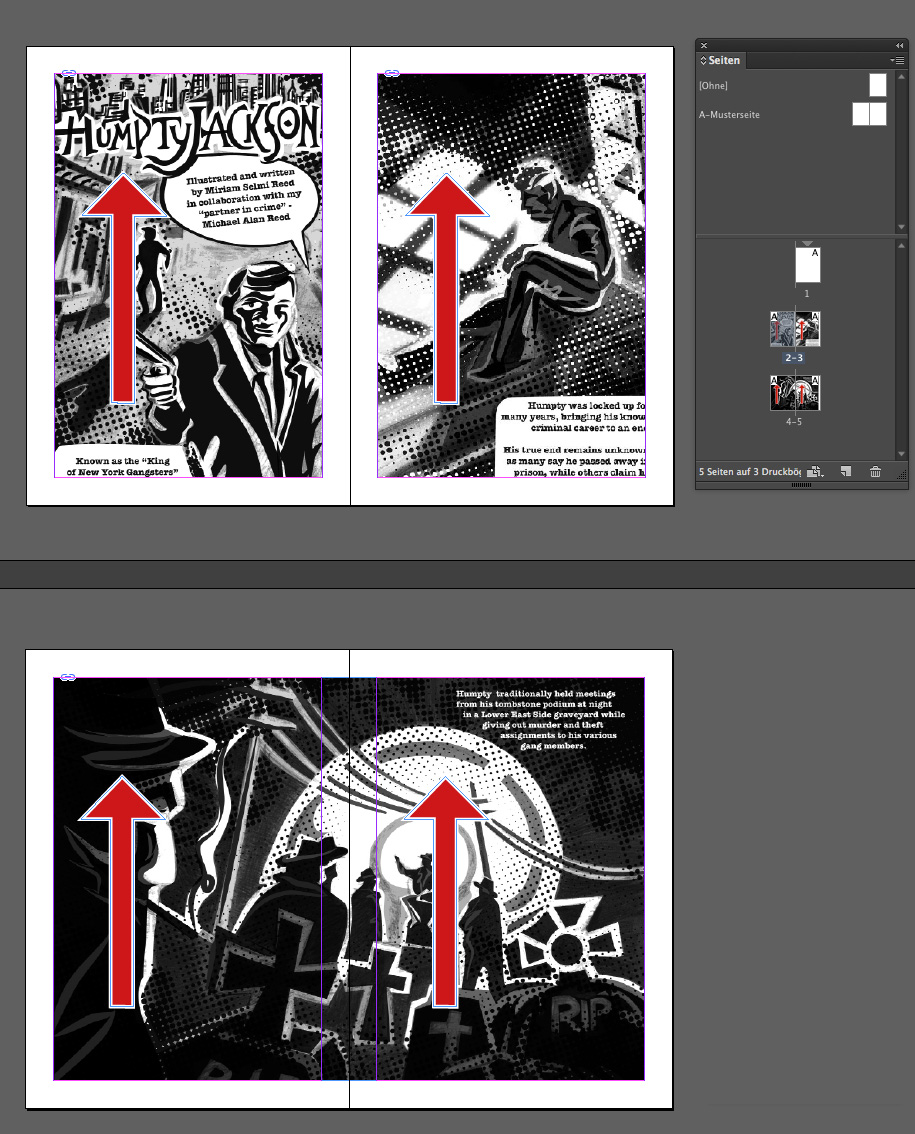
Tip of the week: Here’s how to rotate a Page Spread in Adobe InDesign CS6 and CC.
1. Open an InDesign Document with a main page and 2 page spreads.
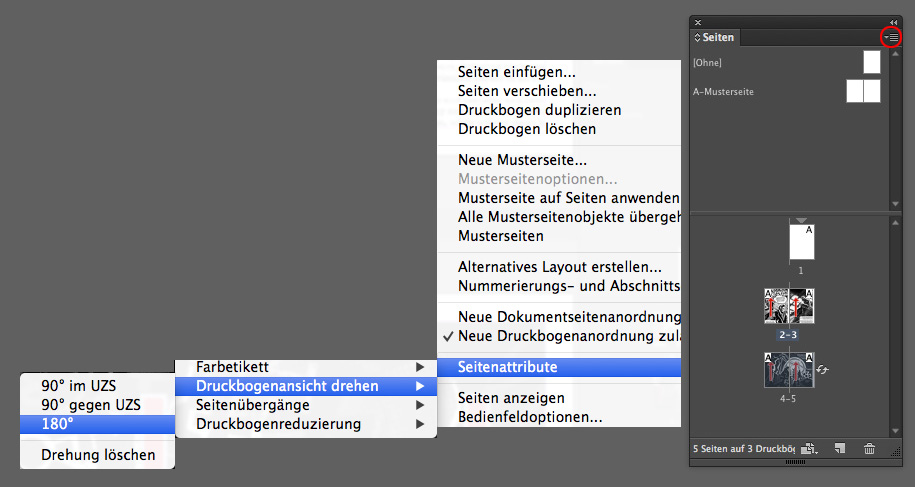
2. Select the Page Spread you’d like to rotate and select under the drop-down arrow of the Pages window the Page Attributes > Rotate Spread View > 180 degrees.
And here it is: the page spread below is now rotated by 180 degrees and facing the other way.
THE HUMPTY JACKSON COMIC, illustrated by Miriam Selmi Reed and written by Michael Alan Reed: HUMPTY JACKSON COMIC Copyright by Round Robin editrice, Rome, Italy / All rights reserved.
Deutsche Version:
1. Öffnen Sie ein CS6 oder CC InDesign Dokument mit einer Cover-Seite und 2 Doppelseiten.
2. Wählen Sie die Doppelseite an welche Sie drehen möchten. Gehen Sie im Seitenbedienfeld ins Untermenü unter Seitenattribute > Druckbogenansicht drehen > 180 Grad.
Und hier ist das Resultat: die untere Doppelseite ist jetzt neu um 180 Grad gedreht.
THE HUMPTY JACKSON COMIC illustriert bei Miriam Selmi Reed und geschrieben bei Michael Alan Reed: HUMPTY JACKSON COMIC Copyright by Round Robin editrice, Rome, Italy / All rights reserved.
Tutorial in English and German / Anleitung in Deutsch und Englisch
Deutsche Version siehe unten!
English version:
Open your InDesign CS6 or CC document with a placed image and a headline.
Select as Fill color white and a Font color from the top Control Bar or under Menu > Window > Color > Swatches.
see example:
Select your text box with your Selection Tool. Then go to MENU > OBJECT > EFFECTS and select your Settings for: Fill > Opacity > 40 %
and Settings for: Text > Transparancy: Drop Shadow, Inner Glow, Bevel & Emboss etc.
Here it is; the Font has added on Effects and the White fill color is now transparent. You may change them at any time using the same steps above.
Deutsche Version:
Öffnen Sie Ihr CS6 oder CC InDesign Dokument mit einem platzierten Bild und einem Titel.
Wählen Sie als Flächenfarbe Weiss und eine Farbe für den Text oben in der Steuerung oder unter Menü > Fenster > Farbe > Farbfelder.
siehe Beispiel:
Wählen Sie Ihre Textbox mit dem Auswahlwerkzeug an. Dann gehen Sie zu MENÜ > OBJEKT > EFFEKTE und wählen Ihre Einstellungen für: Fläche > Deckkraft: 40 %
und Einstellungen für: Text > Transparenz: Schlagschatten, Schein nach Innen, Abgeflachte Kante und Relief usw.
Hier ist das Resultat; der Titel zeigt Effekte und die Flächenfarbe Weiss als Transparenz. Man kann alles jederzeit mit denselben Arbeitschritten wieder ändern.
Miriam Selmi Reed is represented by Illustration Source, New York City. Portfolio and contact: Illustration Source NYC
Illustration technique: Traditional painting combined with digital mixed media using Smart Objects in Photoshop and Illustrator. Copyright by Illustration Source, New York City.
Illustrations-Technik: Acrylbild gemischt mit Illustrator und Photoshop sowie Smart-Objekten. Copyright by Illustration Source, New York City.
Tutorial in English and German / Anleitung in Deutsch und Englisch
Deutsche Version siehe unten!
English version:
Tip of the week: Here’s how to make a Tiff with a transparent background, which allows you to place it into InDesign.
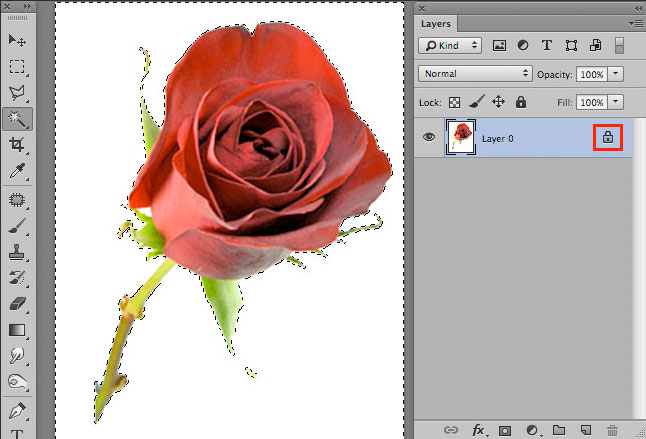
Step 1:
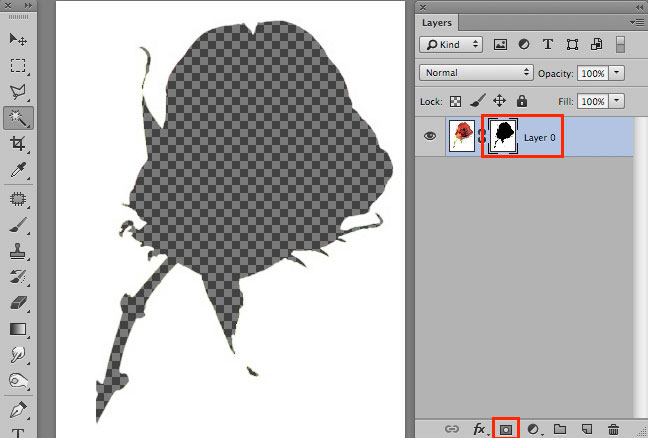
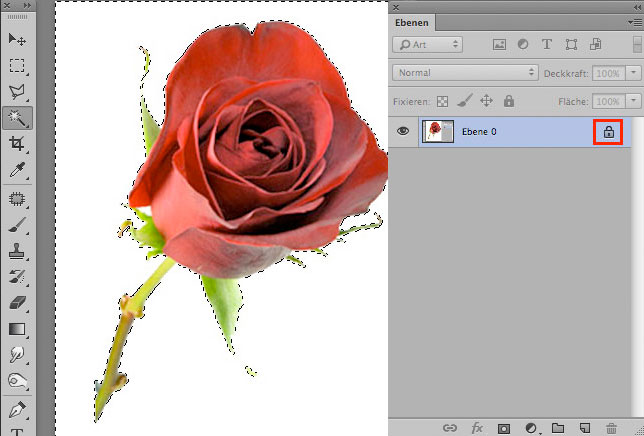
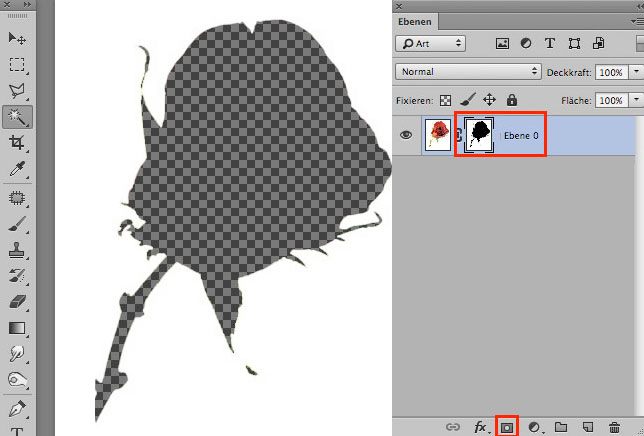
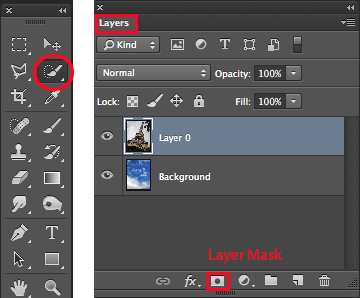
Open your file in Photoshop and double-click on the lock changing the background layer to Layer 0.
Step 2:
Make your selection and click on the Layer Mask icon.
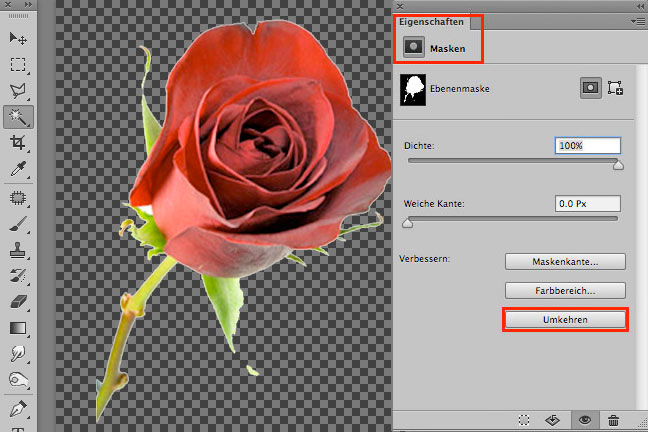
Step 3:
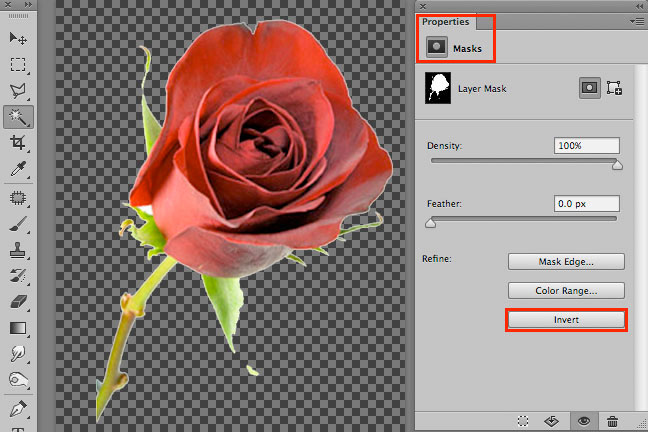
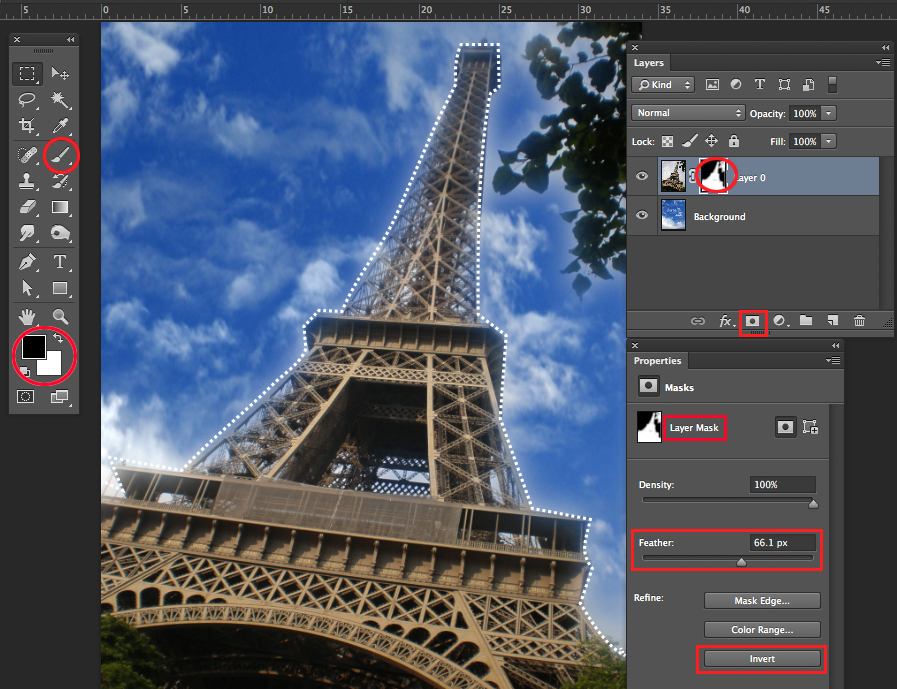
In case you need to invert the selection: click on the Layer Mask so the Properties window opens. There you click on the option Invert.
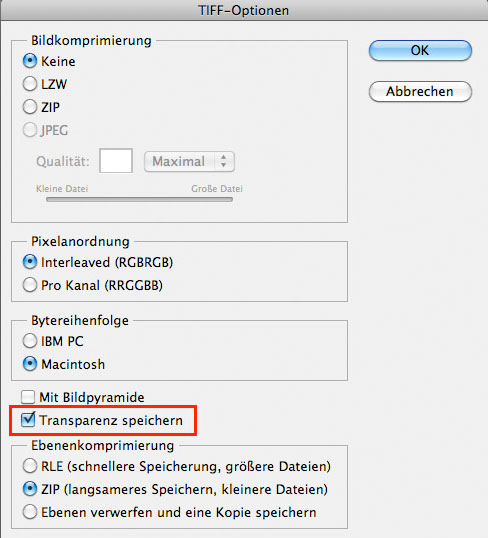
Step 4:
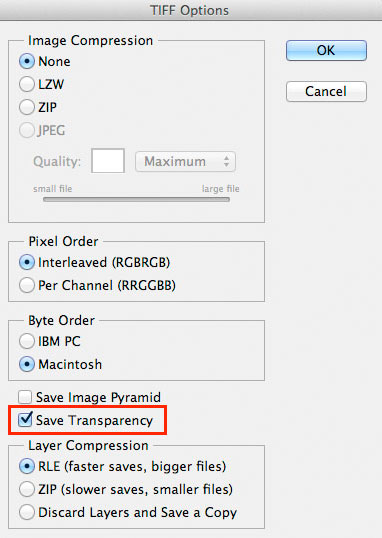
Now comes the crucial step: Save the file as a Tiff with all the layers and in the Tiff Options window click on the box save Save Transparency.
Now open InDesign and place the Tiff File as an image with a transparent background!
Deutsche Version
Tipp der Woche: Wie man bei einem Tiff den Hintergrund transparent macht und es ins InDesign platzieren kann.
Schritt 1:
Öffnen Sie Ihr Photoshop Bild und doppelklicken Sie auf das Schloss, damit wird es Ebene 0.
Schritt 2:
Machen Sie Ihre Auswahl und klicken Sie auf das Ebenenmasken-Symbol.
Schritt 3:
In manchen Fällen müssen Sie Ihre Auswahl umkehren: klicken Sie auf die Ebenenmaske, damit öffnen sich die Eigenschaften. Dort wählen Sie die Box Umkehren.
Schritt 4:
Jetzt kommt der wichtigste Punkt: Sichern Sie ihr Tiff mit allen Ebenen und bei den Tiff-Optionen klicken Sie auf die Box Transparenz speichern.
Jetzt können Sie ihr Tiff Bild ins InDesign mit transparentem Hintergrund platzieren!
Tutorial in English and German / Anleitung in Englisch und Deutsch
English version:
In case you are into mixing Adobe programs, such as Photoshop and Illustrator, using SMART OBJECTS might be an option for you!
Placing Illustrator Images as Smart Objects into Photoshop CS6.
In two simple steps!
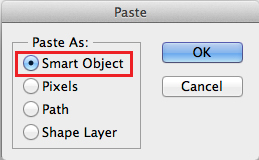
1. Open your Illustrator document with a simple Icon, Illustration or Logo.
2. Copy your Object and place it as Smart Object into Photoshop.
3. Click OK to confirm the placement. In the Layers you’ll find the Smart Oject as a small icon. By clicking on the small icon, the original file opens again in Illustrator.
If you make a change there and hit Save, the changes will be automatically transferred into your Photoshop Document because both programs are now connected.
Simple and Easy!
Deutsche Version:
Falls Sie gerne Adobe Programme – wie Photoshop und Illustrator – mischen…
2. Copy/paste a lighter and smaller circle on top of it. 3. Select both circles and go to MENU > OBJECT > BLEND > MAKE.
4. Make a white oval shape for the highlight. 5. Add on a black & white Gradient and make sure that the Black for the Gradient is Registration Black (C=100, M=100, Y=100, K=100) 6. Open MENU > WINDOW > TRANSPARENCY > and choose the Blending Mode Screen at approx. 50% Opacity.
AND HERE IS THE FINAL BUTTON!
Deutsche Version:
Öffnen Sie Adobe Illustrator CS5, CS6 oder CC:
1. Erstellen Sie einen orangen Kreis. (0% c, 40% m, 90% y, 0% k)
Tipp: Wenn Sie das Orange in den Farbfeldern als globale Farbe erstellen, können Sie den helleren Kreis prozentual heller stellen.
2. Kopieren/Einfügen Sie einen hellen und kleineren Kreis direkt darüber. 3. Wählen Sie beide Kreise gleichzeitig an und gehen zu MENÜ > OBJEKT > ANGLEICHEN > ERSTELLEN.
4. Zeichnen Sie ein weisses Oval für den Lichteffekt. 5. Erstellen Sie einen schwarz/weissen Verlauf und wählen Sie für das Schwarz des Verlaufs ein Passermarken-Schwarz (C=100, M=100, Y=100, K=100). 6. Öffnen Sie unter MENÜ > FENSTER > TRANSPARENZ > und wählen Sie in diesem Bedienfeld die Füllmethode Neg. multiplizieren und ca. 50% Deckkraft.
Illustrations, composition, video & audio – www.reedesign.ch
Michael A. Reed & Miriam S. Reed
Programs: Adobe After Effects CC, Apple Logic Pro, Adobe Photoshop
Composition, animation & audio – www.reedesign.ch
Michael A. Reed & Miriam S. Reed
Programs: Adobe After Effects CC, Apple Logic Pro, Adobe Illustrator
Composition, animation & audio – www.reedesign.ch
Michael A. Reed & Miriam S. Reed
Programs: Adobe After Effects CC, Apple Logic Pro, Adobe Illustrator
Composition, video & audio – www.reedesign.ch
Michael A. Reed & Miriam S. Reed
Programs: Adobe After Effects CC, Apple Logic Pro, Adobe Photoshop
Animation for Trailer I PEAK GmbH.
Client: i-peak infosystems gmbH
Creative Director / CEO: Raoul Julen
Animation & Editing: www.reedesign.ch / Michael A. Reed / Miriam S. Reed
Soundtrack: “Fleure Bleue” / proudmusiclibrary.com
Programs: Adobe After Effects CS6, Apple Logic Pro
New visual audio portfolio for REEDesign, under the art direction of Michael Alan Reed. Set to the instrumental groovy theme of “C how U r” by Michael Alan Reed.
Animation for CIC Bank:
Werbeagentur: Brainheart GmbH
Creative Director: Mirjam Pierig
Kunde: CIC Bank, Sebastian Comment, Leiter Marketing & Kommunikation
Thomas D’haemer, Projektleiter Marketing & Kommunikation
Music & Trailer Edit: Michael A. Reed – www.reedesign.ch
Custom video display advertising for Swiss client Bank CIC, based on Mondrian art style under the creative direction of Mirjam Pierig Brainheart GmbH. Set to the laid-back, chill-groove of the instrumental theme “Way” by Michael Alan Reed.
The making of the Siemens Commercial.
Film company: Zeitsprung Commercial
Werbeagentur: Kaelinkom & Partner
Creative Director: Rolf Kälin
Kunde: Siemens Hausgeräte
Storyboard: Miriam Selmi Reed
Music & Trailer Edit: Michael A. Reed – www.reedesign.ch
The making of the Emmi Latte Commercial.
Film company: Rosas & CO Films AG
Werbeagentur: ByHeart
Creative Director: Hans Siegwart
Kunde: Emmi Caffé Latte
Francina Modeling- www.francinamodels.com
Storyboard: Miriam Selmi Reed
Music & Trailer Edit: Michael A. Reed – www.reedesign.ch
Tutorial in English and German – Anleitung in Deutsch und Englisch
Deutsche Version siehe unten!
English version:
Let’s try to keep it as simple as possible for beginners and open Adobe Photoshop to get familiar with the different color options.
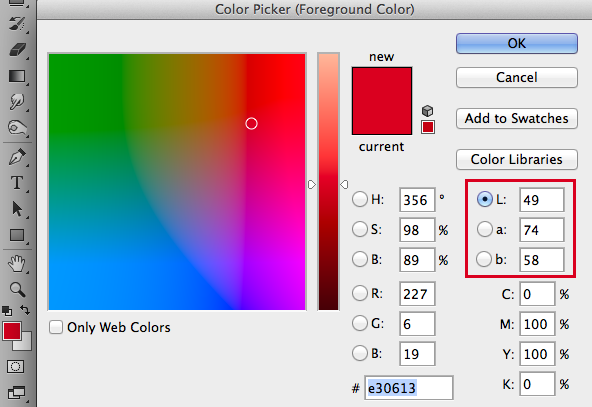
Open your Color Picker by double-clicking the Foreground Color on the Tool bar. There you can see the HSB colors (Hue, Brightness, Saturation), the RGB colors (for monitors, such as web) incl. the HEX code, the CMYK colors (for the printing process) and the LAB colors.
In short, Lab colors are based on a mathematical color model. The L stands for the brightness, the a and b for the color information. In the a chanel you’ll find the pixel information for red/green, in the b chanel for blue/yellow.
You can change the brightness in the Lab color mode separately from the colors, this is neither with RGB nor with CMYK possible. To get the best result, change your image to 16 Bit and then go to Image > Mode > Color and select Lab Color. With this change you won’t loose color information since the Lab mode has even more colors than RGB.
Then start working with your Curves to alter the brightness of your image and leave the colors as is. This is very practical! Just don’t forget to change the Color Mode back to RGB and go back 8 Bit at the end when you’re done.
Deutsche Version:
Wir versuchen das ganze so einfach wie möglich für Anfänger zu halten, daher öffnen wir mal Photoshop und schauen uns alle Farbmöglichkeiten an.
Öffnen Sie Ihren Farbwähler mit einem Doppelklick auf die Vordergrundfarbe unten auf Ihrer Werkzeugleiste. Dort können Sie die HSB Farben (Hue, Brightness, Saturation), die RGB Farben (für Monitore, z.B. für Webseiten) inkl. HEX Code, die CMYK Farben (Prozessfarben für die Druckerei) und die LAB Farben.
Kurz erklärt, basieren die LAB Farben auf einem mathematischen Farbmodell. Das L steht für Helligkeit, das a und b für die Farbinformationen. Im a Kanal findet man die Pixel Infos für rot/grün, im b Kanal für blau/gelb.
Im Lab Mode kann man die Helligkeit separat von den Farben verändern, dies ist bei den RGB und CMYK Modellen nicht möglich. Am besten zuerst das Foto auf 16 Bit umwandeln um optimale Bildqualität zu erhalten und dann unter Bild > Modus > Farbe auf den Lab Modus wechseln. Damit gibt es keinen Qualitätsverlust wie von RGB auf CMYK, da der Lab Farbraum einiges grösser ist als der RGB Farbraum.
Dann kann man mit den Gradatationskurven arbeiten, nur um die Helligkeit des Bildes zu verändern. Eine praktische Sache! Am Schluss ist es einfach wichtig nicht zu vergessen, den Bildmodus wieder auf RGB zu setzen und auf 8 Bit zurückzustellen.
Illustration technique: Traditional drawing combined with digital mixed media using Smart Objects in Photoshop and Illustrator. Copyright by Illustration Source, New York City.
Illustrations-Technik: Farbstift-Zeichnung gemischt mit Illustrator und Photoshop sowie Smart-Objekten. Copyright by Illustration Source, New York City.
Vectorize your pixel image or embed your Photo in Illustrator to avoid missing links!
Option 1: Vectorize your pixel image in Illustrator CS6.
In three simple steps:
1. Place a Photoshop document (jpg, tiff, psd) into Illustrator CS6.
2. Go to Menu > Window > Image Trace, choose your Preset, select under Advanced your Options and click on Trace.
3. When you are done, don’t forget to click on Expand.
Option 2: Embed your image!
In one easy step:
1. Select your image. Go to Window > Links > choose the side option > Embed Image(s).
This way your photo is part of your Illustrator document and won’t show as a missing link.
Simply open a Photoshop file with two images. The image you’d like to remove – a sky for example – is on the top layer.
The new Sky you prefer is on the bottom layer. What you’ll do next is simple and easy:
You delete your old sky on the toplayer with a Layer Mask.
1. Make a selection of your sky or image part you’d like to remove on the top layer, using your favorite selection tool.
For example: The Quick Selection Tool in combination with “Refine Edge”.
2. Once your old sky on the top layer is selected, simply click on the “Layer Mask” icon.
Part of your image on the top will be covered by a Layer Mask and the new image on the layerbelow will show up instead.
3. By double-clicking the Layer Mask icon on the top layer, the “Layer-Mask-Properties” will open. There you’ll be able to invert the Layer Mask or feather the edges.
Tip 1: With the Brush Tool you can easily make changes to your Layer Mask: Simply select the Layer Mask and paint with the Brush Tool using either Black or White directly inside the Layer Mask, until you’re happy with the result!
Öffnen Sie Ihr Photoshop Dokument mit zwei Bildern. Das Sujet welches Sie löschen wollen – zum Beispiel ein Himmel – ist auf der oberen Ebene.
Der neue Himmel den Sie behalten wollen, ist auf der unteren Ebene. Was Sie als nächstes machen ist ganz einfach:
Sie löschen Ihren alten Himmel auf der oberen Ebene mit einer Ebenenmaske.
1. Wählen Sie Ihren Himmel oder Bildteil auf der oberen Ebene, den Sie löschen wollen, mit einem der Auswahlwerkzeuge an.
Zum Beispiel: Das Schnellauswahlwerkzeug zusammen mit der Option “Kante verbessern”.
2. Sobald Sie Ihren Himmel oder Bildteil angewählt haben den Sie löschen wollen, klicken Sie im Ebenenbedienfeld auf das “Ebenenmaske” icon. Sofort wird nun ein Bildteil gelöscht, respektive mit einer Maske abgedeckt und das untere Bild auf der unteren Ebene mit dem neuen Himmel kommt zum vorschein.
3. Wenn Sie mit einem Doppelklick auf das Ebenenmaske-Symbol klicken, öffnen sich die “Ebenenmasken-Eigenschaften”.
Damit können Sie die Maske umkehren oder eine weiche Kante geben.
Tipp 1: Mit dem Pinsel-Werkzeug können Sie einfach und schnell Änderungen an Ihrer Ebenenmaske vornehmen: Wählen Sie die Ebenenmaske an und malen mit dem Pinselwerkzeug, sowie Schwarz oder Weiss direkt in die Ebenenmaske, bis Sie mit Ihrem Resultat zufrieden sind!
Whether an image is intended for either print or digital use, the end result will vary greatly depending on your choice of color profile.
Adobe RGB has a wider gamut than sRGB, and covers more green colors in the CMYK gamut which sRGB is unable to accommodate as you can see in the image below.
If I intend to use my file for websites and use it in Microsoft Word later on, I keep my PSD files in my original sRGB with all my layers intact.
Then I’ll make a copy for the printer, flatten my layers in Photoshop and go to Edit > Convert to Profile and select the color CMYK profile of my choice. The choice of the CMYK color profile depends on my printer, which means direct communication with the printing company.
More important infos about color profiles: Color Profiles
Egal, was für ein Bild es zu bearbeiten gilt, die Aufmerksamkeit sollte immer auf das Endprodukt fokussiert sein. D.h. je nach dem ob mein Bild später gedruckt wird oder nur auf dem Bildschirm erscheinen wird, spielt eine grosse Rolle.
sRGB ist ideal für crossmedialen Einsatz für verschiedenen Ausgabesysteme und Programme wie Microsoft und Web. Adobe RGB hat im grünen Bereich einen grösseren Farbraum, ist ansonsten aber fast identisch.
Wenn ich ein Bild später auf einer WEBSEITE zeigen oder in MICROSOFT Programmen benutzen möchte, behalte ich meine Photoshop Datei im Original sRGB.
Dann mache ich eine Kopie für die Druckerei. In Photoshop gehe ich unter Bearbeiten > In Profil umwandeln und wähle mein CMYK Farbprofil. Die Wahl meines CMYK Farbprofils wird von meiner Druckerei bestimmt. Der Grund ist einfach, je nach Papierwahl und je nach Druckmaschine ändert sich das Farbprofil. D.h. direkte Kommunikation mit der Druckerei ist notwendig.
1. Scan your drawing and place it into Illustrator / Scannen Sie Ihre Zeichnung und platzieren Sie diese in Illustrator
2. Trace the outlines of your drawing / Zeichnen Sie mit einer Konturfarbe Ihrer Zeichung nach
3. Fill in the shapes with a fill color / Füllen Sie die Konturen mit Flächenfarben
Development of Z-Dog – Copyright by Miriam Selmi Reed – All rights reserved
the new Z-DOG COMIC is now online at:z-dog.org
Copyright by Miriam Selmi Reed / All rights reserved
NEW Published Graphic Novel: Soul Crime of new York
Copyright by Round Robin editrice, Rome, Italy / All rights reserved.
INFO: to get serious about drawing in Illustrator, we highly suggest the following tutorials / Um wirklich in Illustrator zeichnen zu können, empfehlen wir die folgenden Übungen:
Tutorial in English and German– Anleitung in Deutsch und Englisch
1. Scan your image and place it in Adobe Illustrator – FILE > PLACE. Scannen Sie ihre Bildvorlage und platzieren Sie es in Adobe Illustrator – DATEI > PLATZIEREN.
2. Go to WINDOW > LAYERS and add a layer on top to trace your image using the Pen Tool. Unter FENSTER > EBENEN erstellen Sie eine neue Ebene und zeichnen mit dem Zeichenstiftwerkzeug den Linien nach.
CARTOON PATH PART 1 – COMIC FIGUR TEIL 1
3. Go to WINDOW > SWATCHES and select your lines to fill them with color. Unter FENSTER > FARBFELDER und wählen sie ihre Konturen und füllen diese mit Farbe.
Info in English and German – Info in Deutsch und Englisch
English Version:
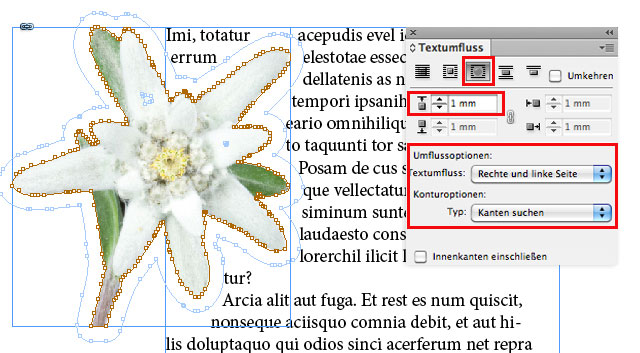
Select a Photoshop image which already has a path or a contrasting background as the white in our sample. InDesign is able to detect the edges and wrap the text around the object.
In two simple steps: First open Adobe InDesign and place your image.
1. Select your image with the Selection Tool and go to MENU > OBJECT > CLIPPING PATH > OPTIONS. This will open the following window where you should select the option TYPE > DETECT EDGES and play around with the Treshold and Tolerance to find the right setting for your image. (In the same window you could select a Photoshop Channel or a Photoshop Path if available)
2. Now the image should have a Path around it. Go to WINDOW > TEXT WRAP and select the third Box with the name “Wrap around object shape”. Select the Offset which defines the distance from your Path to the text.
This should do it! Of course, we’re only using this method as a quick fix for layout purposes.
Deutsche Version:
Nehmen Sie ein Photoshop Bild mit einem Pfad oder eines mit einem neutralen Hintergrund, wie in unserem Beispiel; Weiss. InDesign kann die Kanten finden und den Text um das Objekt fliessen lassen.
In zwei einfachen Schritten: zuerst öffnen Sie Adobe InDesign und platzieren Sie Ihr Bild.
1. Wählen Sie das Bild mit dem Auswahlwerkzeug an und gehen Sie unter MENU > OBJEKT > BESCHNEIDUNGSPFAD > OPTIONEN. Damit wird sich ein Bedienfeld öffnen, wobei Sie die Option ART > KANTEN SUCHEN und spielen Sie mit dem Schwellenwert and Toleranz um die richtige Einstellung für Ihr Bild zu finden. (Im selben Bedienfeld finden Sie zudem die Optionen Photoshop Kanal und Photoshop Pfad)
2. Jetzt sollte Ihr Bild einen Pfad haben. Gehen Sie zum FENSTER > TEXTUMFLUSS und wählen Sie die dritte Box mit dem Namen “Umfliessen der Objektform”. Wählen Sie Ihren Versatz welches die Distanz von Ihrem Pfad zum Text definiert.
Damit sollte es klappen! Natürlich benutzen wir diese Art nur als schnelle Lösung zum layouten.
Image by Miriam Selmi Reed – Technique: Manual drawing, combined with Adobe CC.
Image: Courtesy of Illustration Source.
Copyright by www.illustrationsource.com All rights reserved.
15 East 32nd Street 7th Floor, New York, NY 10016 USA
Contact: sales@illustrationsource.com
Info in English and German – Info in Deutsch und Englisch
This is quick guide of file extensions for beginners / Eine Liste der Dateiendungen und ihre Bedeutungen für Anfänger:
.psd = Photoshop (working file with all layers, path and masks / Arbeitsdatei mit allen Ebenen, Pfade und Masken)
.tif= Tagged Image File Format (Often, printers will prefer TIFF files for digital photos / Meistens werden Druckereien TIFF Dateien für digitale Fotos bevorzugen)
.eps= Encapsulated PostScript (Considered the best choice of graphics format for high resolution printing of vector illustrations / Generell eine gute Wahl für Hochresolution-Vektor-Illustrationen im Druck)
.pdf = Portable Document Format (PDF is a file format created by Adobe Systems, Inc. PDF is highly portable across computer platforms and perfect to send to printers. / PDF ist ein Format von Adobe Systems, Inc. PDF ist Plattformübergreifend und ideal um druckfertige Dateien professionell drucken zu lassen)
.svg= Scalable Vector Graphics (SVG files are smaller and easier to compress than other formats. SVG images are zoomable and scalable. Like other graphics, SVG works as a static or animated image. / SVG Dateien sind kleiner und einfacher zu komprimieren als andere Formate. SVG Grafiken sind skalierbar und können sogar animiert werden)
.jpg = Joint Photographic Experts Group, also known as JPEG files (common file format for digital photos used for websites / Wird meistens für digitale Fotos für Webseiten benutzt)
.gif= Graphics Interchange Format (GIF images are ideal for transparency and animation for websites. GIF files are ideal for simple shapes since they are reduced to 256 unique colors. / GIF Bilder sind ideal für Transparenzen und Animationen für Webseiten und sind ideal für Grafiken mit nicht mehr als 256 Farben)
.png = Portable Network Graphic (The PNG format was developed as a replacement for the GIF Format. PNG files offer transparency as well as animation. / Das PNG ersetzt heute vielfach das GIF Format. PNG sind gut für transparente Bilder und Animationen)
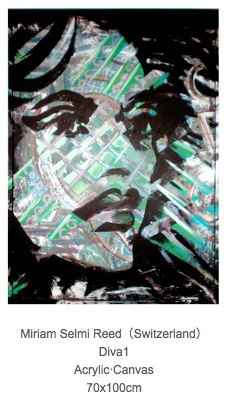
Finalist of the 2014 International Art Competition – April 16th until April 20th, 2014.
Painting by Miriam Selmi Reed, Acrylic combined with Adobe CC, framed canvas, 70 x 100 cm.
Custom video display advertising for Swiss client Bank CIC, based on Mondrian art style under the art direction of Brainheart Gmbh. Set to the laid-back, chill-groove of instrumental freeform theme “Way” by Michael Alan Reed.
AUFTRAGGEBER:
Banque CIC (Suisse) – Sebastian Comment, Leiter Marketing
& Kommunikation / Thomas D’haemer, Projektleiter Marketing &
Kommunikation
WERBEAGENTUR:
Brainheart Gmbh – Mirjam Pierig, Creative Director